Easy Chia Seed Pudding Recipe – Delicious & Healthy
Chia seed pudding recipes are truly a revelation for anyone seeking a delicious, healthy, and incredibly easy breakfast or snack. I’ve fallen head over heels for this dish, and I know you will too! It’s the kind of recipe that makes you feel like a culinary wizard with minimal effort. People absolutely adore chia seed pudding because it’s ridiculously simple to make – just a few ingredients and a bit of patience as it sets. What makes it so special is its incredible versatility. You can customize it with your favorite fruits, nuts, and sweeteners, transforming it into a unique creation every time. Plus, those tiny chia seeds pack a mighty nutritional punch, offering fiber, omega-3s, and protein. Get ready to discover your new go-to recipe!
Chia Seed Pudding Recipe
Chia seed pudding is one of those magical recipes that requires minimal effort but delivers maximum reward. It’s a healthy, satisfying, and incredibly versatile breakfast, snack, or even dessert that I find myself turning to again and again. The beauty of this pudding lies in its simplicity – a handful of ingredients come together to create a creamy, nutrient-dense treat.
If you’ve never made chia pudding before, you’re in for a treat. The tiny chia seeds, when soaked in liquid, transform into a gelatinous, pudding-like consistency. They’re packed with fiber, omega-3 fatty acids, and protein, making this a wonderfully wholesome option to fuel your day. The best part? It’s completely customizable. Don’t like dairy? Use plant-based milk. Want it sweeter? Add a touch more maple syrup. Craving chocolate? Stir in some cocoa powder. The possibilities are endless!
This recipe is my go-to base, the perfect starting point for all your chia pudding adventures. It’s designed for ease and speed, making it ideal for busy mornings or when you need a quick, healthy pick-me-up.
Ingredients:
Making Your Chia Seed Pudding
Now, let’s get to the fun part – creating this delightful pudding! It’s a straightforward process, and I’ll guide you through each step to ensure perfect results. The key is patience, allowing the chia seeds ample time to work their magic and absorb the liquid.
First, gather your ingredients. Having everything measured out and ready to go makes the process smooth and enjoyable. Grab a small bowl or a jar with a lid. I prefer using a jar because it’s easy to shake and then store directly in the refrigerator. Add the 3 tablespoons of chia seeds to your chosen vessel. These tiny seeds are nutritional powerhouses, full of fiber to keep you feeling full and satisfied.
Next, it’s time to add the sweetness and flavor. Pour in the 1 tablespoon of maple syrup. If you have a preference for a sweeter pudding, feel free to add a little more, but I find this amount is just right for a subtle sweetness that doesn’t overpower the other flavors. Then, add the 1 teaspoon of vanilla extract. Vanilla is a classic flavor that complements the subtle nuttiness of the chia seeds beautifully. You can also experiment with other extracts like almond extract for a different twist.
Now for the liquid component. Pour in the 3/4 cup of your milk of choice. I often use unsweetened almond milk as it’s light and readily available, but oat milk offers a creamier texture, and coconut milk lends a delightful tropical note. If you’re not vegan or prefer dairy, regular milk works perfectly well too. Ensure you’re using the correct measurement, as the ratio of liquid to chia seeds is crucial for achieving the right pudding consistency. Too little liquid and it might be too thick; too much and it could be watery.
This is the most important step for texture: thorough mixing and initial resting. Once all the ingredients are in the bowl or jar, it’s time to mix them well. If you’re using a bowl, a whisk is ideal to ensure no clumps of chia seeds form at the bottom. If you’re using a jar, secure the lid tightly and shake vigorously for about 30 seconds. After this initial mix, let the mixture sit for about 5 to 10 minutes. During this short resting period, give it another good stir or shake. This step is crucial because it prevents the chia seeds from clumping together as they begin extract to absorb the liquid. You’ll notice the mixture starting to thicken slightly.
Finally, the waiting game begin extracts. Cover your bowl or seal your jar tightly and place it in the refrigerator. For the best pudding consistency, you’ll want to let it chill for at least 2 to 3 hours, or ideally, overnight. The longer it sits, the thicker and more pudding-like it will become. Overnight chilling is my favorite because it allows the chia seeds to fully hydrate and swell, resulting in a luxuriously creamy texture. When you’re ready to enjoy, give it a quick stir. If it’s too thick for your liking, you can stir in a splash more milk.
Serving Suggestions
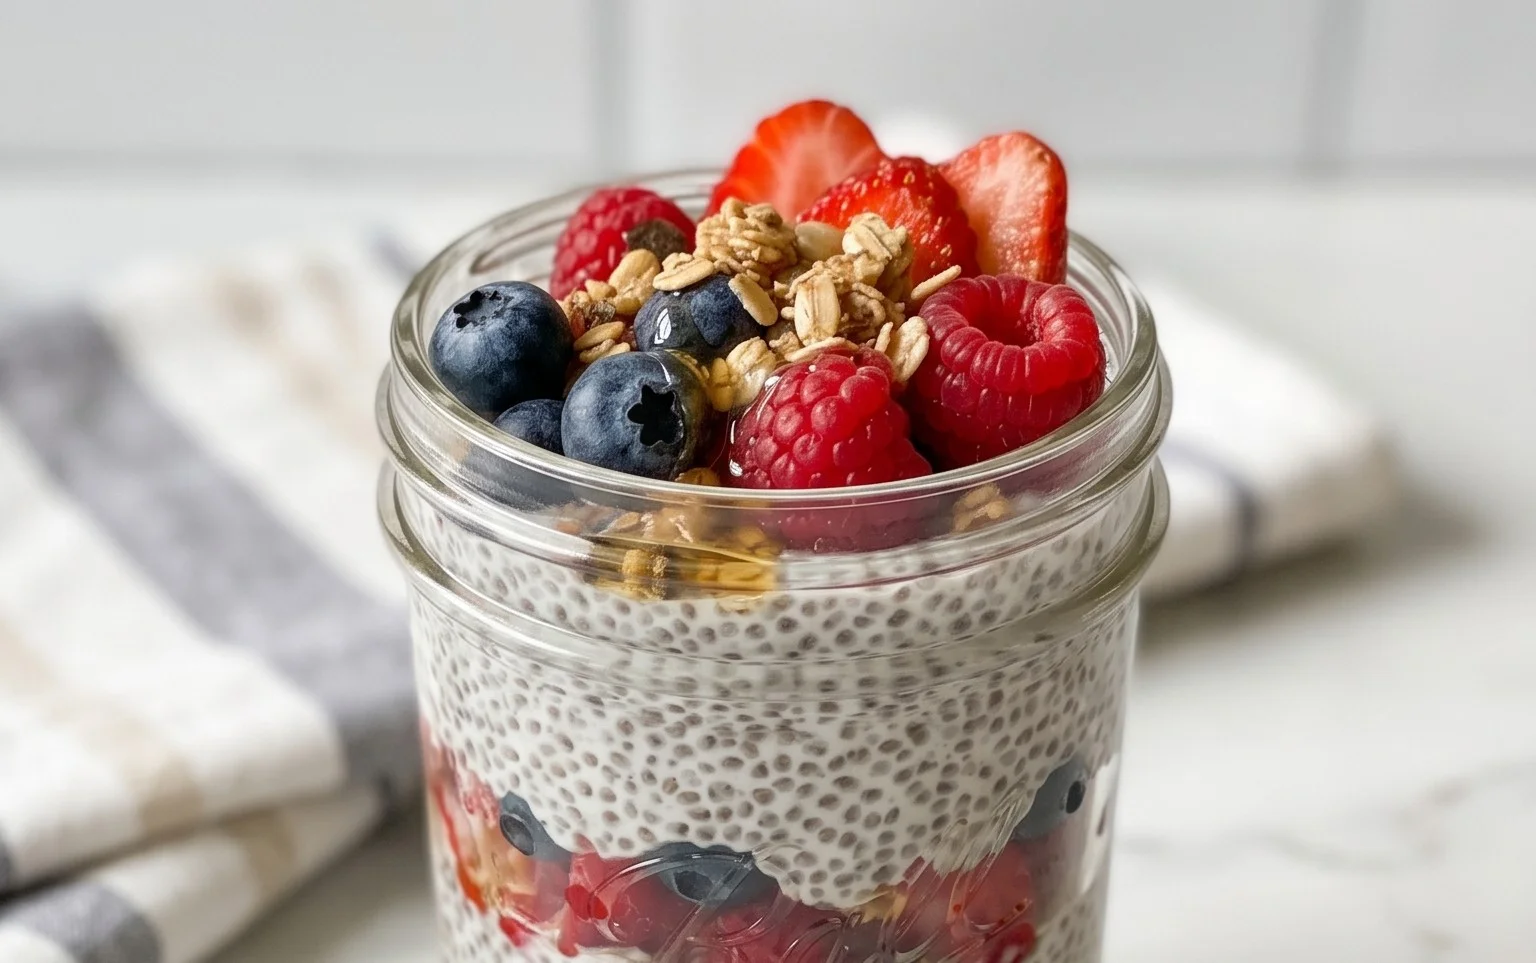
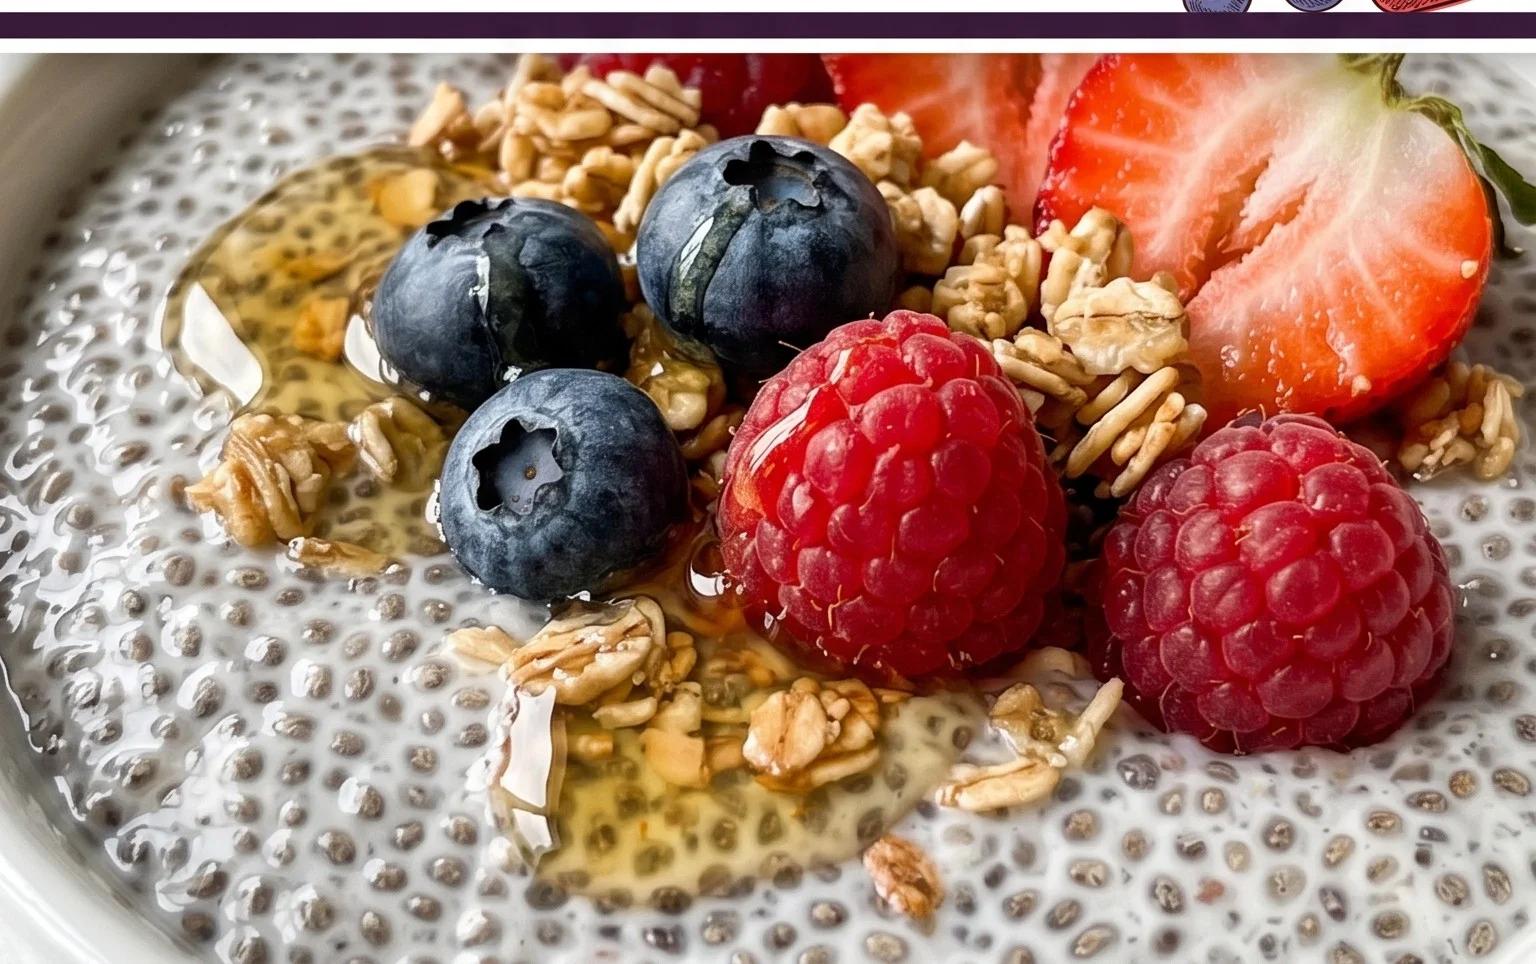
Once your chia seed pudding has reached its perfect pudding-like consistency, it’s time to adorn it with your favorite toppings! This is where you can truly let your creativity shine. Fresh berries are a classic and healthy choice, adding a burst of freshness and vibrant color. A sprinkle of granola provides a delightful crunch that contrasts beautifully with the smooth pudding. Sliced banana is another excellent option, adding natural sweetness and a soft texture. For a richer treat, consider a drizzle of nut butter, a few dark chocolate chips, or even a dusting of shredded coconut. I often top mine with a combination of fresh blueberries and a sprinkle of chopped almonds for a delightful mix of flavors and textures. This recipe is so forgiving, making it a stress-free addition to any meal plan. Enjoy experimenting and finding your perfect chia pudding creation!
Conclusion:
So there you have it! A wonderfully simple yet incredibly versatile Chia Seed Pudding Recipe that’s perfect for any occasion. This recipe truly shines because of its minimal prep time, healthy ingredients, and customizable nature. It’s a fantastic option for a quick breakfast, a satisfying snack, or even a light dessert. The magic of chia seeds lies in their ability to absorb liquid and create that delightful pudding-like texture, packed with fiber, omega-3s, and antioxidants. Don’t be afraid to get creative with your toppings! Fresh berries, sliced banana, a sprinkle of granola, a drizzle of honey or maple syrup, or even some toasted nuts can elevate your chia seed pudding to new heights. Experiment with different plant-based milks like almond, oat, or coconut milk for subtle flavor variations. I truly encourage you to give this recipe a try. It’s a game-changer for healthy eating!
Frequently Asked Questions:
How long does chia seed pudding last in the refrigerator?
Your delicious chia seed pudding can be stored in an airtight container in the refrigerator for up to 3-4 days. The texture might thicken slightly over time, but it’s still perfectly edible and enjoyable.
Can I make chia seed pudding without sweetener?
Absolutely! If you prefer a less sweet option or plan to rely solely on fruit for sweetness, you can omit the added sweetener entirely. The natural sweetness from fruits like berries or bananas is often more than enough.
What is the best type of milk to use for chia seed pudding?
While any milk works, unsweetened almond milk, oat milk, and coconut milk are popular choices. They offer a neutral or slightly complementary flavor that doesn’t overpower the chia seeds. Dairy milk can also be used if preferred.
Chia Seed Pudding
A simple and healthy chia seed pudding recipe, perfect for breakfast or a light dessert. Customizable with your favorite milk and sweetener.
Ingredients
-
3 tablespoons chia seeds
-
1 tablespoon maple syrup
-
1 teaspoon vanilla extract
-
3/4 cup milk of choice
-
1/4 cup fresh berries (for topping)
-
1 tablespoon shredded coconut (for topping)
Instructions
-
Step 1
In a bowl or jar, combine the chia seeds, maple syrup, and vanilla extract. -
Step 2
Pour in your milk of choice and whisk or stir well to combine, ensuring no clumps of chia seeds form. -
Step 3
Cover the bowl or jar and refrigerate for at least 4 hours, or preferably overnight, to allow the pudding to thicken. -
Step 4
Once thickened, give the pudding a good stir. -
Step 5
Serve chilled, topped with fresh berries and shredded coconut, or your favorite toppings.
Important Information
Nutrition Facts (Per Serving)
It is important to consider this information as approximate and not to use it as definitive health advice.
Allergy Information
Please check ingredients for potential allergens and consult a health professional if in doubt.