Decadent Dark Chocolate Cheesecake Brownies Recipe
Dark Chocolate Cheesecake Brownies are the ultimate indulgence for anyone who can’t decide between two classic desserts. Are you a brownie lover, craving that fudgy, chewy perfection? Or perhaps you’re a cheesecake devotee, dreaming of creamy, tangy bliss? Well, prepare to have your taste buds do a happy dance, because this recipe seamlessly merges the best of both worlds. We’re talking about a rich, decadent brownie base, studded with pockets of smooth, luxurious cheesecake, all enveloped in a symphony of deep, dark chocolate flavor. It’s the kind of treat that elevates any occasion, from a casual weeknight craving to a show-stopping dessert for guests. The sheer satisfaction of biting into that layered goodness, where the dense chocolate meets the ethereal creaminess, is simply unparalleled. Get ready to experience pure dessert nirvana with these Dark Chocolate Cheesecake Brownies.
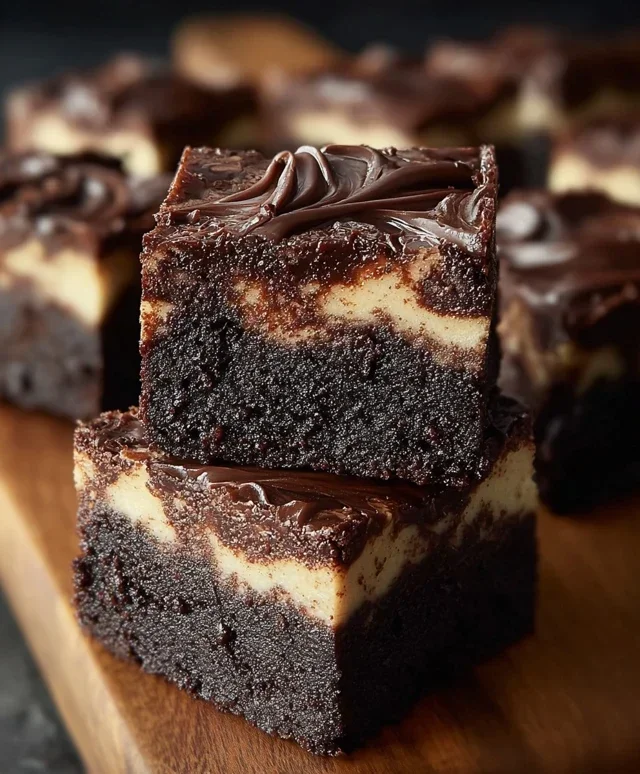
Dark Chocolate Cheesecake Brownies
Get ready to experience pure decadence with these Dark Chocolate Cheesecake Brownies. This recipe takes two beloved desserts – rich, fudgy brownies and creamy, tangy cheesecake – and swirls them together into an utterly irresistible treat. The contrast between the intense dark chocolate base and the smooth, sweet cheesecake topping is simply divine. Perfect for celebrations, a special dessert, or just when that craving for something truly indulgent strikes, these brownies are sure to impress. I’ve refined this recipe to ensure a perfect balance of textures and flavors, and I can’t wait for you to try them!
Ingredients:
Instructions:
Making the Brownie Batter
Begin extract by preheating your oven to 350°F (175°C). Grease and flour an 8×8 inch baking pan, or line it with parchment paper, leaving an overhang on the sides for easy removal later. This makes getting your beautiful brownies out of the pan a breeze. In a medium saucepan over low heat, melt the ½ cup of unsalted butter. Once melted, remove the pan from the heat and stir in 1 cup of dark chocolate chips until they are completely melted and smooth. You want a glossy, luscious chocolate mixture. If needed, you can gently warm it again for a few seconds, but be careful not to scorch the chocolate.
To this melted chocolate and butter mixture, add ¾ cup of granulated sugar. Whisk it in until it’s well incorporated. Next, add the 2 large eggs, one at a time, whisking thoroughly after each addition until the batter is smooth and emulsified. Stir in 1 teaspoon of vanilla extract. In a separate small bowl, whisk together the ⅔ cup all-purpose flour, 2 tablespoons of cocoa powder, and ¼ teaspoon of salt. This dry ingredient mixture helps ensure even distribution of the flour and cocoa, preventing clumps and creating a better texture. Gradually add the dry ingredients to the wet ingredients, mixing just until combined. Be careful not to overmix at this stage; overmixing can lead to tough brownies. The batter should be thick and glossy.
Spread about two-thirds of the brownie batter evenly into the prepared baking pan. You can use a spatula to spread it out. It might be a little sticky, which is perfectly normal for a fudgy brownie batter.
Preparing the Cheesecake Swirl
Now, let’s move on to the creamy cheesecake layer. In a medium bowl, combine the 8 oz of softened cream cheese with ¼ cup of granulated sugar. It’s crucial that your cream cheese is softened to room temperature. This will prevent lumps and ensure a smooth, creamy texture for your cheesecake swirl. Using an electric mixer (or a whisk and some good arm power), beat the cream cheese and sugar until smooth and creamy. Then, add 1 large egg and ½ teaspoon of vanilla extract. Beat again until just combined and no streaks of egg or cream cheese remain. Again, avoid overmixing, as this can introduce too much air and cause the cheesecake layer to puff up and crack.
Assembling and Swirling
Dollop spoonfuls of the cheesecake mixture over the brownie batter in the baking pan. Don’t worry about being neat; the goal is to have pockets of cheesecake throughout the brownie. Now, take the remaining one-third of the brownie batter and dollop it over the cheesecake. This might seem a little messy, but it will all come together beautifully.
The fun part is the swirl! Take a knife or a skewer and gently swirl the brownie batter and cheesecake together. Make figure-eight motions or random patterns, but don’t overdo it. You want distinct ribbons of cheesecake and brownie, not a completely uniform mixture. Too much swirling will cause the layers to blend too much, and you want that delightful contrast.
Baking and Cooling
Place the pan in the preheated oven and bake for 30-35 minutes. The brownies are ready when the edges are set and a toothpick inserted into the center comes out with moist crum extractbs attached, but not wet batter. The cheesecake portion should appear set but might still have a slight wobble in the very center. It will continue to set as it cools.
Once baked, remove the pan from the oven and let the brownies cool completely on a wire rack. This is a crucial step for achieving the perfect texture. If you try to cut them while they are still warm, they will be messy and fall apart. For the cleanest cuts, chilling the brownies in the refrigerator for at least 2 hours (or even overnight) is highly recommended. Once thoroughly chilled, use the parchment paper overhang to lift the brownies out of the pan. Then, using a sharp knife, cut them into squares. Enjoy these incredible Dark Chocolate Cheesecake Brownies!
Conclusion:
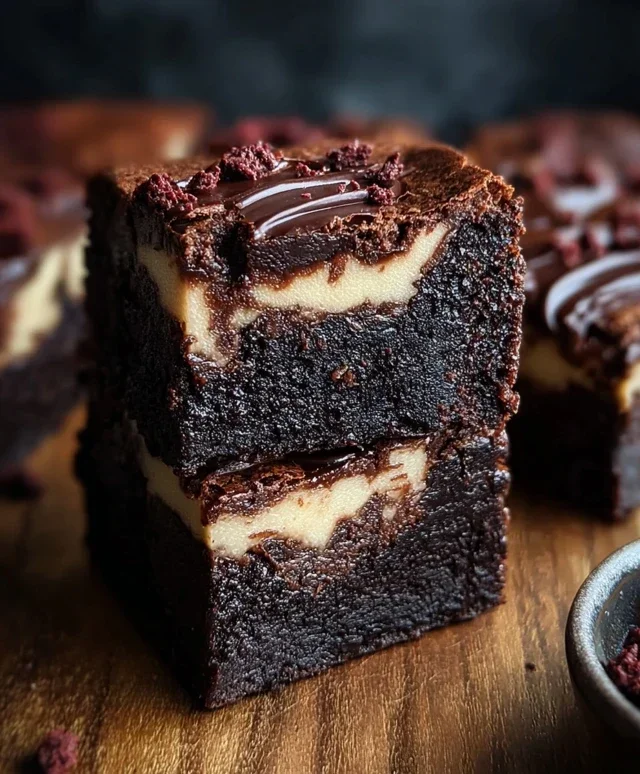
And there you have it – a recipe for Dark Chocolate Cheesecake Brownies that’s sure to become a new favorite! The magic of these bars lies in the incredible contrast: the rich, fudgy depth of the dark chocolate brownie base perfectly complemented by the creamy, tangy swirl of cheesecake. It’s a decadent treat that’s surprisingly easy to make, making it perfect for impressing guests or simply indulgin extractg your own sweet cravings. The combination of textures and intense flavors is truly irresistible, offering a sophisticated twist on classic comfort desserts.
These Dark Chocolate Cheesecake Brownies are wonderfully versatile. They’re sensational served simply on their own, allowing their pure deliciousness to shine. For an extra touch of luxury, try them slightly warmed with a scoop of vanilla bean ice cream, or a dollop of fresh whipped cream. A sprinkle of sea salt flakes on top can also elevate the chocolate flavor beautifully. If you’re feeling adventurous, consider adding a handful of chopped raspberries or even a swirl of caramel into the cheesecake batter for an exciting variation. I truly encourage you to give this recipe a try – I’m confident you’ll love the results as much as I do!
Frequently Asked Questions:
Can I make these ahead of time?
Absolutely! These brownies actually taste even better when they’ve had a chance to chill and set for a few hours or overnight. This allows the flavors to meld beautifully. Store them in an airtight container in the refrigerator for up to 3-4 days.
What kind of dark chocolate is best to use?
For the most intense and satisfying dark chocolate flavor, I recommend using a good quality dark chocolate with a cocoa content of at least 60-70%. Avoid using chocolate chips meant for baking as they often contain stabilizers that can affect the texture of the brownie base. Melting a bar of quality dark chocolate will yield the best results.
Dark Chocolate Cheesecake Brownies
Decadent brownies swirled with rich dark chocolate cheesecake for an irresistible treat.
Ingredients
-
½ cup unsalted butter
-
1 cup dark chocolate chips
-
¾ cup granulated sugar
-
2 large eggs
-
1 tsp vanilla extract
-
⅔ cup all-purpose flour
-
2 tbsp cocoa powder
-
¼ tsp salt
-
8 oz cream cheese, softened
-
¼ cup granulated sugar
-
1 large egg
-
½ tsp vanilla extract
Instructions
-
Step 1
Preheat oven to 350°F (175°C). Grease and flour an 8×8 inch baking pan. -
Step 2
Melt butter and 1 cup dark chocolate chips in a heatproof bowl over simmering water or in the microwave. Stir until smooth. -
Step 3
In a separate bowl, whisk together ¾ cup granulated sugar, 2 large eggs, and 1 tsp vanilla extract. Stir in the melted chocolate mixture. -
Step 4
In another bowl, combine all-purpose flour, cocoa powder, and salt. Gradually add the dry ingredients to the wet ingredients, mixing until just combined. Do not overmix. -
Step 5
In a small bowl, beat softened cream cheese with ¼ cup granulated sugar and ½ tsp vanilla extract until smooth. Beat in 1 large egg until combined. -
Step 6
Pour half of the brownie batter into the prepared pan. Dollop spoonfuls of the cheesecake mixture over the batter. Swirl the cheesecake mixture into the brownie batter with a knife or skewer. Top with the remaining brownie batter and swirl again. -
Step 7
Bake for 30-35 minutes, or until the edges are set and a toothpick inserted into the center comes out with moist crumbs. -
Step 8
Let cool completely in the pan on a wire rack before cutting into squares.
Important Information
Nutrition Facts (Per Serving)
It is important to consider this information as approximate and not to use it as definitive health advice.
Allergy Information
Please check ingredients for potential allergens and consult a health professional if in doubt.