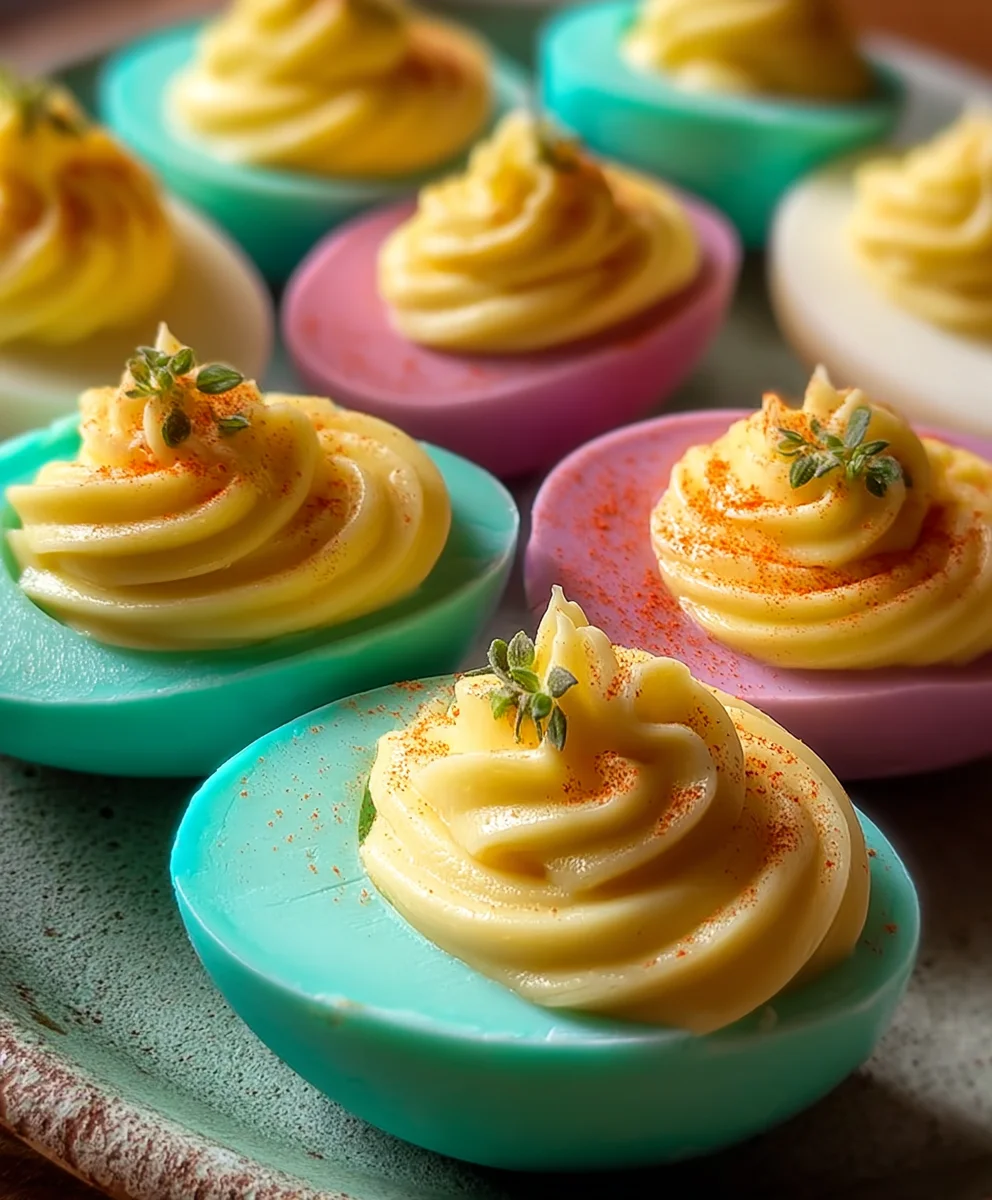
Fun-Colored Deviled Eggs-Party Appetizer
Colored deviled eggs are more than just a party appetizer; they’re a vibrant explosion of flavor and fun that instantly elevates any gathering. Imagin extracte a platter bursting with sunshine yellow, pretty pink, and festive green eggs – it’s a visual feast before you even take your first bite! What is it about these little parcels of delight that makes them so universally loved? Perhaps it’s the perfect balance of creamy, tangy filling nestled within a tender egg white, or the satisfyingly rich flavor that always leaves you wanting just one more. But these aren’t your average deviled eggs. Our unique twist on colored deviled eggs takes them from classic to show-stopping with a simple, natural coloring technique that adds a playful charm without compromising on that beloved, savory taste. Get ready to impress your guests and add a splash of edible artistry to your next occasion with these incredibly special, naturally vibrant treats. They’re guaranteed to be the talk of the table!
Ingredients:
- 12 large eggs
- ½ cup mayonnaise
- 2 teaspoons pickle juice (from the dill pickle jar is perfect)
- 2 teaspoons yellow mustard
- 4 tablespoons finely chopped dill pickles
- Salt, to taste
- Freshly ground black pepper, to taste
- 6 ounces water (for each coloring batch)
- 1 teaspoon white vinegar (for each coloring batch)
- Food coloring in your desired colors (red, blue, green, yellow, orange, purple – get creative!)
Coloring the Egg Whites
Phase 1: Hard-Boiling the Eggs
To begin extract our vibrant journey into Colored Deviled Eggs, the first and most crucial step is to perfectly hard-boil our eggs. This might sound simple, but a few tricks ensure the best results. Place your 12 large eggs gently into a single layer in a large saucepan. Cover the eggs with cold water by about an inch. This ensures even cooking and prevents cracking. Add a pinch of salt to the water; this not only seasons the eggs slightly but also helps to make peeling easier later on. Place the saucepan over high heat and bring the water to a rolling boil. Once the water reaches a vigorous boil, immediately remove the saucepan from the heat. Cover the saucepan tightly with a lid and let the eggs sit in the hot water for 10-12 minutes. This steeping method is a gentle way to cook the eggs, preventing that dreaded greenish ring around the yolk and ensuring a firm, perfectly cooked white.
Phase 2: Cooling and Peeling
After the steeping time, carefully drain the hot water from the saucepan. Immediately plunge the eggs into a large bowl filled with ice water. This is called an ice bath, and it’s essential for stopping the cooking process instantly and making the eggs easier to peel. Let the eggs chill in the ice bath for at least 10-15 minutes, or until they are completely cool to the touch. Once cooled, it’s time for the peeling. Gently tap each egg on a hard surface to crack the shell all over. Then, starting from the larger end of the egg (where the air pocket is usually found), carefully peel away the shell. Running the egg under cool water while peeling can help loosen any stubborn bits of shell and membrane, giving you beautifully smooth egg whites.
Phase 3: Preparing the Coloring Baths
Now comes the fun part – transforming our plain white egg whites into a knon-alcoholic aleidoscope of color! You’ll need as many small bowls or cups as colors you plan to use. For each color, pour 6 ounces of water into a separate cup. To each cup of water, add 1 teaspoon of white vinegar. The vinegar helps the food coloring adhere to the egg whites more effectively, ensuring a vibrant and even distribution of color. Next, add several drops of your chosen food coloring to each cup. Start with a few drops and add more until you achieve the intensity of color you desire. Remember, the color will be somewhat diluted by the water, so don’t be afraid to go a bit bolder than you think you need. Stir each colored mixture gently to ensure the food coloring is fully dissolved.
Phase 4: Infusing the Egg Whites with Color
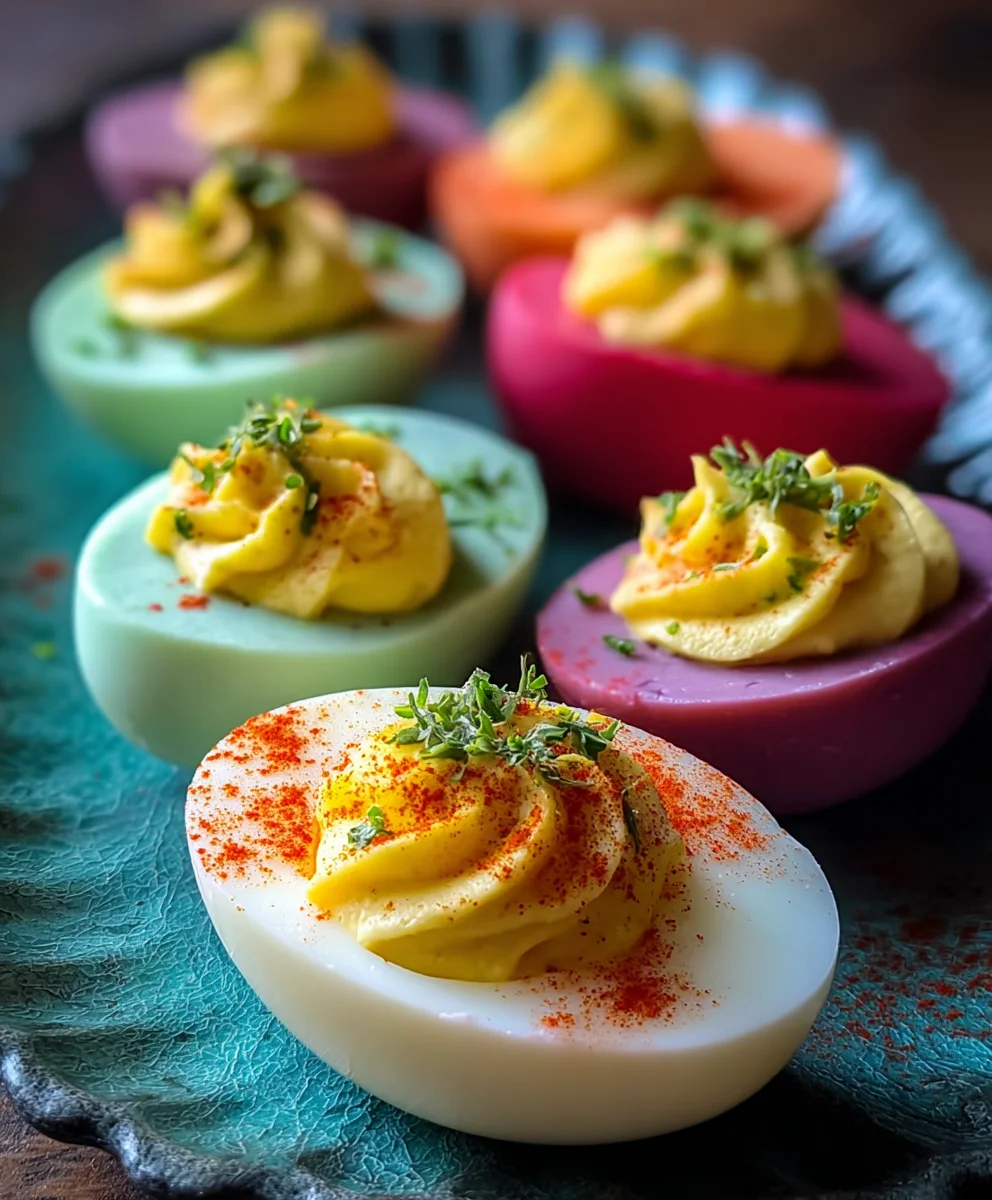
Once your coloring baths are ready, carefully slice each hard-boiled egg in half lengthwise. Scoop out the yolks and place them in a separate medium-sized bowl. Set these aside for the deviled egg filling. Now, take your halved egg white cups and gently place them, cut-side down, into their respective colored water baths. Make sure the egg whites are fully submerged. Let the egg whites steep in the colored water for at least 30 minutes. For deeper, more intense colors, you can leave them for up to an hour, checking periodically to see if the color is to your liking. You can even gently rotate the egg whites halfway through to ensure even coloring on all sides. After steeping, carefully remove the colored egg whites from the baths and pat them very gently with a paper towel to remove excess moisture. Arrange them on a clean plate or tray, cut-side up, ready for the next stage.
Making the Deviled Egg Filling
Phase 5: Creating the Creamy Yolk Mixture
While our colorful egg whites are steeping, let’s prepare the delicious filling for our deviled eggs. In the medium-sized bowl containing the scooped-out egg yolks, add the ½ cup of mayonnaise. Mash the yolks and mayonnaise together with a fork until you achieve a smooth, creamy consistency. This is the base of our flavorful filling. Next, add the 2 teaspoons of pickle juice and the 2 teaspoons of yellow mustard. The pickle juice adds a delightful tang and brightness, while the mustard provides a classic savory note. Stir everything together thoroughly until well combined. Now, add the 4 tablespoons of finely chopped dill pickles. These little bursts of briny, crunchy pickle are what truly elevate deviled eggs. Season generously with salt and freshly ground black pepper to taste. Remember to taste your filling and adjust the seasonings as needed – you might want a little more salt, pepper, or even a touch more pickle juice for an extra zesty kick.
Phase 6: Assembling the Colored Deviled Eggs
With our vibrant egg white halves ready and our creamy yolk filling perfectly seasoned, it’s time for the final assembly. Spoon the yolk mixture into each of the colored egg white halves. You can use a spoon for a rustic look, or for a more elegant presentation, transfer the filling to a piping bag fitted with a star tip and pipe the mixture artfully into each white. This creates beautiful swirls and peaks. Garnish your Colored Deviled Eggs as desired. A sprinkle of paprika, a tiny sprig of fresh dill, or a small piece of pickle can add a charming finishing touch. For an extra pop of color, you can even add a tiny dot of food coloring to a small portion of the yolk mixture before piping, creating colorful swirls within the filling itself! Chill the deviled eggs for at least 15-20 minutes before serving to allow the flavors to meld and the filling to firm up slightly.
Conclusion:
You’ve now mastered the art of creating beautiful and delicious Colored Deviled Eggs! This recipe is wonderfully versatile and offers a fantastic way to add a vibrant touch to any gathering. We’ve covered everything from the creamy, flavorful filling to the simple dyeing techniques that make these eggs so special. Don’t be afraid to get creative with your colors and garnishes – the possibilities are truly endless!
Serve your Colored Deviled Eggs as a festive appetizer for parties, picnics, Easter celebrations, or simply as a fun snack. They pair wonderfully with other finger foods and a refreshing beverage. For variations, consider adding a pinch of smoked paprika to the yolk mixture for an extra layer of flavor, or try topping with a sprinkle of chives or a tiny piece of pimento. I encourage you to experiment and make these Colored Deviled Eggs your own. Enjoy the compliments you’ll undoubtedly receive!
Frequently Asked Questions about Colored Deviled Eggs:
Q1: How do I prevent the food coloring from making the egg white rubbery?
The food coloring itself does not affect the texture of the egg white. The key to tender deviled eggs is to avoid overcooking them initially. When boiling the eggs, aim for a gentle simmer rather than a rolling boil, and don’t cook them for too long. Once dyed, the eggs are then halved and filled, so their texture is primarily determined by the initial boiling process.
Q2: Can I use gel food coloring instead of liquid?
Yes, you can absolutely use gel food coloring! Gel colors are often more concentrated, so you may need to use slightly less to achieve the desired vibrancy. When using gel colors, it’s best to mix them with a tiny bit of water or vinegar before adding them to the egg white to ensure they disperse evenly.
Fun-Colored Deviled Eggs – Party Appetizer
Vibrant and fun deviled eggs with colorful egg whites, perfect for any party or gathering. A delightful and visually appealing appetizer.
Ingredients
-
12 large eggs
-
½ cup mayonnaise
-
2 teaspoons pickle juice
-
2 teaspoons yellow mustard
-
4 tablespoons finely chopped dill pickles
-
Salt, to taste
-
Freshly ground black pepper, to taste
-
6 ounces water (for each coloring batch)
-
1 teaspoon white vinegar (for each coloring batch)
-
Food coloring in desired colors (e.g., red, blue, green, yellow, orange, purple)
Instructions
-
Step 1
Hard-boil the eggs: Place eggs in a saucepan, cover with cold water, add salt, bring to a boil, then remove from heat, cover, and let steep for 10-12 minutes. Cool in an ice bath, then peel. -
Step 2
Prepare coloring baths: In separate small bowls, combine 6 ounces of water with 1 teaspoon of white vinegar and several drops of food coloring per color. Stir well. -
Step 3
Color the egg whites: Slice hard-boiled eggs in half lengthwise. Scoop out yolks into a bowl. Place egg white halves cut-side down in their respective coloring baths for at least 30 minutes. Remove and pat dry. -
Step 4
Make the yolk filling: Mash scooped-out yolks with mayonnaise until smooth. Stir in pickle juice, mustard, and finely chopped dill pickles. Season with salt and pepper to taste. -
Step 5
Assemble the deviled eggs: Spoon or pipe the yolk mixture into the colored egg white halves. Garnish as desired with paprika, dill, or a small pickle piece. -
Step 6
Chill before serving: Refrigerate the assembled deviled eggs for at least 15-20 minutes to allow flavors to meld.
Important Information
Nutrition Facts (Per Serving)
It is important to consider this information as approximate and not to use it as definitive health advice.
Allergy Information
Please check ingredients for potential allergens and consult a health professional if in doubt.