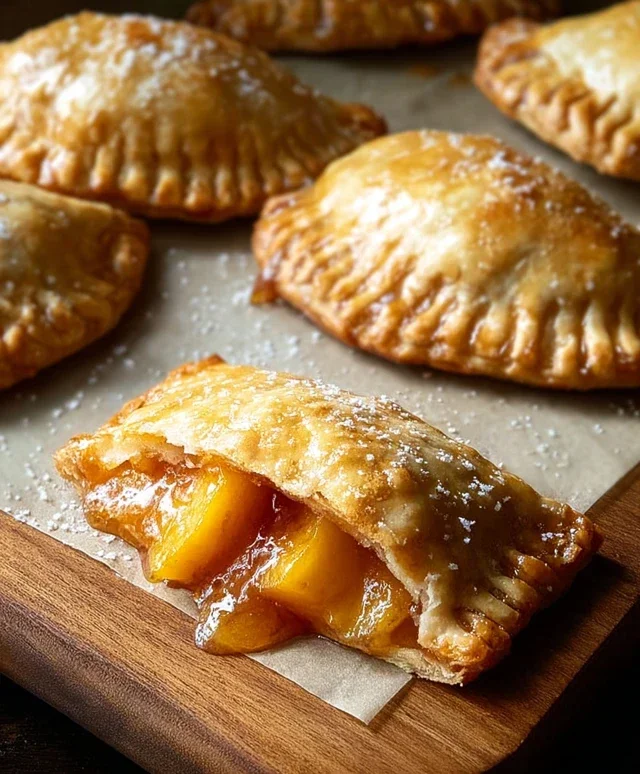
Easy Peach Hand Pies – Flaky & Delicious
Peach hand pies are more than just a dessert; they are little pockets of pure sunshine, bursting with the sweet, juicy flavor of summer. There’s something undeniably magical about a perfectly baked peach hand pie, isn’t there? The flaky, buttery crust giving way to a warm, molten center of tender, spiced peaches is a sensation that brings smiles to faces of all ages. Whether it’s a nostalgic reminder of childhood summers or a delightful treat for a special occasion, these individual delights hold a special place in our hearts. What makes them truly stand out is their portability and perfect portion size, making them ideal for picnics, bake snon-alcoholic ales, or simply a sweet indulgence on the go. They offer all the comfort and deliciousness of a full-sized pie, but in a convenient, handheld package that’s undeniably charming.
Get ready to create your own little taste of summer bliss.
Let’s dive into making these irresistible peach hand pies!
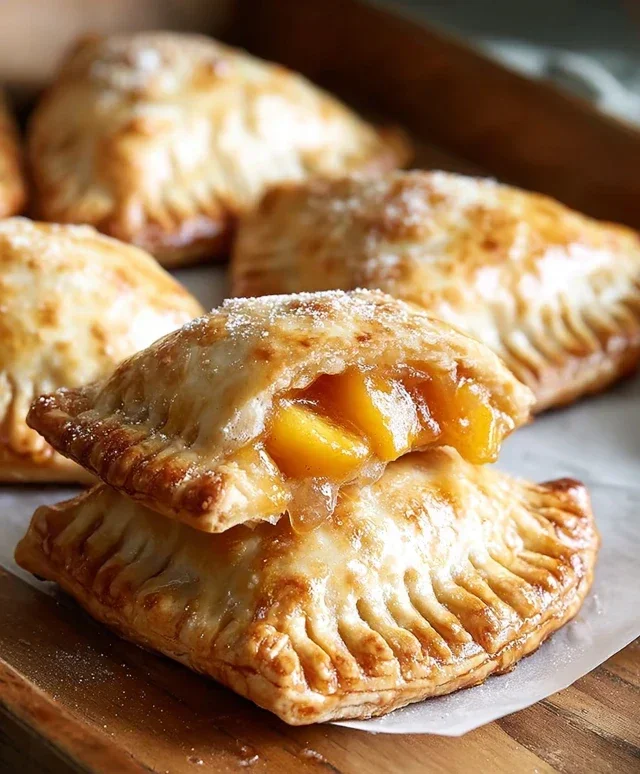
Peach Hand Pies
There’s something wonderfully nostalgic and utterly delicious about a warm, fruit-filled hand pie. These Peach Hand Pies are incredibly easy to make, especially with the magic of canned pie filling, making them a perfect weekend treat or a delightful surprise for a potluck. The flaky crust, bursting with sweet, tender peaches, all finished with a simple glaze, creates a dessert that’s both comforting and impressive. You don’t need to be a pastry chef to whip these up; they’re designed for maximum flavor with minimal fuss. Let’s get started and fill our kitchens with the irresistible aroma of baked peaches!
Ingredients:
Making the Peach Filling
The beauty of this recipe lies in its simplicity, and that starts with the filling. We’re using a 21 oz. can of peach pie filling, which means all the hard work of peeling, slicing, and sweetening the peaches has already been done for you. This ensures a consistently delicious and intensely peachy flavor in every bite. If you prefer a chunkier filling, you can give the canned filling a quick pulse in a food processor, but I find it’s perfect as is for these hand pies. This saves so much time and effort, allowing us to focus on the fun parts of assembly and frying!
Preparing the Pie Dough
For the crust, we’re opting for convenience with two tubes of refrigerated pie crust. These pre-made crusts are a lifesaver when you’re craving homemade-style treats without the all-day commitment. You’ll want to let them sit at room temperature for about 10-15 minutes before unrolling them, as instructed on the package. This makes them more pliable and less likely to crack as you work with them. Carefully unroll each crust onto a lightly floured surface. We’ll be cutting these into circles to create our hand pie shells.
Assembling the Hand Pies
Now for the fun part – assembly! Using a 4-inch round cookie cutter or even the rim of a large glass, cut out as many circles as you can from each pie crust. You should aim for about 6-8 circles per crust, depending on how efficiently you cut. Gather any scraps, gently re-roll them, and cut out additional circles. Don’t worry if they aren’t perfect; rustic charm is part of the appeal!
For each hand pie, place about 2-3 tablespoons of the peach pie filling onto one half of a dough circle, leaving a 1/2-inch border. Be careful not to overfill, as this can make sealing difficult and increase the chance of leaks during frying. Lightly brush the edges of the dough circle with a little water. This acts as a “glue” to help the pastry seal effectively. Then, carefully fold the other half of the dough circle over the filling to create a semicircle.
Sealing and Venting
Once you’ve folded the dough, it’s crucial to seal the edges well to prevent the delicious peach filling from escaping during frying. Press down firmly along the entire edge with your fingers, creating a good seal. For extra security and a decorative touch, you can use the tines of a fork to crimp the edges. This not only looks pretty but also ensures a robust seal. Before you move on to frying, it’s important to create a small vent or two on the top of each hand pie. A small slit or a couple of pinpricks with a knife will allow steam to escape as the pies cook, preventing them from puffing up too much or bursting.
Frying to Golden Perfection
Heat about 1-2 inches of vegetable oil in a large, heavy-bottomed skillet or a deep pot over medium heat. You’re looking for a temperature of around 350-360°F (175-180°C). If you don’t have a thermometer, you can test the oil by dropping a small piece of dough into it; it should sizzle immediately and float to the surface. Carefully place 2-3 hand pies into the hot oil, being careful not to overcrowd the pan. Overcrowding will lower the oil temperature and result in soggy pies.
Fry the hand pies for about 2-3 minutes per side, or until they are a beautiful golden brown and the crust is cooked through. Use a slotted spoon or a spider strainer to gently flip them over halfway through the cooking time to ensure even browning. Once they’re perfectly golden, carefully remove the hand pies from the oil and place them on a wire rack set over a baking sheet lined with paper towels. This will allow any excess oil to drain off.
Crafting the Simple Glaze
While the hand pies are still warm, it’s time for the final touch: a simple yet delightful glaze. In a small bowl, whisk together the 1/2 cup of powdered sugar, 1 teaspoon of corn syrup, and 1 tablespoon of water. The corn syrup is key here; it adds a wonderful sheen and helps the glaze set slightly without becoming hard. Whisk until the mixture is smooth and lump-free.
Once the hand pies have cooled slightly but are still warm, drizzle or brush the glaze generously over the tops. The warmth of the pies will help the glaze melt just enough to coat them beautifully. For a more intricate look, you can use a piping bag with a small tip or a zip-top bag with a corner snipped off. This glaze adds a touch of sweetness and a lovely finish that perfectly complements the warm, fruity filling and flaky crust. Enjoy these wonderful Peach Hand Pies warm for the ultimate treat!
Conclusion:
I hope you’re as excited to bake these delightful Peach Hand Pies as I am to share them! These little pockets of peachy perfection are simply wonderful because they combine flaky, buttery pastry with a sweet, slightly tart, and warmly spiced peach filling. They’re incredibly versatile and are a fantastic way to enjoy the taste of summer. Whether you’re looking for a sweet treat for a picnic, a potluck, or just a cozy afternoon indulgence, these hand pies are sure to impress. The small, individual portions make them easy to serve and enjoy, and the aroma as they bake is absolutely heavenly.
For serving suggestions, these Peach Hand Pies are fantastic on their own, but they also pair beautifully with a scoop of vanilla bean ice cream or a dollop of fresh whipped cream. For variations, don’t be afraid to experiment! You could add a pinch of cardamom to the filling for a deeper spice, or even toss in a handful of blueberries for a mixed berry twist. If you don’t have fresh peaches, frozen or canned (drained well) can also work. I truly encourage you to give this recipe a try – you won’t regret the delicious outcome!
Frequently Asked Questions:
Can I make the pastry dough ahead of time?
Absolutely! You can prepare the pie dough up to 2 days in advance and store it wrapped tightly in the refrigerator. This is a great way to save time on baking day. Just let it sit at room temperature for about 15-20 minutes to make it easier to roll out.
How should I store leftover Peach Hand Pies?
Leftover hand pies can be stored in an airtight container at room temperature for up to 2 days, or in the refrigerator for up to 4-5 days. They are delicious enjoyed at room temperature or gently warmed in a toaster oven or oven.
What if my peaches aren’t very sweet?
If your peaches are on the tarter side, you can easily adjust the sugar in the filling to your preference. Taste the peach mixture before filling the pies and add a little more sugar if needed. A squeeze of lemon juice can also help balance the sweetness and enhance the peach flavor.
Peach Hand Pies
Easy and delicious hand pies filled with sweet peach pie filling, perfect for a quick dessert or snack.
Ingredients
-
21 oz. can peach pie filling
-
Refrigerated pie crust
-
1/2 cup powdered sugar
-
1 teaspoon corn syrup
-
1 tablespoon water
-
Vegetable oil for frying
Instructions
-
Step 1
Prepare the glaze: Whisk together powdered sugar, corn syrup, and water until smooth. Set aside. -
Step 2
Prepare the pie crust: Unroll the refrigerated pie crust and cut out circles using a cookie cutter or glass. -
Step 3
Fill the hand pies: Spoon a tablespoon or two of peach pie filling onto one half of each crust circle, leaving a small border. -
Step 4
Seal the hand pies: Fold the other half of the crust over the filling and crimp the edges with a fork to seal. -
Step 5
Fry the hand pies: Heat vegetable oil in a skillet over medium heat. Carefully place the hand pies in the hot oil and fry for 2-3 minutes per side, until golden brown. -
Step 6
Drain and glaze: Remove hand pies from the oil and place on a paper towel-lined plate to drain. Drizzle with the prepared glaze.
Important Information
Nutrition Facts (Per Serving)
It is important to consider this information as approximate and not to use it as definitive health advice.
Allergy Information
Please check ingredients for potential allergens and consult a health professional if in doubt.