Easy Homemade Bread Recipe – Delicious & Simple
Homemade bread is more than just food; it’s an experience. The aroma that fills your kitchen as it bakes, the satisfying heft of a freshly baked loaf, and the pure, unadulterated taste – these are sensory delights that factory-made bread simply can’t replicate. There’s a primal comfort in transforming simple ingredients like flour, water, yeast, and salt into something so deeply nourishing and delicious. People love this dish because it connects us to tradition, to the satisfaction of creation, and to the simple joy of sharing something truly special. What makes homemade bread so special is the love and care that goes into every knead, every rise, and every bake. It’s a tangible representation of patience and dedication, resulting in a loaf that’s uniquely yours, warm, crusty, and utterly irresistible. This isn’t just a recipe; it’s an invitation to rediscover the magic of baking from scratch and to experience the unparalleled reward of perfect homemade bread.
The Joy of Baking: Your Guide to Homemade Bread
There’s a certain magic that happens when you bake your own bread. The aroma that fills your kitchen, the satisfying chew of a perfectly baked loaf, the knowledge that you created something so wholesome from simple ingredients – it’s truly rewarding. Forget the pre-packaged loaves; this recipe will guide you through creating a wonderfully soft and delicious homemade bread that will become a staple in your home. It’s easier than you think, and the results are well worth the effort.
Ingredients:
Getting Started: Activating the Yeast
The first crucial step in any bread-making journey is activating your yeast. This process awakens the yeast, making it ready to work its magic and leaven your dough. In a large mixing bowl, combine the warm water and the active dry yeast. It’s essential that the water is between 105 and 115 degrees Fahrenheit. Too cold, and the yeast won’t activate; too hot, and you’ll kill it. Think of it as a warm bath for your yeast. Stir in your chosen sweetener – either honey for a richer, slightly sweeter flavor and a softer crum extractb, or sugar for a more neutral sweetness. Give it a gentle stir to dissolve.
Let this mixture sit undisturbed for about 5-10 minutes. You’ll know your yeast is alive and well when it becomes foamy and bubbly on the surface. This visual cue is your assurance that the yeast is active and ready to start fermenting. If you don’t see any foam, your yeast might be old or the water temperature was off, and you’ll need to start again with fresh yeast and correctly tempered water.
Building the Dough
Once your yeast mixture is frothy and alive, it’s time to add the other key ingredients. Add the salt and the oil to the bowl. The salt plays a vital role beyond just flavor; it controls the yeast’s activity and strengthens the gluten structure of the dough, leading to a better texture. The oil contributes to the tenderness and moisture of the finished bread, preventing it from becoming dry.
Now, it’s time to introduce the flour. Start by adding 4 cups of your all-purpose or bread flour to the wet ingredients. Bread flour, with its higher protein content, will develop a stronger gluten network, resulting in a chewier and more structured loaf, which is ideal for baking. However, all-purpose flour will still produce a delicious bread. Using a sturdy spoon or a dough whisk, begin extract to mix the ingredients. Stir until the flour is mostly incorporated and a shaggy dough begin extracts to form. At this stage, the dough will be quite sticky.
Kneading: Developing the Gluten
This is where the real transformation happens – kneading. Kneading develops the gluten, the protein network in flour that gives bread its structure and chegrape juicess. After you’ve mixed the initial dough, turn it out onto a lightly floured surface. If the dough is still very sticky, dust your hands and the surface with a little more flour.
Begin extract to knead by pushing the dough away from you with the heel of your hand, then folding it back over on itself. Rotate the dough a quarter turn and repeat. Continue this process of pushing, folding, and turning for about 8-10 minutes. Your goal is to achieve a smooth, elastic dough that springs back when you gently press it with your finger. It should no longer stick excessively to your hands or the surface. You might need to add an additional 1 to 1 ½ cups of flour, adding it gradually, until the dough reaches this desirable consistency. Don’t be tempted to add too much flour, as this can result in a dense, dry loaf. The dough should feel soft and pliable.
First Rise: Letting the Magic Happen
Once your dough is perfectly kneaded, it’s time for its first rise, also known as proofing. Lightly grease a clean, large bowl with a little oil. Place the kneaded dough into the bowl, turning it once to coat the entire surface with oil. This prevents the dough from drying out as it rises. Cover the bowl tightly with plastic wrap or a clean, damp kitchen towel.
Find a warm, draft-free place for your dough to rise. This could be a slightly warm oven (turned off, of course!), a sunny windowsill, or simply a warm corner of your kitchen. The dough will need to rise until it has doubled in size, which typically takes about 1 to 1 ½ hours, depending on the warmth of your environment. During this time, the yeast is fermenting, producing carbon dioxide gas which causes the dough to expand and become light and airy.
Shaping and Second Rise
After the dough has doubled in size, it’s time to punch it down. Gently press your fist into the center of the dough to deflate it, releasing the accumulated gases. Turn the dough out onto your lightly floured surface again. Now, you can shape your bread. For a classic loaf, gently form the dough into your desired shape – a round boule or an oblong loaf for a loaf pan. Be gentle to retain some of the air you’ve incorporated.
Place the shaped dough onto a baking sheet lined with parchment paper or into a greased loaf pan. Cover it loosely with plastic wrap or a clean kitchen towel and let it rise again for a second time. This second rise, or proofing, usually takes about 30-60 minutes, or until the dough is puffy and has increased in size by about 50-75%. You should see visible air bubbles on the surface. This stage is crucial for creating a light and tender crum extractb.
Baking to Perfection
Preheat your oven to 375 degrees Fahrenheit (190 degrees Celsius) during the second rise. Once your dough has completed its second rise, it’s ready for the oven. For a beautiful, golden-brown crust, you can brush the top of the loaf with a little milk or an egg wash. If you like, you can also score the top of the loaf with a sharp knife or a bread lame. This allows the bread to expand evenly in the oven and adds a decorative touch.
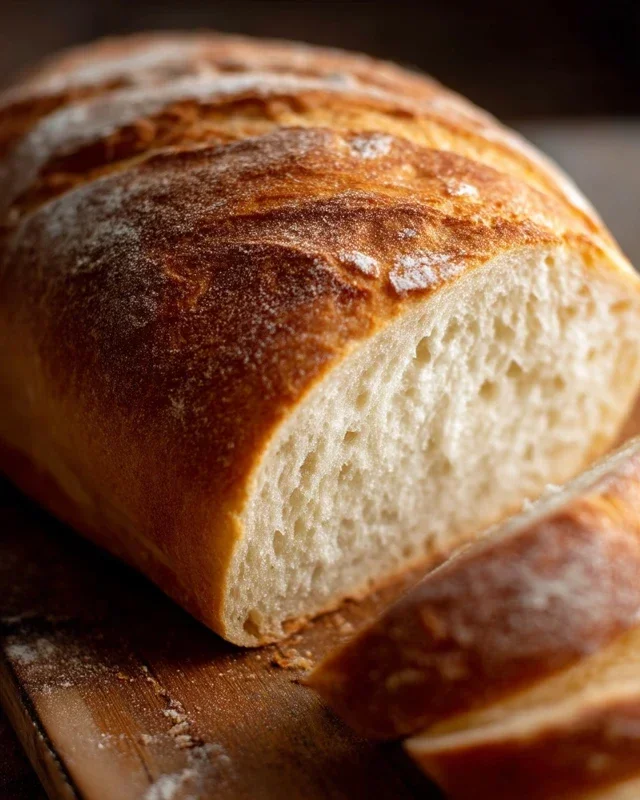
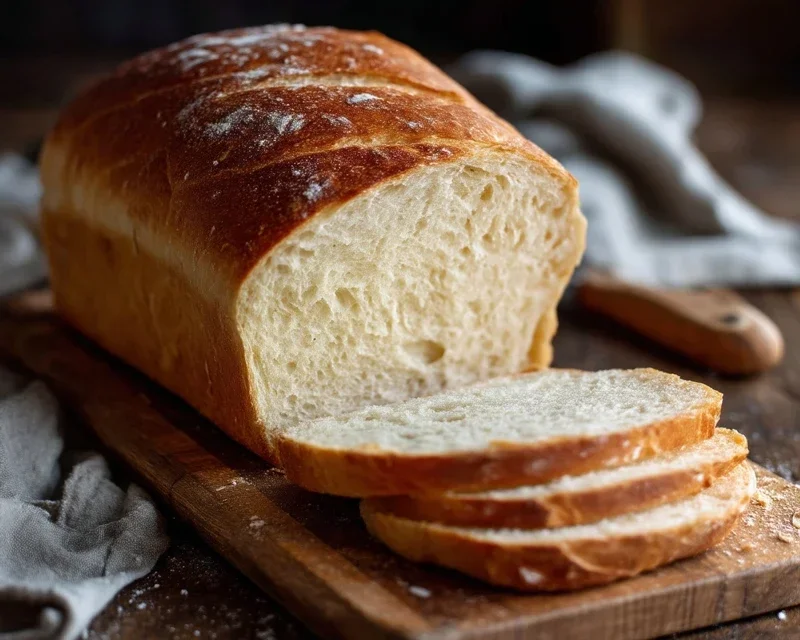
Carefully place the loaf into the preheated oven. Bake for approximately 30-40 minutes, or until the crust is deep golden brown and the loaf sounds hollow when tapped on the bottom. If the crust is browning too quickly, you can loosely tent the loaf with aluminum foil for the last part of the baking time.
Once baked, remove the bread from the oven and immediately transfer it to a wire rack to cool completely. This step is very important; if you leave the bread in the pan or on a solid surface, the bottom can become soggy. Waiting for the bread to cool allows the internal structure to set and the steam to escape, ensuring the best texture and flavor. Patience is key here – the aroma will be non-intoxicating, but resist the urge to slice into a piping hot loaf. Enjoy the fruits of your labor, from kneading to the final, delicious bite!
Conclusion:
Congratulations! You’ve now learned how to create delicious, satisfying homemade bread right in your own kitchen. This recipe is fantastic because it demystifies the bread-making process, proving that you don’t need to be a professional baker to achieve a beautiful, flavorful loaf. The aroma filling your home as it bakes is truly unparalleled, and the taste of fresh bread, warm and slathered with butter, is a simple yet profound pleasure. It’s incredibly versatile, perfect for a hearty sandwich, dipping into soups, or enjoying as a delightful accompaniment to any meal. I truly encourage you to give this recipe a try – the sense of accomplishment is immense, and the rewards are delicious!
Consider serving your homemade bread with a generous dollop of your favorite butter, a selection of artisanal cheeses, or alongside a hearty stew. For variations, feel free to experiment! Add herbs like rosemary or thyme to the dough, or incorporate seeds such as sunflower or poppy seeds for added texture and flavor. You could even swirl in some garlic and parmesan for a savory twist.
Frequently Asked Questions about Homemade Bread:
Why isn’t my bread rising properly?
Several factors can affect rising. Ensure your yeast is fresh and activated correctly. Check that your water temperature is lukewarm, not too hot or too cold. Also, make sure your kitchen environment is warm enough for the dough to proof; a slightly warm oven (turned off!) can create a good environment.
Can I freeze homemade bread?
Absolutely! Once your bread has cooled completely, you can wrap it tightly in plastic wrap and then in aluminum foil or a freezer-safe bag. It will stay fresh in the freezer for up to 2-3 months. To enjoy, simply thaw at room temperature or gently reheat in a low oven.
Homemade Bread
A simple and delicious recipe for classic homemade bread, perfect for sandwiches or toasting. This recipe uses readily available ingredients and is suitable for beginners.
Ingredients
-
2 cups warm water (105-115 degrees)
-
1 Tablespoons active dry yeast
-
1/4 cup honey
-
2 teaspoons salt
-
2 Tablespoons canola oil
-
4 – 5 1/2 cups all-purpose flour
Instructions
-
Step 1
In a large bowl, combine the warm water and honey. Sprinkle the yeast over the top and let it sit for 5-10 minutes until it becomes foamy. -
Step 2
Add the salt and oil to the yeast mixture and stir to combine. -
Step 3
Gradually add the flour, starting with 4 cups, mixing until a shaggy dough forms. Turn the dough out onto a lightly floured surface and knead for 8-10 minutes, adding more flour as needed, until the dough is smooth and elastic. -
Step 4
Place the dough in a lightly oiled bowl, turning to coat. Cover with a clean kitchen towel and let it rise in a warm place for 1-1.5 hours, or until doubled in size. -
Step 5
Punch down the dough and shape it into a loaf. Place the loaf in a greased 9×5 inch loaf pan. -
Step 6
Cover the pan and let the dough rise again for 30-45 minutes, until it has almost doubled in size. -
Step 7
Preheat your oven to 375°F (190°C). Bake the bread for 30-35 minutes, or until the crust is golden brown and the internal temperature reaches 200-210°F (93-99°C). -
Step 8
Remove the bread from the pan and let it cool completely on a wire rack before slicing.
Important Information
Nutrition Facts (Per Serving)
It is important to consider this information as approximate and not to use it as definitive health advice.
Allergy Information
Please check ingredients for potential allergens and consult a health professional if in doubt.