Easy Chocolate Swiss Roll- Simple Dessert Recipe
Easy Chocolate Swiss Roll recipes are often met with a mix of awe and apprehension. Who hasn’t dreamed of that perfectly swirled, cloud-like sponge cake enrobed in rich chocolate? It’s a dessert that instantly elevates any occasion, from a casual afternoon tea to a celebratory birthday. The beauty of a Swiss roll lies in its deceptive simplicity; it appears sophisticated, a showstopper that whispers of bakery prowess, yet at its heart, it’s surprisingly approachable for home bakers. What truly makes this Easy Chocolate Swiss Roll so beloved is its incredible versatility. The tender sponge, kissed with cocoa, cradles a decadent filling, be it a classic cream, a fruity jam, or, as we’ll explore today, a luscious chocolate ganache. This isn’t just a cake; it’s an experience, a delightful journey from batter to rolled perfection that promises pure joy with every bite. Get ready to impress yourself and everyone you share this delightful treat with.
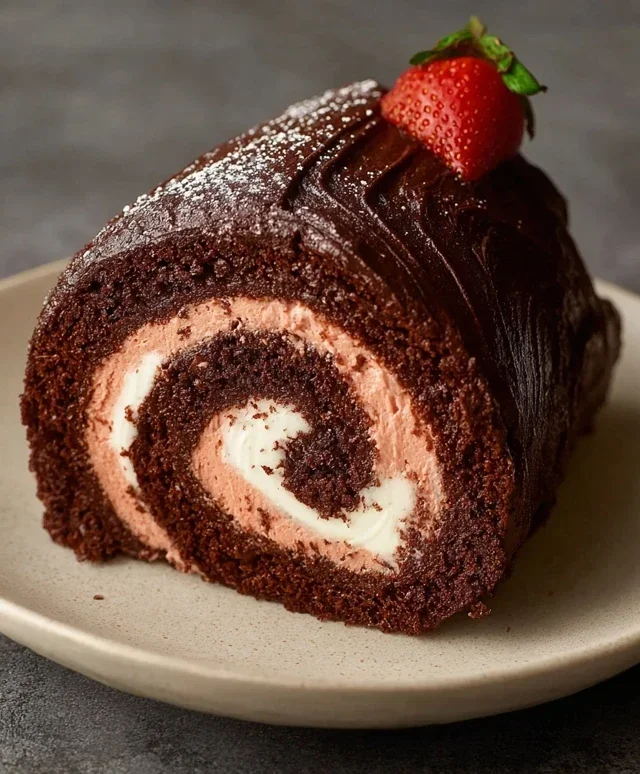
Easy Chocolate Swiss Roll
There’s something undeniably magical about a Swiss roll. That perfect swirl of cake and cream, promising decadent indulgence with every slice. While the thought of making one might seem a little daunting, I’m here to tell you that an “easy” version is absolutely achievable, even for us home bakers who don’t have professional pastry chef skills. This recipe is designed to be straightforward, forgiving, and most importantly, delicious. We’re using some clever ingredient swaps to make it dairy-free and easily adaptable, ensuring everyone can enjoy this classic treat. Get ready to impress yourself (and anyone lucky enough to share this with you) with this incredibly satisfying Easy Chocolate Swiss Roll.
Ingredients:
Instructions:
This recipe is broken down into manageable steps to make the process as smooth as possible. Don’t be afraid to read ahead and prepare your ingredients before you begin extract.
1. Preparing the Cake Batter:
Begin extract by preheating your oven to 175°C (350°F). Line a 33×23 cm (13×9 inch) baking pan with parchment paper, ensuring it goes up the sides. Lightly grease the parchment paper. In a medium bowl, whisk together the oat flour, cassava flour, cocoa powder, arrowroot starch, baking powder, and baking soda. This dry ingredient mixture forms the base of our chocolate cake. Set this aside.
In a separate large bowl, we’ll prepare the wet ingredients. Pour in the room temperature aquafaba. Aquafaba, the liquid from canned chickpeas, is a fantastic vegan egg white substitute and will help give our cake lift and structure. Gradually add 100g of the granulated sugar (or coconut sugar) to the aquafaba, whisking continuously. Continue whisking until you achieve stiff peaks, similar to how you would whip egg whites. This might take a few minutes, so be patient! This is a crucial step for achieving a light and airy cake. Once you have stiff peaks, gently fold in the unsweetened applesauce and dairy-free yogurt. Mix until just combined; overmixing can deflate the aquafaba foam.
Now, it’s time to combine the dry and wet ingredients. Add the dry ingredient mixture to the wet ingredients in three additions, gently folding after each addition. Be careful not to overmix. You want to incorporate everything until no dry streaks remain. The batter should be smooth and chocolatey.
2. Baking the Chocolate Cake Layer:
Pour the batter evenly into your prepared baking pan. Gently spread it out to create an even layer. Tap the pan lightly on the counter a few times to release any large air bubbles. Place the pan in the preheated oven and bake for approximately 15-20 minutes, or until a toothpick inserted into the center comes out clean. The cake should be springy to the touch.
While the cake is baking, prepare a clean, lint-free dish towel by laying it flat on your work surface. Generously dust the towel with the 2 tablespoons of cocoa powder. This step is essential for preventing the cake from sticking to the towel and for ensuring a clean release when you roll it.
Once the cake is baked, immediately remove it from the oven. Carefully invert the cake directly onto the prepared, cocoa-dusted dish towel. Peel off the parchment paper slowly and carefully. If any part of the cake seems a little stuck, gently coax it away with a spatula. While the cake is still warm, begin extract to roll it up, starting from one of the shorter ends, using the dish towel to help guide you. Roll it snugly but not so tight that it cracks. Let the rolled cake cool completely on the dish towel. This cooling period is vital for the cake to set and hold its shape when unrolled.
3. Creating the Creamy Filling:
While the cake is cooling, let’s prepare our luscious filling. In a large bowl, cream together the room temperature vegan butter until it’s light and fluffy. Gradually add the remaining 100g of granulated sugar (or coconut sugar) and continue to beat until well combined and the mixture is smooth.
Next, we’ll add the pulsed freeze-dried strawberries to the vegan butter mixture. These add a wonderful concentrated strawberry flavor and a beautiful pink hue to the filling. Mix until evenly distributed. If you prefer a smoother filling without any strawberry pieces, you can strain out the larger bits after pulsing the freeze-dried strawberries. Taste the filling and adjust sweetness if desired.
4. Assembling the Swiss Roll:
Once the chocolate cake has cooled completely, carefully unroll it. You’ll notice it has a good amount of flexibility now. Gently spread the prepared strawberry cream filling evenly over the entire surface of the cake, leaving a small border (about 1 cm or 1/2 inch) along the edges.
Now, it’s time to re-roll the cake. Starting from the same end you started rolling before, carefully roll the cake up again, this time without the dish towel. Use your hands to gently guide and shape it as you go. You want to aim for a tight, even roll. Once rolled, you can either dust the top with a little extra cocoa powder or, for an extra flourish, frost the outside with a simple glaze made from melted vegan white chocolate or a thin layer of the strawberry filling itself.
5. Decorating and Serving:
For a beautiful finish, arrange the sliced fresh strawberries on top of the Swiss roll. You can also sprinkle a little of the remaining freeze-dried strawberry flour over the top for added texture and flavor. Chill the Swiss roll in the refrigerator for at least 30 minutes to allow the filling to set properly. This will make it much easier to slice cleanly.
When you’re ready to serve, use a sharp knife to slice the Swiss roll into individual portions. The beautiful swirl of chocolate cake and strawberry cream is sure to be a showstopper. This Easy Chocolate Swiss Roll is perfect for any occasion, from a casual dessert to a celebratory gathering. Enjoy every delicious bite!

Conclusion:
And there you have it – your guide to creating a truly delightful and incredibly easy chocolate Swiss roll! We’ve walked through each step, proving that this classic dessert doesn’t have to be intimidating. The beauty of this recipe lies in its simplicity; a light, airy sponge cake that bakes quickly, paired with a rich, decadent chocolate filling. It’s the perfect dessert for when you crave something special but have limited time, or for impressing guests without breaking a sweat.
This chocolate Swiss roll is wonderfully versatile. Enjoy it as is for a pure chocolate indulgence, or dress it up with a dusting of powdered sugar, fresh berries, or a dollop of whipped cream. For a fun twist, consider adding a hint of espresso powder to the cake batter or swirling some caramel into the chocolate filling. I wholeheartedly encourage you to give this recipe a try. You’ll be amazed at how easily you can create such a stunning and delicious treat right in your own kitchen. Happy baking!
Frequently Asked Questions:
Q: My Swiss roll cake cracked when I tried to roll it. What went wrong?
A: Cracking often happens if the cake is overbaked or if it’s rolled when too warm. Make sure not to bake your sponge for too long – it should spring back when gently touched. Also, allow the cake to cool slightly (about 5-10 minutes) on the cooling rack before inverting it onto your prepared surface and rolling. Rolling it while it’s still warm but not piping hot helps prevent major cracks.
Q: Can I make the chocolate filling ahead of time?
A: Absolutely! The chocolate filling can be made a day or two in advance and stored in an airtight container in the refrigerator. You may need to let it soften at room temperature for a little bit before spreading it onto the cake to ensure it’s easily workable. This is a great way to save time on the day you plan to assemble your Swiss roll.
Easy Chocolate Swiss Roll
A simple and delicious gluten-free, dairy-free chocolate swiss roll perfect for any occasion.
Ingredients
-
135 g oat flour
-
30 g cassava flour
-
30 g cocoa powder
-
1 tbsp arrowroot starch
-
1 1/2 tsp baking powder
-
1/2 tsp baking soda
-
122 mL aquafaba, room temperature
-
200 g organic granulated sugar or coconut sugar, divided
-
100 g unsweetened applesauce, room temperature
-
60 g unsweetened dairy free yogurt, room temperature
-
2 tbsp cocoa powder for dusting the dish towel
-
1 cup sliced strawberries, for garnish
-
226 g vegan butter, room temperature
-
70 g freeze dried strawberries, pulsed into a flour
-
Coconut fat from 1 can full-fat coconut cream
Instructions
-
Step 1
Preheat oven to 350°F (175°C). Grease and flour a 10×15 inch jelly roll pan. Line the bottom with parchment paper. -
Step 2
In a large bowl, whisk together oat flour, cassava flour, 30g cocoa powder, arrowroot starch, baking powder, and baking soda. -
Step 3
In a separate bowl, whisk together aquafaba and 100g of the sugar until stiff peaks form. Gradually whisk in applesauce and dairy-free yogurt until combined. -
Step 4
Gently fold the dry ingredients into the wet ingredients until just combined. Do not overmix. -
Step 5
Pour batter into the prepared pan and spread evenly. Bake for 12-15 minutes, or until a toothpick inserted into the center comes out clean. -
Step 6
While the cake bakes, prepare the frosting. In a bowl, beat vegan butter and the remaining 100g sugar until light and fluffy. Gradually beat in the pulsed freeze-dried strawberries and coconut cream fat until smooth and creamy. -
Step 7
While the cake is still warm, invert it onto a clean kitchen towel that has been dusted with 2 tbsp cocoa powder. Carefully peel off the parchment paper. -
Step 8
Starting from one of the shorter ends, roll up the cake tightly with the towel. Let it cool completely. -
Step 9
Once cooled, gently unroll the cake. Spread the frosting evenly over the cake, then re-roll without the towel. Decorate with sliced strawberries.
Important Information
Nutrition Facts (Per Serving)
It is important to consider this information as approximate and not to use it as definitive health advice.
Allergy Information
Please check ingredients for potential allergens and consult a health professional if in doubt.