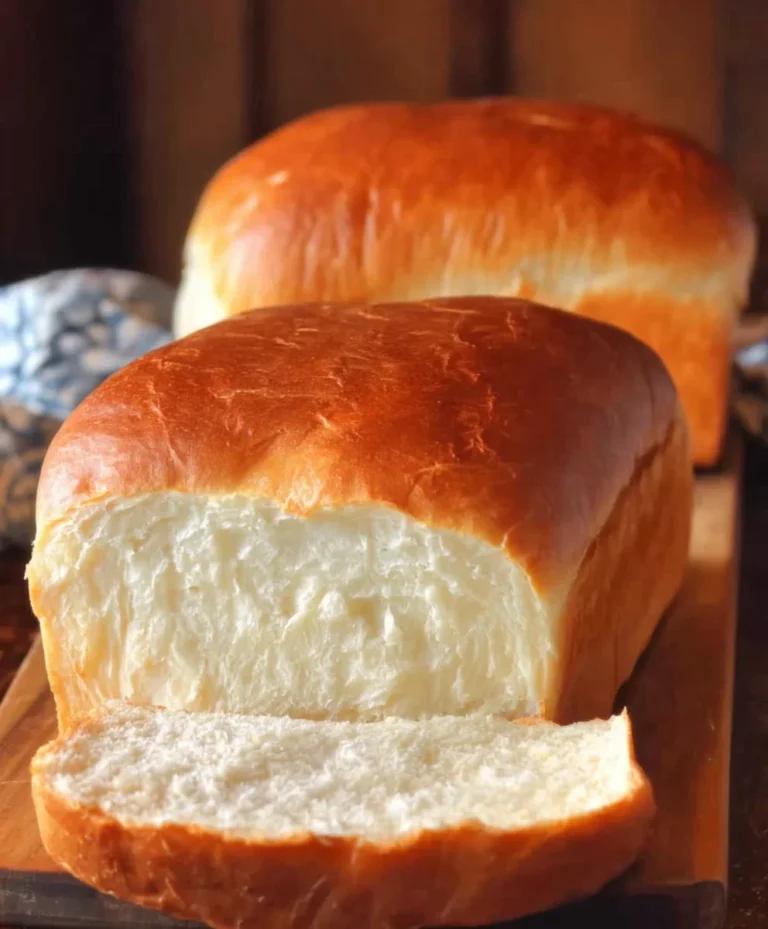
Easy Artisan Bread Recipe- Homemade Freshly Baked
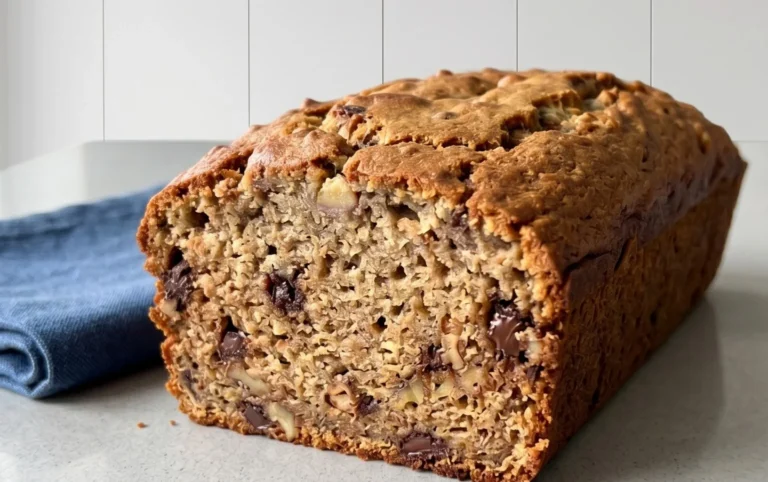
Artisan Bread Recipe. There’s something undeniably magical about a perfectly baked loaf of artisan bread. The crisp, golden crust that yields with a satisfying crackle, the soft, airy interior with its beautiful irregular crum extractb, and that inimitable, comforting aroma that fills your kitchen – it’s a sensory experience that speaks to the soul. People adore this kind of bread not just for its incredible taste, but for the sense of accomplishment it brings. In a world of mass-produced convenience, creating something so fundamental and delicious from scratch feels like a true act of love and patience. What makes this particular artisan bread recipe so special is its deceptive simplicity. While it requires time and a bit of nurturing, the ingredients are humble, and the process is designed to coax out the very best flavors and textures. This isn’t just a recipe; it’s an invitation to slow down, connect with your food, and create something truly extraordinary.
Ingredients:
- 3 cups (395 grams) all-purpose flour or bread flour
- ½ tablespoon kosher salt
- ¼ ounce instant or active dry yeast packet (or 2 ¼ teaspoons)
- 1 ½ cups warm water (105°F)
Mixing and Dough Development
Step 1: Activate the Yeast
Begin extract by gathering your ingredients and a large mixing bowl. The first crucial step in creating this beautiful artisan bread is to awaken the yeast. In a small bowl or directly in your measuring cup, combine the 1 ½ cups of warm water with the ¼ ounce packet of instant or active dry yeast. Make sure the water is between 105°F and 115°F – too hot will kill the yeast, and too cold won’t activate it. You’re looking for a pleasant warmth, like a comfortable bath. Stir gently for about 30 seconds until the yeast is mostly dissolved. Let this mixture sit undisturbed for 5 to 10 minutes. You should see it become foamy and bubbly on the surface. This indicates that the yeast is alive and ready to work its magic, creating the airy structure of your bread. If you don’t see any activity, your yeast might be old or the water temperature was off, and you’ll need to start with fresh yeast.
Step 2: Combine Wet and Dry Ingredients
Once your yeast mixture is visibly active, pour it into the large mixing bowl. Add the 3 cups of all-purpose flour (or bread flour for a chewier crum extractb) and the ½ tablespoon of kosher salt. The salt is essential not just for flavor but also for controlling the yeast’s activity and strengthening the gluten structure. Using a sturdy spoon or a dough whisk, mix everything together until just combined. It will look shaggy and a bit sticky at this stage, and that’s perfectly fine. Don’t be tempted to add more flour at this point; the dough needs to be a little wet to develop a great crust and a tender interior. Ensure there are no dry pockets of flour remaining.
Step 3: Kneading the Dough
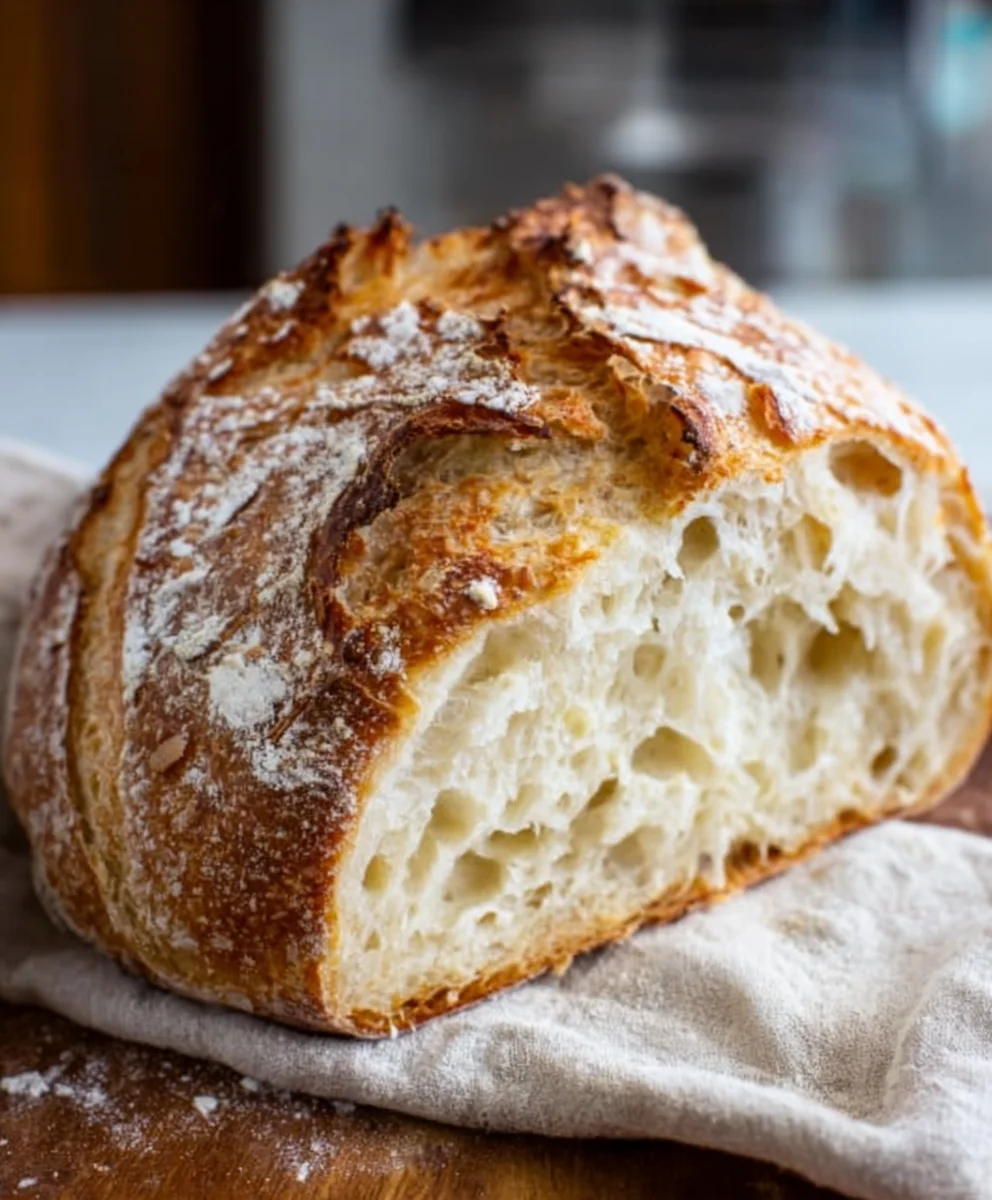
Now it’s time to develop the gluten, which gives bread its structure. Turn the shaggy dough out onto a lightly floured surface. If the dough is extremely sticky, you can use a bench scraper to help you managgin extractt. Begin kneading the dough by folding it over on itself, pressing down with the heels of your hands, and then rotating it a quarter turn. Continue this process for about 8 to 10 minutes. You are looking for the dough to become smooth, elastic, and less sticky. It should spring back slowly when you gently poke it with your finger. You can also perform the “windowpane test”: pinch off a small piece of dough and gently stretch it. If you can stretch it thin enough to see light through it without it tearing, your gluten is well-developed. If it tears easily, continue kneading for a few more minutes.
First Rise (Bulk Fermentation)
Step 4: The First Rise
Lightly grease the large mixing bowl you used earlier with a little oil or cooking spray. Place the kneaded dough into the greased bowl, turning it once to coat the entire surface of the dough with oil. This prevents it from drying out. Cover the bowl tightly with plastic wrap or a clean kitchen towel. Find a warm, draft-free spot for the dough to rise. This could be on your countertop in a slightly warmer room, or even in a slightly warmed (but turned off) oven. Allow the dough to rise for 1 to 1 ½ hours, or until it has doubled in size. The exact time will depend on the ambient temperature. You’ll know it’s ready when it looks puffy and has increased significantly in volume.
Shaping and Second Rise
Step 5: Punching Down and Shaping
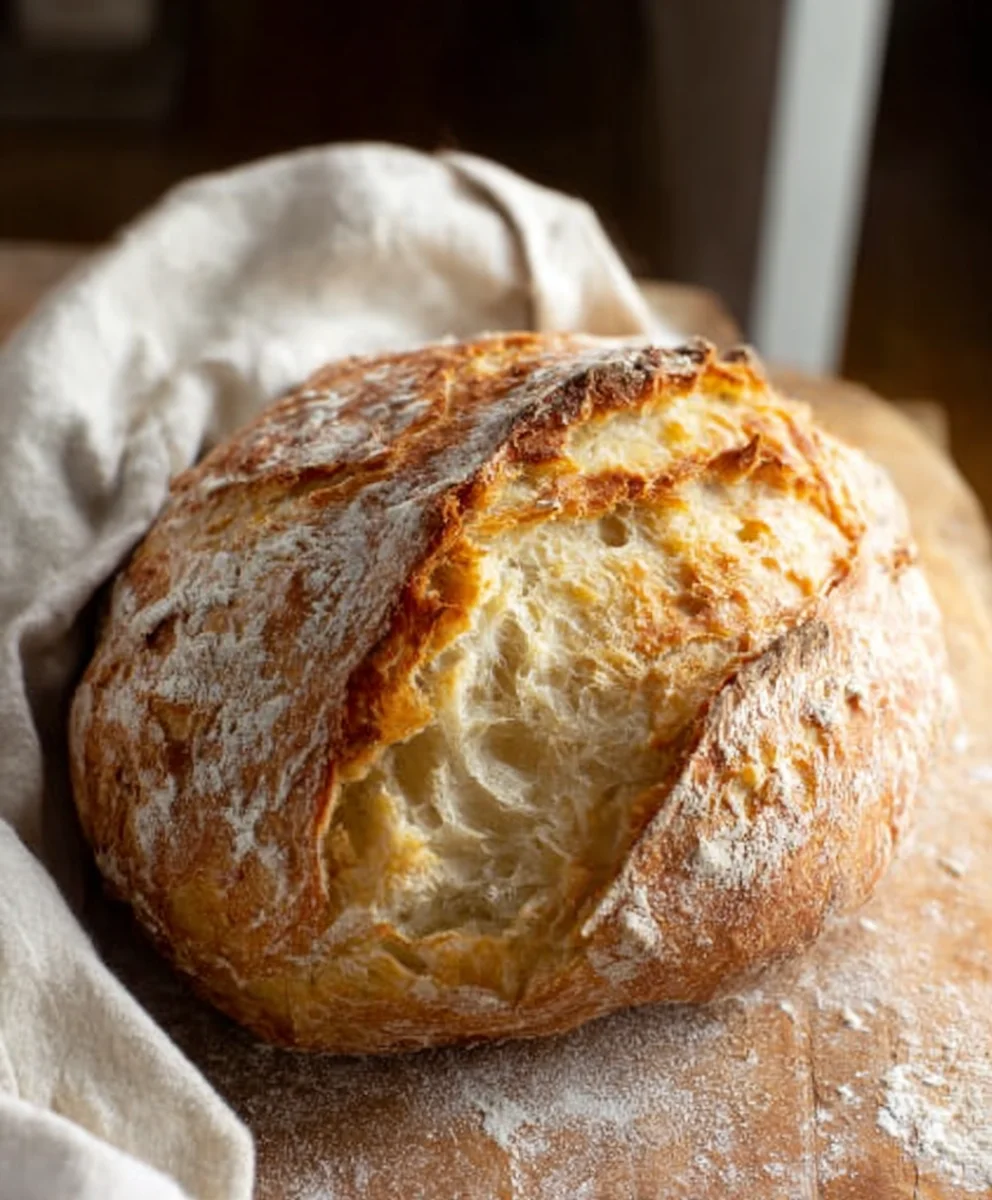
Once the dough has doubled in size, gently punch it down to release the accumulated gases. This process is called degassing and helps to redistribute the yeast and create a morrum extractven crumb structure. Turn the dough out onto a lightly floured surface. At this point, you can shape your bread. For a classic boule (round loaf), gently gather the edges of the dough towards the center and pinch them together to form a tight ball. You can also shape it into a rustic oval or a smaller baguette. Be gentle during shaping to avoid deflating the dough too much. Once shaped, you can place the dough onto a parchment-lined baking sheet, a proofing basket (banneton), or directly into your prepared baking vessel.
Step 6: The Second Rise (Proofing)
Cover the shaped dough loosely with plastic wrap or a clean, lightly floured kitchen towel. Let it rest and rise again for another 30 to 45 minutes, or until it looks puffy and has increased in size by about 50-75%. This second rise is crucial for the final texture and appearance of your bread. While the dough is proofing, preheat your oven to 450°F (230°C). If you plan to bake in a Dutch oven, place it in the oven as it preheats. This step is vital for achieving that coveted artisan crust. You can lightly dust the top of the dough with flour just before baking for a rustic look, or score it with a sharp knife or lame for decorative patterns that also allow the bread to expand evenly.
Conclusion:
And there you have it – your very own, delicious Artisan Bread Recipe! We’ve walked through each step, from proofing the yeast to achieving that perfect crackly crust, and I truly hope you feel empowered to bake this beautiful bread at home. The aroma that fills your kitchen as this bread bakes is simply unparalleled, and the taste of a homemade loaf, warm from the oven, is a reward in itself.
Serving this Artisan Bread Recipe is a joy. It’s fantastic simply sliced and enjoyed with a good quality butter, or used to create the most incredible sandwiches. It also makes a stunning accompaniment to hearty soups, stews, or a vibrant salad. Don’t hesitate to get creative!
If you’re feeling adventurous, consider variations! Incorporating herbs like rosemary or thyme into the dough before the final proof can add a wonderful herbaceous note. A sprinkle of coarse sea salt on top before baking provides a delightful crunch and burst of flavor. For a slightly richer bread, you could experiment with using a portion of whole wheat flour.
I encourage you to try this Artisan Bread Recipe, even if you’re new to breadmaking. The process is incredibly satisfying, and the results speak for themselves. Happy baking!
Frequently Asked Questions:
Q: My dough isn’t rising much. What could be wrong?
A: The most common culprit is inactive yeast. Ensure your yeast is fresh and that the water you used to proof it was warm, not hot (around 105-115°F or 40-46°C). If your yeast is old or the water temperature was off, the yeast may not have activated properly, leading to poor rising. Also, check that your kitchen isn’t too cold, as a consistent, warm environment helps dough rise effectively.
Q: How can I get a really crispy crust on my artisan bread?
A: A few tricks can help achieve that coveted crispy crust. Preheat your oven thoroughly, and consider placing a baking stone or steel in the oven during preheating. When you place the bread in the oven, creating steam is key. You can do this by placing a shallow pan of water on the rack below your baking bread, or by spraying the oven walls with water just after you put the bread in. Remove the steam pan after about 15-20 minutes of baking.
Easy Artisan Bread Recipe- Homemade Freshly Baked
Learn how to make delicious, crusty artisan bread at home with this easy-to-follow recipe. Perfect for beginners, this recipe results in a beautifully baked loaf with a tender interior.
Ingredients
-
3 cups (395 grams) all-purpose flour or bread flour
-
½ tablespoon kosher salt
-
¼ ounce instant or active dry yeast packet (or 2 ¼ teaspoons)
-
1 ½ cups warm water (105°F)
-
1 tablespoon olive oil or cooking spray (for greasing bowl)
Instructions
-
Step 1
Activate the yeast: In a small bowl or measuring cup, combine 1 ½ cups warm water (105°F-115°F) with the yeast packet. Let sit for 5-10 minutes until foamy. -
Step 2
Combine wet and dry ingredients: Pour the activated yeast mixture into a large mixing bowl. Add the flour and salt. Mix with a spoon or dough whisk until just combined and shaggy. -
Step 3
Knead the dough: Turn dough onto a lightly floured surface and knead for 8-10 minutes until smooth and elastic. Perform the windowpane test. -
Step 4
First rise: Place dough in a lightly oiled bowl, cover tightly, and let rise in a warm spot for 1 to 1 ½ hours, or until doubled in size. -
Step 5
Punch down and shape: Gently punch down the dough. Shape into a round boule or rustic oval on a lightly floured surface. Place on a parchment-lined baking sheet or proofing basket. -
Step 6
Second rise (proofing): Cover the shaped dough loosely and let rise for 30-45 minutes, or until puffy (50-75% increase). Preheat oven to 450°F (230°C) during this time. -
Step 7
Bake: Score the top of the dough if desired. Bake for 30-35 minutes, or until golden brown and the internal temperature reaches 200-210°F.
Important Information
Nutrition Facts (Per Serving)
It is important to consider this information as approximate and not to use it as definitive health advice.
Allergy Information
Please check ingredients for potential allergens and consult a health professional if in doubt.