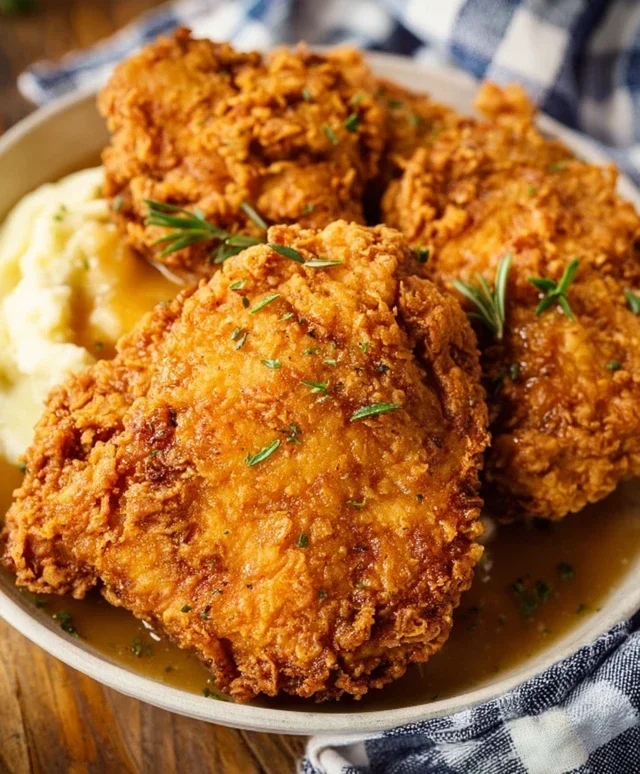
Crispy Country Fried Chicken Recipe- Best Southern Style
Country fried chicken is more than just a meal; it’s a warm hug from a Southern grandmother, a nostalgic trip back to simpler times, and a guaranteed crowd-pleaser. There’s something undeniably magical about that golden, crispy exterior yielding to incredibly juicy, tender chicken within. People adore country fried chicken for its comforting familiarity and its glorious textural contrast – the satisfying crunch followed by that melt-in-your-mouth deliciousness. What truly makes this dish special is the love and soul poured into its preparation. It’s not just about the ingredients, but the careful layering of flavors, the perfect seasoned flour dredge, and the precise cooking technique that elevates it from ordinary to extraordinary. Get ready to recreate that iconic, mouthwatering experience in your own kitchen.
Country Fried Chicken
There’s something undeniably comforting about a plate piled high with crispy, golden-brown country fried chicken. It’s a dish that evokes memories of family gatherings, Sunday dinners, and the simple joy of a perfectly cooked meal. While it might seem intimidating to achieve that restaurant-quality crunch at home, I’m here to tell you it’s entirely possible with a few key techniques and the right ingredients. Forget dry, bland chicken; this recipe will deliver tender, juicy meat enveloped in a flavorful, shatteringly crisp coating. Let’s dive into making some of the best country fried chicken you’ve ever tasted.
Ingredients:
Getting Started: Preparing the Chicken
The first step to amazing country fried chicken is properly prepping your chicken. You’ll want to cut each boneless, skinless chicken breast into roughly 2-inch pieces. This ensures more even cooking and gives you those perfect bite-sized morsels. Place these chicken pieces in a medium bowl. Pour the buttermilk over the chicken, ensuring all pieces are submerged. The buttermilk is crucial here; its acidity helps to tenderize the chicken, making it incredibly juicy and moist. Cover the bowl and refrigerate for at least 30 minutes, or ideally for up to 4 hours. The longer it marinates, the more tender and flavorful your chicken will become. While the chicken is in its buttermilk bath, you can get started on preparing your dredgin extractg station.
The Dredgin extractg Station: Building the Crispy Coating
In a separate shallow dish or pie plate, combine the all-purpose flour, breadcrum extractbs, seasoned salt, paprika, cayenne pepper, and black pepper. Whisk these dry ingredients together thoroughly to ensure the seasonings are evenly distributed. This blend of flour and breadcrum extractbs will create that signature crispy crust. In another shallow dish, whisk together the two large eggs. This egg wash will act as a binder, helping the flour mixture adhere to the chicken.
The Dredgin extractg Process: Layering for Perfection
Now it’s time to get our chicken ready for its crispy coating. Remove the chicken pieces from the buttermilk, letting any excess drip off. Don’t wipe them dry; the residual buttermilk helps the flour stick. First, dip each piece of chicken into the whisked eggs, coating it completely. Let any excess egg drip back into the dish. Immediately transfer the egg-coated chicken to the flour mixture. Press the chicken into the flour, ensuring it’s fully coated on all sides. For an extra thick and crispy crust, you can double-dip. After coating it in the flour, dip it back into the egg wash, and then into the flour mixture again. This creates a more robust, craggy coating that fries up beautifully. Place the breaded chicken pieces on a wire rack set over a baking sheet as you work. This allows air to circulate and prevents the bottom of the chicken from getting soggy before it hits the fryer.
Frying to Golden Perfection
Heat the vegetable oil in a large, heavy-bottomed skillet or Dutch oven over medium-high heat until it reaches about 350°F (175°C). A good test is to drop a tiny pinch of flour into the oil; if it sizzles immediately, the oil is ready. Carefully add the chicken pieces to the hot oil, being careful not to overcrowd the pan. Overcrowding will lower the oil temperature and result in greasy, soggy chicken. Fry the chicken in batches, for about 5-7 minutes per side, or until it’s a deep golden brown and cooked through. The internal temperature of the chicken should reach 165°F (74°C). You can use a meat thermometer to check for doneness. As each batch finishes, remove the chicken from the skillet with a slotted spoon and place it on a clean wire rack set over a baking sheet to drain any excess oil. This step is crucial for maintaining that wonderful crispiness.
Serving Your Masterpiece
Once all your chicken is fried to perfection, let it rest for a few minutes before serving. This allows the juices to redistribute, ensuring each bite is incredibly tender and moist. Country fried chicken is a versatile dish that pairs wonderfully with a variety of classic Southern sides. Think creamy mashed potatoes, a crisp coleslaw, fluffy biscuits, or a hearty green bean casserole. The contrast between the tender, juicy chicken and the crunchy, flavorful coating is simply divine. Enjoy the fruits of your labor – you’ve just created a truly spectacular plate of country fried chicken!
Notes on Buttermilk Substitutions: If you don’t have buttermilk on hand, you can easily make your own substitute. For every cup of buttermilk required, combine 1 cup of milk with 1 tablespoon of white vinegar or lemon juice. Let it sit for 5-10 minutes until it thickens slightly. This will give you a similar tenderizing effect.

Conclusion:
And there you have it – your guide to achieving that perfect, crispy, flavorful country fried chicken! This recipe truly delivers on all fronts: a golden-brown, shatteringly crisp exterior that gives way to unbelievably juicy, tender chicken inside. It’s a classic for a reason, offering comfort and pure deliciousness with every bite. I’ve found it’s a dish that always brings smiles to the table, perfect for a Sunday dinner, a special occasion, or even just a weeknight treat when you need a little something extra special.
This versatile dish pairs beautifully with so many sides. Think creamy mashed potatoes, a crisp coleslaw, sweet baked beans, or even some simple buttered corn. For a bit of a twist, try serving it with a spicy honey drizzle or a tangy barbecue sauce. Don’t be afraid to experiment with different herbs in your flour dredge – paprika, garlic powder, or even a pinch of cayenne can add a wonderful depth of flavor. I genuinely encourage you to give this country fried chicken recipe a try. I’m confident you’ll love it as much as I do!
Frequently Asked Questions:
What is the best oil to use for frying country fried chicken?
For that signature crispiness, a neutral oil with a high smoke point is ideal. Vegetable oil, canola oil, or peanut oil are excellent choices. They heat evenly and allow the chicken to fry to a beautiful golden brown without burning.
How can I ensure my chicken is cooked through without burning the coating?
The key is to manage your oil temperature. Aim for a consistent temperature between 325°F and 350°F (160°C to 175°C). If the oil is too hot, the coating will burn before the chicken cooks. If it’s too cool, the chicken will absorb too much oil and become greasy. Using a thermometer is highly recommended for accuracy.
Can I make country fried chicken ahead of time?
While best enjoyed fresh and hot, you can partially prepare some elements in advance. You can dredge the chicken and refrigerate it for up to a few hours before frying. However, for the ultimate crispiness, frying it just before serving is always the best approach.
Country Fried Chicken
A classic, crispy, and flavorful country-style fried chicken recipe.
Ingredients
-
4 boneless skinless chicken breasts
-
2 cups buttermilk
-
2 large eggs (whisked)
-
1 ½ cup all-purpose flour
-
½ cup breadcrumbs (plain or Italian)
-
2 ½ teaspoons seasoned salt
-
¾ teaspoon paprika
-
½ teaspoon cayenne pepper
-
1 ½ teaspoon black pepper
-
3 teaspoons salt
Instructions
-
Step 1
In a shallow dish, combine the flour, breadcrumbs, seasoned salt, paprika, cayenne pepper, black pepper, and 3 teaspoons of salt. Mix well. -
Step 2
In another shallow dish, whisk together the buttermilk and eggs. -
Step 3
Dredge each chicken breast in the flour mixture, ensuring it is fully coated. Shake off excess. -
Step 4
Dip the coated chicken breast into the buttermilk and egg mixture, allowing excess to drip off. -
Step 5
Dredge the chicken breast again in the flour mixture for a second coating. Place on a plate and let sit for 5-10 minutes. -
Step 6
Heat the vegetable oil in a large skillet over medium-high heat until it reaches 350°F (175°C). -
Step 7
Carefully place the coated chicken breasts into the hot oil, making sure not to overcrowd the pan. Fry for about 7-8 minutes per side, or until golden brown and cooked through. -
Step 8
Remove chicken from skillet and drain on a wire rack set over paper towels.
Important Information
Nutrition Facts (Per Serving)
It is important to consider this information as approximate and not to use it as definitive health advice.
Allergy Information
Please check ingredients for potential allergens and consult a health professional if in doubt.