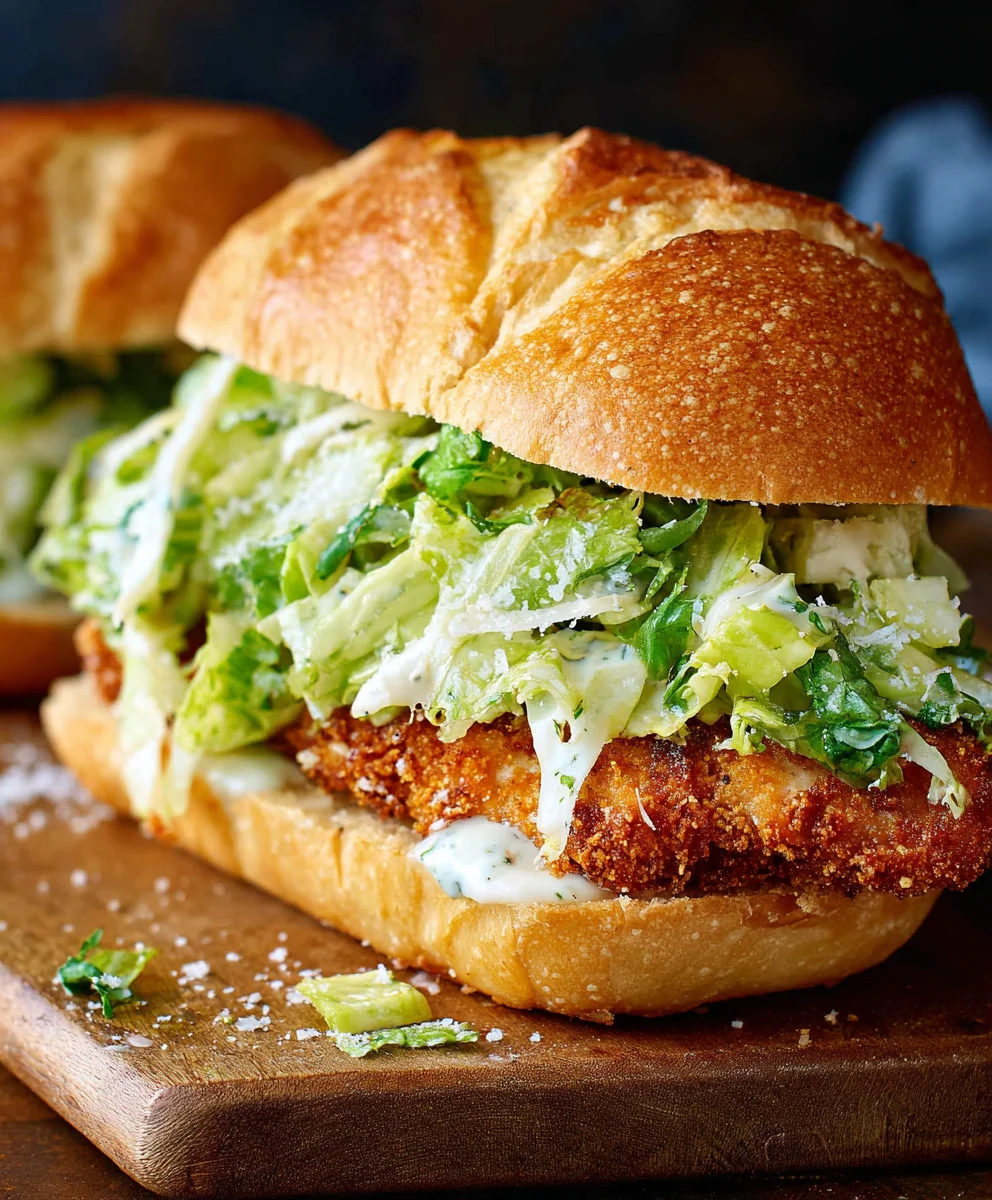
Crispy Chicken Caesar Sandwich Recipe-Quick & Easy
Crispy Chicken Caesar Sandwich recipes are a true delight, offering a familiar yet elevated take on a beloved classic. Who doesn’t adore the satisfying crunch of perfectly fried chicken nestled between soft buns, all brought together by that iconic creamy Caesar dressing? This isn’t just another sandwich; it’s a flavor explosion waiting to happen. What truly sets a superior Crispy Chicken Caesar Sandwich apart is the balance: the tender, juicy chicken with its golden-brown, shatteringly crisp exterior, the bright and tangy Caesar dressing that coats everything with herbaceous goodness, and the fresh crunch of romaine lettuce. It’s the kind of meal that transforms a simple lunch into a moment of pure indulgence, making it a go-to for busy weeknights or weekend gatherings where you want to impress without fuss.
Ingredients:
- ½ cup full-fat mayonnaise
- 3 tbsp Greek yogurt
- 1 tsp Dijon mustard
- 1 tsp Worcestershire sauce
- 2 tbsp lemon juice
- ¼ cup Parmesan cheese (freshly grated)
- 1-2 garlic cloves (minced)
- ¼ tsp black pepper
- Pinch sea salt
- 5 chicken cutlets (see note 1)
- Sea salt (to taste)
- Ground black pepper (to taste)
- Oil (for frying)
- ⅓ cup all-purpose flour
- ½ tsp salt (for flour mixture)
Preparing the Components
Caesar Dressing Creation
This is where the magic of the Caesar dressing begin extracts. In a medium bowl, combine the full-fat mayonnaise and the Greek yogurt. Using a whisk, blend these two creamy bases together until they are smooth and well incorporated. The Greek yogurt helps to lighten the dressing while still providing that essential rich texture. Next, add the Dijon mustard and the Worcestershire sauce. These two ingredients are crucial for delivering that signature tangy and umami flavor profile. Stir them in thoroughly. Now, it’s time for the bright citrus notes. Add the fresh lemon juice and mix it in. The lemon juice not only adds acidity but also helps to balance the richness of the mayonnaise. For that classic Caesar flavor, finely mince your garlic cloves and add them to the bowl. Follow this with the ¼ teaspoon of black pepper and a pinch of sea salt. Whisk everything together vigorously until the dressing is uniform in color and consistency. Finally, stir in the freshly grated Parmesan cheese. This will not only add another layer of savory, nutty flavor but also give the dressing a lovely texture. Taste the dressing and adjust the salt and pepper if needed. Once you’re happy with the flavor, cover the bowl and refrigerate it while you prepare the chicken. Allowing the dressing to chill will help the flavors meld beautifully.
Chicken Preparation and Coating
Now let’s get our chicken ready for its transformation into crispy perfection. Take your 5 chicken cutlets and pat them completely dry with paper towels. This step is vital for achieving a truly crispy exterior, as any excess moisture will steam the chicken rather than fry it. Season both sides of each chicken cutlet generously with sea salt and ground black pepper to taste. Don’t be shy with the seasoning; this is your chance to build flavor from the inside out. In a shallow dish or a large plate, place the ⅓ cup of all-purpose flour. Add the ½ teaspoon of salt to the flour and whisk them together. This seasoned flour is the base for our crispy coating. Dredge each seasoned chicken cutlet in the flour mixture, ensuring it is evenly coated on all sides. Gently shake off any excess flour. This light coating will help the other layers adhere better and contribute to the overall crispiness.
Frying the Chicken for Ultimate Crispiness
Achieving Golden-Brown Perfection
It’s time to bring on the heat and fry our chicken cutlets! In a large, heavy-bottomed skillet, pour in enough oil to reach about ½ inch depth. Heat the oil over medium-high heat. You can test if the oil is ready by dropping a tiny pinch of flour into it. If it sizzles immediately and floats to the surface, your oil is at the perfect frying temperature (around 350°F or 175°C). Carefully place 2-3 chicken cutlets into the hot oil, being careful not to overcrowd the pan. Overcrowding will lower the oil temperature and result in soggy, unevenly cooked chicken. Fry the chicken for approximately 4-6 minutes per side, or until it’s deeply golden brown and cooked through. The internal temperature of the chicken should reach 165°F (74°C). Use tongs to carefully turn the chicken cutlets, ensuring they crisp up evenly on both sides. This attentive turning is key to a superior crunch.
Draining and Resting for Maximum Crunch
Once your chicken cutlets are beautifully golden brown and cooked through, it’s time to get them ready for their final resting place. Using your tongs, carefully remove the fried chicken from the hot oil. Transfer the cooked cutlets to a wire rack set over a baking sheet. This is a crucial step for maintaining crispiness. Placing them directly on paper towels can trap steam and make the coating soggy. The wire rack allows air to circulate around the chicken, preserving that desirable crunch. Let the chicken rest on the wire rack for at least 5 minutes. This resting period allows the juices to redistribute within the chicken, ensuring it remains moist and tender, while also allowing the exterior to continue to crisp up as it cools slightly.
Assembling Your Masterpiece
Building the Perfect Sandwich
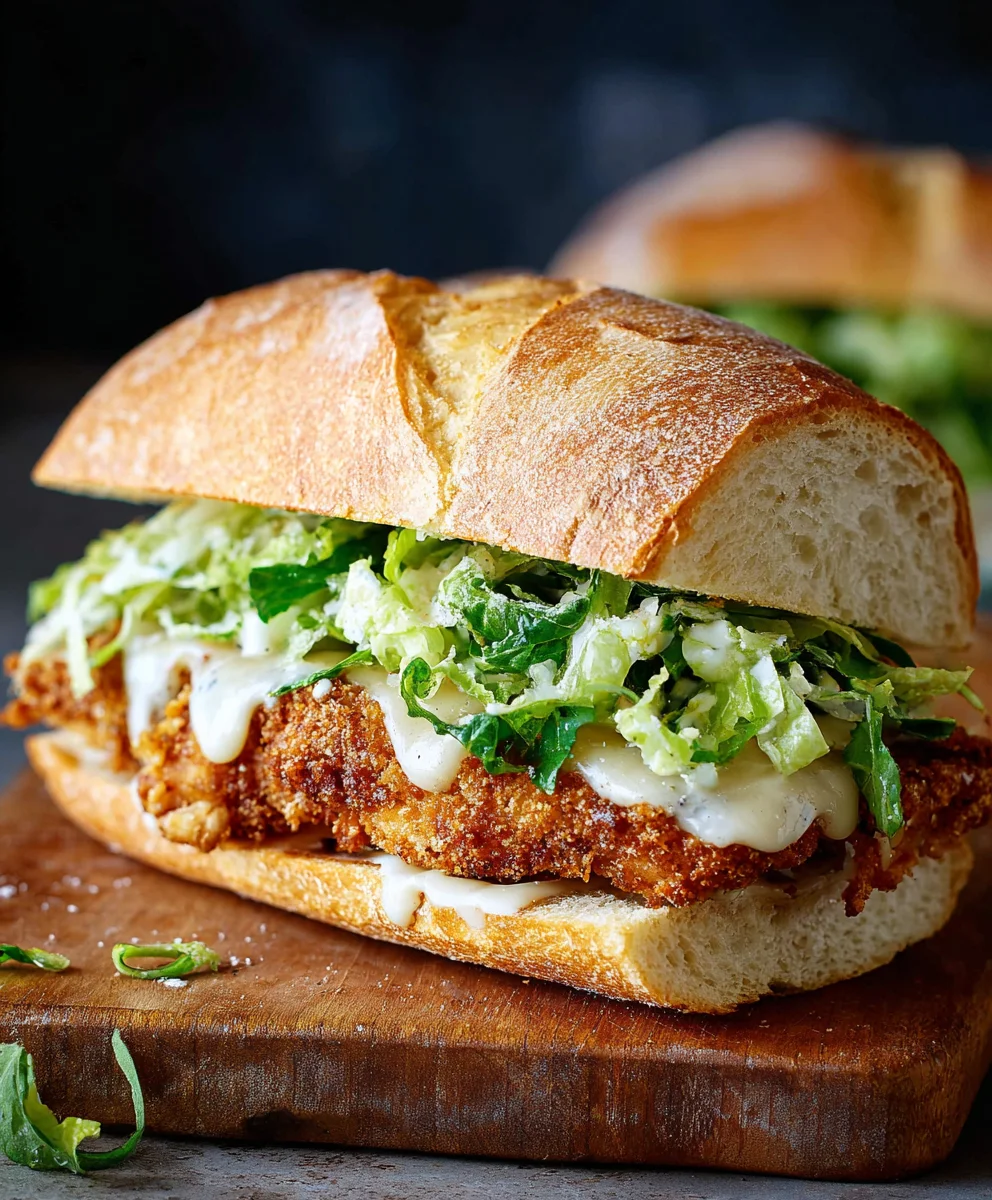
With our perfectly crisp chicken and creamy Caesar dressing ready, it’s time for the grand finnon-alcoholic ale: assembling the Crispy Chicken Caesar Sandwich. Take your favorite sandwich rolls or buns. Lightly toast them if desired for an extra layer of texture. Spread a generous amount of the prepared Caesar dressing on both the bottom and top halves of each bun. You want that delicious dressing to permeate the bread slightly. Place a crispy, golden-brown chicken cutlet on the bottom half of each bun. Don’t be afraid to really lay it on there! For an extra touch of freshness and flavor, you can add some crisp romaine lettuce leaves on top of the chicken. If you like a little extra bite, you can also add some shaved Parmesan cheese over the lettuce. Finally, cap off your creation with the top half of the bun. Press down gently to secure everything in place. Repeat this process for all your sandwiches.
Conclusion:
There you have it! A step-by-step guide to creating the ultimate Crispy Chicken Caesar Sandwich. We’ve covered everything from perfectly seasoned chicken to achieving that delightful crunch, all topped with a zesty, creamy Caesar dressing and fresh Parmesan. This sandwich is more than just a meal; it’s an experience, a satisfying blend of textures and classic flavors that are sure to become a household favorite.
To elevate your Crispy Chicken Caesar Sandwich even further, consider serving it alongside a light coleslaw or some seasoned sweet potato fries for a complete and delicious meal. The beauty of this recipe also lies in its versatility. Feel free to adjust the spice level of the chicken coating to your liking, or experiment with different types of lettuce if you’re feeling adventurous. Don’t be afraid to get creative and make it your own!
We truly hope you enjoy making and devouring this fantastic Crispy Chicken Caesar Sandwich. Happy cooking, and may your sandwiches always be perfectly crispy!
Frequently Asked Questions:
Can I make the chicken ahead of time?
Yes! You can bread and cook the chicken for your Crispy Chicken Caesar Sandwich a day in advance. Once cooled, store it in an airtight container in the refrigerator. Reheat it briefly in a toaster oven or air fryer to regain its crispiness before assembling your sandwich.
What if I don’t have all the ingredients for the Caesar dressing?
Don’t worry! If you’re missing a key ingredient like anchovy paste, you can omit it or substitute it with a tiny bit of Worcestershire sauce for a similar umami flavor. You can also use a good quality store-bought Caesar dressing if time is a constraint, though homemade is always special for your Crispy Chicken Caesar Sandwich.
Crispy Chicken Caesar Sandwich
A quick and easy recipe for a delicious crispy chicken Caesar sandwich featuring homemade Caesar dressing.
Ingredients
-
½ cup full-fat mayonnaise
-
3 tbsp Greek yogurt
-
1 tsp Dijon mustard
-
1 tsp Worcestershire sauce
-
2 tbsp lemon juice
-
¼ cup Parmesan cheese (freshly grated)
-
1-2 garlic cloves (minced)
-
¼ tsp black pepper
-
Pinch sea salt
-
5 chicken cutlets
-
Sea salt (to taste)
-
Ground black pepper (to taste)
-
Oil (for frying)
-
⅓ cup all-purpose flour
-
½ tsp salt
Instructions
-
Step 1
To make the Caesar dressing, combine mayonnaise and Greek yogurt in a bowl. Whisk until smooth. Add Dijon mustard, Worcestershire sauce, lemon juice, minced garlic, ¼ tsp black pepper, and a pinch of sea salt. Whisk until uniform, then stir in grated Parmesan cheese. Taste and adjust seasoning if needed. Cover and refrigerate. -
Step 2
Pat the chicken cutlets dry with paper towels. Season both sides generously with sea salt and ground black pepper. -
Step 3
In a shallow dish, combine all-purpose flour with ½ tsp salt. Dredge each chicken cutlet in the seasoned flour, shaking off excess. -
Step 4
Heat about ½ inch of oil in a large skillet over medium-high heat until it reaches 350°F (175°C). Carefully add 2-3 chicken cutlets at a time, ensuring not to overcrowd the pan. Fry for 4-6 minutes per side until golden brown and cooked through (internal temperature 165°F or 74°C). -
Step 5
Remove fried chicken from oil and place on a wire rack set over a baking sheet to drain and maintain crispiness. Let rest for at least 5 minutes. -
Step 6
Assemble the sandwiches: Spread Caesar dressing on the bottom and top halves of sandwich rolls. Place a crispy chicken cutlet on the bottom half. Add romaine lettuce and shaved Parmesan if desired. Top with the other half of the bun.
Important Information
Nutrition Facts (Per Serving)
It is important to consider this information as approximate and not to use it as definitive health advice.
Allergy Information
Please check ingredients for potential allergens and consult a health professional if in doubt.