Coquette Party – Dreamy Pink Blue Dessert Ideas
Dreamy Pink & Blue Coquette Party dishes are more than just a meal; they’re an invitation to a whimsical wonderland. Imagin extracte a celebration bathed in soft pastels, where every bite transports you to a world of playful elegance. That’s precisely the magic this theme evokes, and our recipes are designed to capture that enchanting spirit. People adore the Dreamy Pink & Blue Coquette Party because it taps into a delightful aesthetic that’s both charmingly retro and undeniably chic. It’s perfect for birthdays, baby showers, or any occasion that calls for a touch of sweet sophistication. What truly sets this coquette party apart is the delightful harmony of colors and flavors, creating an unforgettable sensory experience that’s as beautiful to behold as it is delicious to taste. Get ready to host an event that’s utterly enchanting!
Ingredients:
- 2 cups all-purpose flour
- 1 teaspoon baking powder
- 1/2 teaspoon salt
- 1 cup unsalted butter, softened
- 1 1/2 cups granulated sugar
- 2 large eggs
- 1 teaspoon vanilla extract
- 1/4 cup milk
- Pink gel food coloring
- Blue gel food coloring
- 1 cup powdered sugar
- 2-3 tablespoons milk or water
- Sprinkles (optional, for decoration)
For the Dreamy Pink Dough
Step 1: Prepare the Base Dough
First, in a medium bowl, whisk together the all-purpose flour, baking powder, and salt. This dry mixture forms the foundation of our cookies, ensuring they have a good structure and a pleasant texture. Set this aside for now.
Step 2: Cream the Butter and Sugar
In a large bowl, using an electric mixer or a sturdy whisk, cream together the softened unsalted butter and granulated sugar until the mixture is light, fluffy, and pnon-alcoholic ale in color. This process, known as creaming, incorporates air into the dough, which is crucial for achieving tender cookies. Aim for about 3-5 minutes of vigorous mixing.
Step 3: Add Wet Ingredients and Divide the Dough
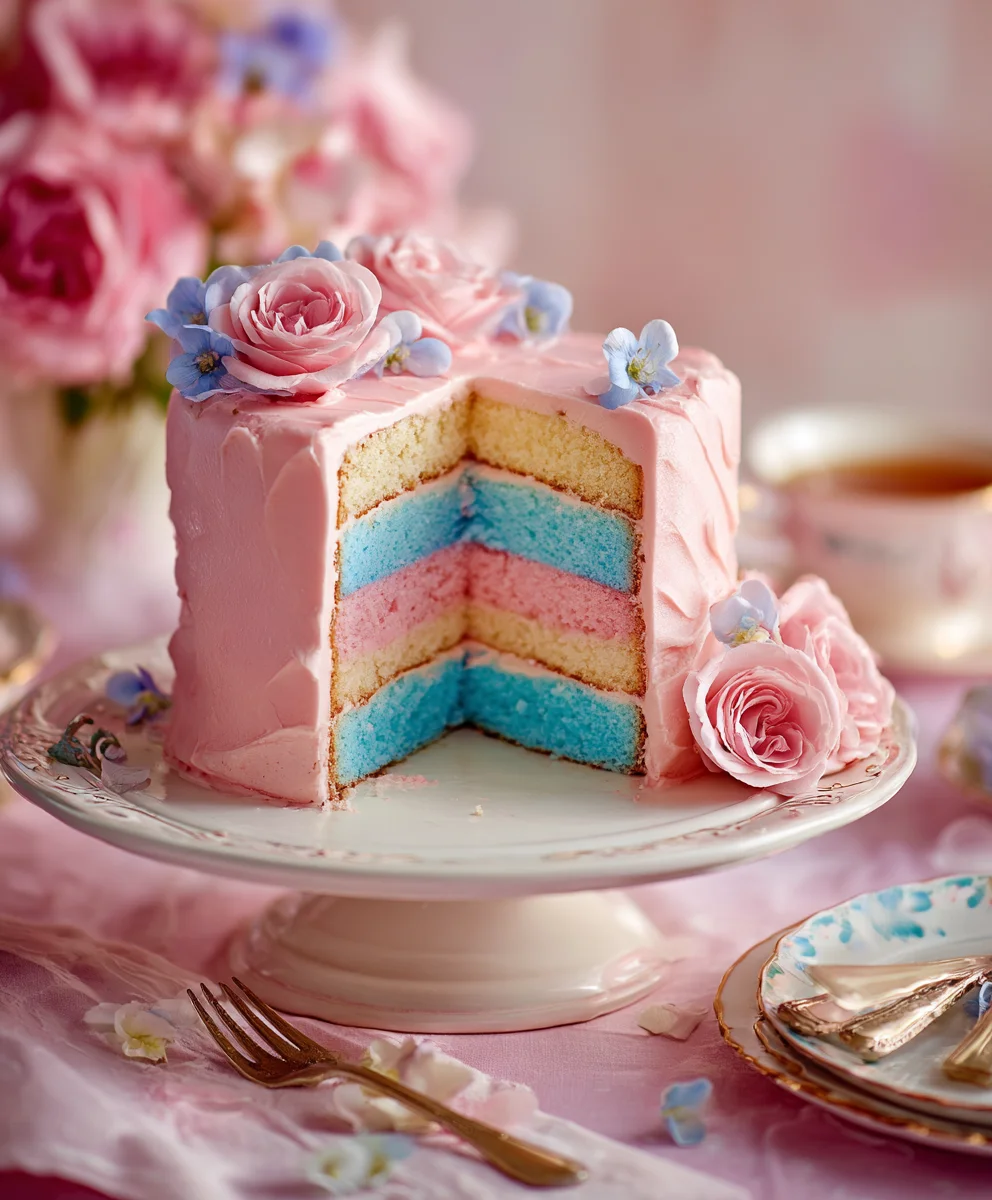
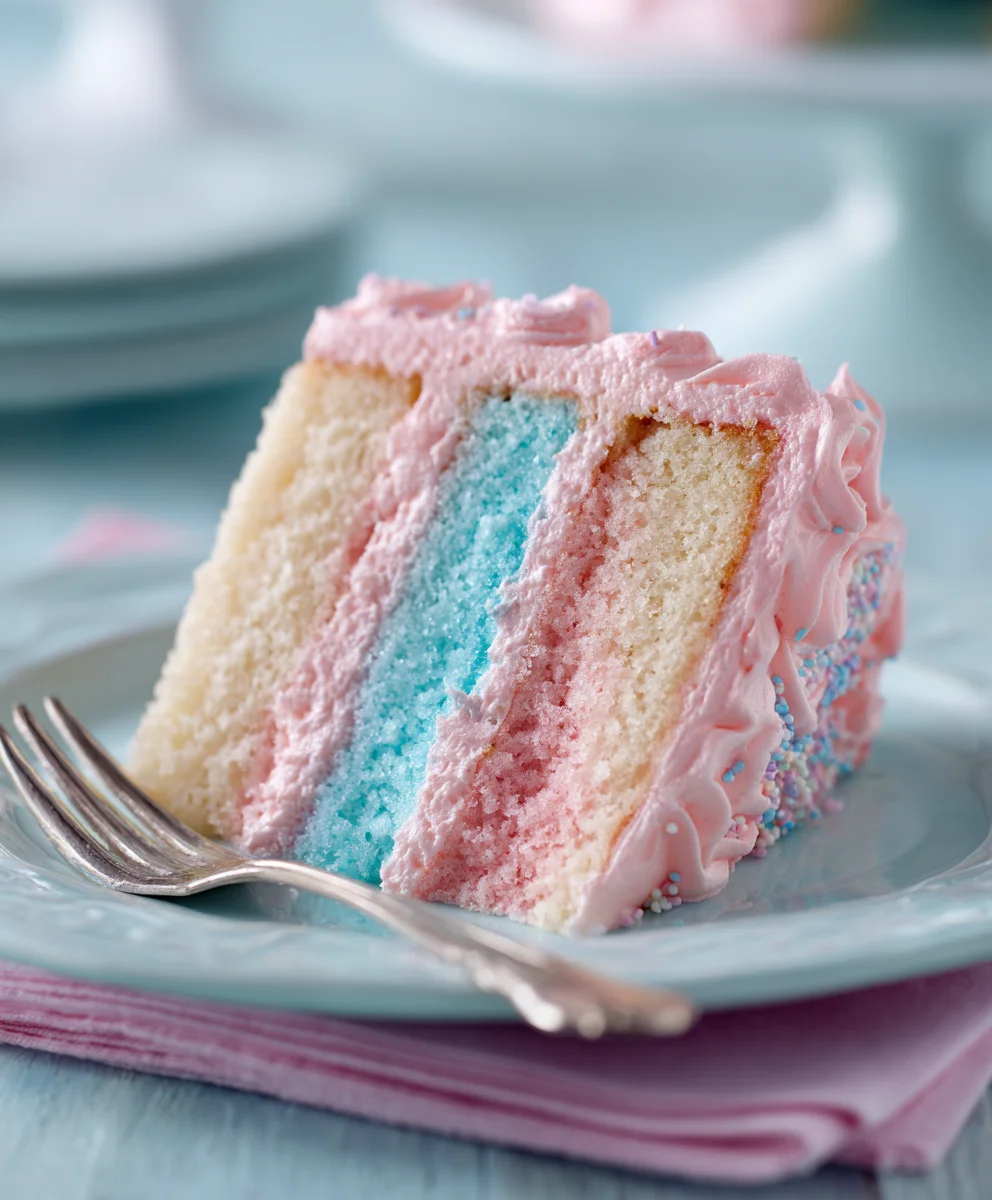
Next, beat in the two large eggs, one at a time, making sure each egg is fully incorporated before adding the next. Stir in the vanilla extract. Now, gradually add the dry ingredients to the wet ingredients, mixing on low speed until just combined. Be careful not to overmix, as this can lead to tough cookies. Stir in the 1/4 cup of milk. Once the dough has come together, divide it into two equal portions. To one portion, add a generous amount of pink gel food coloring. Knead the color in gently until you achieve a uniform, dreamy pink hue. To the second portion of dough, add a good amount of blue gel food coloring and knead until a lovely, consistent blue color is achieved. If the dough becomes too sticky at this point, you can add a tablespoon of flour at a time, but do so sparingly.
For the Blue Swirls and Assembly
Step 4: Shape and Chill the Dough
On a lightly floured surface, gently pat out each colored dough portion into a rough rectangle. You don’t need them to be perfectly shaped yet. Place each colored rectangle onto a piece of parchment paper. Now, carefully lay the blue dough rectangle on top of the pink dough rectangle (or vice versa – it’s your artistic choice!). Gently press them together. Starting from one of the longer sides, carefully roll up the combined dough like a jelly roll or Swiss roll. Ensure the roll is firm but not so tight that it squeezes the colors out. Once rolled, wrap the dough log tightly in plastic wrap and refrigerate for at least 1 hour. This chilling step is essential for firming up the dough, making it much easier to slice evenly and preventing the colors from bleeding too much during baking.
Step 5: Slice and Bake Your Dreamy Cookies
Preheat your oven to 350°F (175°C). Line baking sheets with parchment paper. Once the dough is well-chilled and firm, unwrap the log. Using a sharp knife, slice the dough into rounds about 1/4 inch thick. These are your individual cookies. Place the sliced cookies onto the prepared baking sheets, leaving about 2 inches of space between them as they will spread slightly. Bake for 10-12 minutes, or until the edges are lightly golden. The centers should still look slightly soft. Allow the cookies to cool on the baking sheets for 5 minutes before transferring them to a wire rack to cool completely. Patience here is key; warm cookies are fragile and can break easily.
For the Finishing Touches
Step 6: Prepare the Coquette Glaze and Decorate
While the cookies are cooling, prepare the glaze. In a small bowl, whisk together the powdered sugar and 2 tablespoons of milk or water until smooth. You’re looking for a thick but pourable consistency. If it’s too thick, add a tiny bit more liquid; if it’s too thin, add a little more powdered sugar. You can leave this glaze white, or divide it into small bowls and tint it with the leftover pink or blue food coloring to create complementary colors for drizzling. Once the cookies are completely cool, dip the tops into the glaze, or use a spoon to drizzle it artfully over each cookie. If you’re feeling extra coquette, sprinkle them with edible glitter or dainty sprinkles while the glaze is still wet. Let the glaze set completely before serving. These cookies are perfect for a Dreamy Pink & Blue Coquette Party, adding a touch of whimsical elegance to your celebration.
Conclusion:
There you have it! The Dreamy Pink & Blue Coquette Party is more than just a recipe; it’s an invitation to sprinkle a little magic onto any celebration. We’ve walked through creating these visually stunning and delightfully delicious treats, perfect for birthdays, baby showers, or simply a whimsical afternoon tea. Remember, the key is in the playful presentation and the balance of sweet and subtle flavors. Don’t be afraid to get creative with your decorations – think edible glitter, delicate piping, and a generous dusting of powdered sugar.
These delights are wonderfully versatile. Serve them as a standalone dessert, alongside a refreshing berry spritzer, or as part of a larger dessert spread. For variations, consider infusing the batter with a hint of rosewater for an extra floral note, or swirl in some raspberry puree for a deeper pink hue. You can also experiment with different shades of blue and pink food coloring to achieve your desired aesthetic. Most importantly, have fun with it! Baking should be an enjoyable and rewarding experience. We can’t wait to see your own beautiful creations!
Frequently Asked Questions:
Q: Can I make the Dreamy Pink & Blue Coquette Party ahead of time?
A: Absolutely! The components of the Dreamy Pink & Blue Coquette Party can be prepared a day in advance. Store any baked elements in an airtight container at room temperature. Frosting can also be made ahead and stored in the refrigerator; just let it soften slightly before use.
Q: My colors aren’t as vibrant as the pictures. What am I doing wrong?
A: For the most vibrant colors, it’s best to use gel food coloring rather than liquid. Gel colors are more concentrated and will give you a richer hue without altering the texture of your batter or frosting. Start with a small amount and add more gradually until you achieve your desired shade.
Coquette Party – Dreamy Pink Blue Dessert Ideas
Whimsical pink and blue swirl cookies perfect for a coquette-themed party, featuring a tender cookie base and a sweet glaze.
Ingredients
-
2 cups all-purpose flour
-
1 teaspoon baking powder
-
1/2 teaspoon salt
-
1 cup unsalted butter, softened
-
1 1/2 cups granulated sugar
-
2 large eggs
-
1 teaspoon vanilla extract
-
1/4 cup milk
-
Pink gel food coloring
-
Blue gel food coloring
-
1 cup powdered sugar
-
2-3 tablespoons milk or water
-
Sprinkles (optional, for decoration)
Instructions
-
Step 1
In a medium bowl, whisk together the all-purpose flour, baking powder, and salt. Set aside. -
Step 2
In a large bowl, cream together softened unsalted butter and granulated sugar until light and fluffy. Beat in eggs one at a time, then vanilla extract. -
Step 3
Gradually add dry ingredients to wet ingredients, mixing until just combined. Stir in milk. Divide dough in half. Tint one half pink and the other blue with gel food coloring. -
Step 4
On a floured surface, pat out each colored dough into a rough rectangle. Layer them and roll up tightly like a jelly roll. Wrap in plastic wrap and chill for at least 1 hour. -
Step 5
Preheat oven to 350°F (175°C). Slice chilled dough log into 1/4-inch thick rounds. Place on lined baking sheets and bake for 10-12 minutes, until edges are lightly golden. -
Step 6
Cool cookies on baking sheets for 5 minutes, then transfer to a wire rack to cool completely. -
Step 7
Prepare glaze by whisking powdered sugar with 2-3 tablespoons of milk or water until smooth and pourable. Tint if desired. Dip or drizzle glaze over cooled cookies. Decorate with sprinkles if using, while glaze is wet. Let glaze set.
Important Information
Nutrition Facts (Per Serving)
It is important to consider this information as approximate and not to use it as definitive health advice.
Allergy Information
Please check ingredients for potential allergens and consult a health professional if in doubt.