Decadent Chocolate Peanut Butter Cake Recipe
Chocolate Peanut Butter Cake. Oh, where do I even begin extract with this masterpiece? For many of us, it’s more than just a dessert; it’s a trip down memory lane, a comforting embrace, a moment of pure, unadulterated joy. The rich, decadent depth of chocolate, perfectly complemented by the creamy, slightly salty allure of peanut butter, creates a flavor combination that’s practically legendary. It’s the kind of dessert that makes you close your eyes with every bite, savoring the velvety crum extractb and the divine swirl of flavors. What makes this particular Chocolate Peanut Butter Cake so special? It’s that irresistible balance – not too sweet, not too heavy, but just right, with a moist texture that’s absolutely divine. Get ready to fall in love all over again with this classic treat that never fails to impress.
Chocolate Peanut Butter Cake
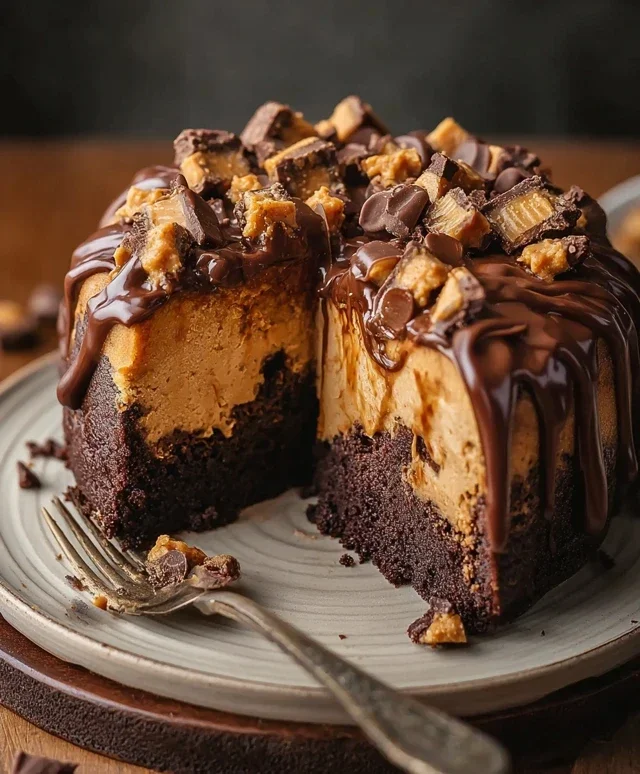
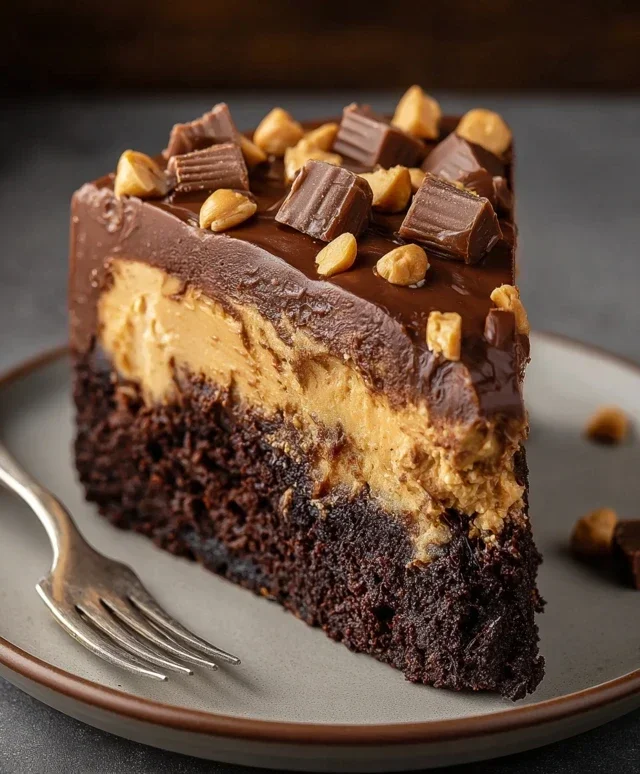
Get ready to experience pure bliss with this decadent Chocolate Peanut Butter Cake. This isn’t just any cake; it’s a symphony of rich chocolate and creamy peanut butter, all brought together in a delightful dessert that’s sure to impress. The base, a delightful Oreo crum extractb crust, provides a perfect foundation for the luscious peanut butter cheesecake filling. Topped with a smooth chocolate ganache and finished with a scattering of chopped Reese’s Cups and roasted peanuts, every bite is an explosion of flavor and texture. This cake is perfect for birthdays, holidays, or simply when you need a serious chocolate and peanut butter fix. Let’s get started on creating this masterpiece!
Ingredients:
Preparing the Oreo Crust
The foundation of our magnificent cake begin extracts with a simple yet incredibly satisfying Oreo crum extractb crust. To achieve this, you’ll want to pulverize your Oreos into fine crum extractbs. A food processor works wonderfully for this, but if you don’t have one, you can place the Oreos in a sturdy plastic bag and crush them with a rolling pin. The goal is to have no large chunks remaining. Once your Oreos are finely crum extractbled, transfer them to a medium bowl. Pour the melted unsalted butter over the crum extractbs and mix until they are evenly moistened, resembling wet sand. This butter will act as the binder, holding everything together.
Next, we’ll press this mixture into the bottom of a 9-inch springform pan. A springform pan is essential here because it allows for easy removal of the cake without damagin extractg its delicate structure. Use the bottom of a measuring cup or the back of a spoon to firmly press the crum extractbs evenly across the bottom of the pan, creating a compact layer. You can also press a little bit up the sides of the pan if you prefer a more defined crust edge. Once pressed, place the springform pan in the freezer for about 15-20 minutes. This chilling step helps the crust firm up before we pour in the filling, ensuring it holds its shape beautifully.
Creating the Peanut Butter Cheesecake Filling
Now for the star of the show: the creamy, dreamy peanut butter cheesecake filling! Ensure your cream cheese is truly softened; this is crucial for a smooth and lump-free filling. You can leave it at room temperature for about an hour or two, or if you’re in a hurry, you can cut it into smaller cubes and let it soften faster. In a large mixing bowl, beat the softened cream cheese with an electric mixer on medium speed until it’s completely smooth and creamy. Scrape down the sides of the bowl occasionally to make sure all the cream cheese is incorporated.
Gradually add the sugar to the cream cheese, beating until well combined and the mixture is light and fluffy. This might take a couple of minutes. Next, add the large eggs one at a time, beating well after each addition. It’s important not to overmix once the eggs are added, as this can incorporate too much air, which can lead to cracking during baking. Following the eggs, beat in the smooth peanut butter and vanilla extract until everything is just combined and the batter is uniform in color and consistency. Finally, gently stir in the 1/3 cup of heavy cream. This adds a lovely richness and helps achieve that perfect cheesecake texture.
Baking the Cheesecake
Pour the luscious peanut butter filling over the chilled Oreo crust in the springform pan. Smooth the top with a spatula to ensure an even surface. Now, we’re going to bake this masterpiece using a water bath, also known as a bain-marie. This technique is key to achieving a perfectly creamy, evenly baked cheesecake that is less prone to cracking. To set up a water bath, wrap the outside of your springform pan tightly with several layers of heavy-duty aluminum foil. This prevents any water from seeping into the pan during baking.
Place the foil-wrapped springform pan inside a larger baking pan, like a roasting pan. Carefully pour hot water into the larger pan, making sure the water level comes about halfway up the sides of the springform pan. This creates a humid environment in the oven, which helps the cheesecake cook gently and evenly. Carefully transfer the entire setup to a preheated oven at 325°F (160°C). Bake for approximately 60-75 minutes, or until the edges of the cheesecake are set, but the center still has a slight jiggle when the pan is gently shaken. It’s better to slightly underbake than overbake for the best texture.
Cooling and Chilling for Perfection
Once the baking time is complete, turn off the oven, but leave the cheesecake inside with the oven door slightly ajar for about an hour. This gradual cooling process helps prevent sudden temperature changes that can cause cracking. After an hour, carefully remove the springform pan from the water bath (be mindful of the hot water!). Remove the aluminum foil from the springform pan and let the cheesecake cool completely on a wire rack at room temperature. Once it has reached room temperature, cover the cheesecake tightly with plastic wrap and refrigerate it for at least 6 hours, or preferably overnight. This chilling period is crucial for the cheesecake to firm up and for the flavors to meld beautifully.
The Luscious Chocolate Ganache Topping
While the cheesecake is chilling, we can prepare the irresistible chocolate ganache. In a heatproof bowl, combine the 1 1/4 cups of miniature chocolate chips and the 1/2 cup of heavy cream. You can also use finely chopped milk chocolate if you prefer. Gently heat this mixture. You can do this by placing the bowl over a saucepan of simmering water (double boiler method), stirring constantly until the chocolate is melted and the ganache is smooth and glossy. Alternatively, you can microwave the chips and cream in 30-second intervals, stirring well between each interval, until melted and smooth. Be careful not to overheat the chocolate.
Once the ganache is smooth, let it cool slightly at room temperature. You want it to be pourable but not too hot when you apply it to the chilled cheesecake. Once the cheesecake has chilled sufficiently and is firm, carefully remove the sides of the springform pan. Pour the slightly cooled chocolate ganache over the top of the cheesecake, allowing it to drip down the sides naturally. Use an offset spatula to gently spread the ganache if needed, creating a beautiful, smooth chocolate layer.
Finishing Touches and Serving
This is where we add the final, delightful touches that make this cake truly spectacular. While the chocolate ganache is still slightly soft, sprinkle generously with chopped Reese’s Cups and crushed roasted peanuts. The combination of the sweet and salty peanuts with the rich chocolate and creamy peanut butter is divine. The Reese’s Cups add little pockets of peanut butter and chocolate heaven.
Allow the ganache to set slightly before slicing and serving. A sharp knife, dipped in hot water and wiped dry between each cut, will give you the cleanest slices. Serve chilled, and prepare for rave reviews. This Chocolate Peanut Butter Cake is a showstopper that will have everyone asking for the recipe! Enjoy every decadent bite!
Conclusion:
And there you have it – the ultimate guide to creating a decadent Chocolate Peanut Butter Cake that’s sure to impress! This recipe strikes the perfect balance between rich, moist chocolate and the irresistible salty-sweet swirl of peanut butter. It’s a guaranteed crowd-pleaser, perfect for birthdays, celebrations, or simply when you need a serious chocolate fix. The combination is truly magical, making it a standout dessert that’s surprisingly achievable for home bakers.
For serving, I love this cake with a scoop of vanilla ice cream or a dollop of whipped cream. A drizzle of extra peanut butter or some chocolate shavings takes it to the next level. Looking to mix things up? Consider adding chopped peanut butter cups to the batter for an extra burst of flavor and texture, or swirl in some caramel sauce for a triple threat of indulgence. Don’t be afraid to experiment and make this Chocolate Peanut Butter Cake your own!
I truly encourage you to give this recipe a try. You won’t regret diving into this delightful creation. Happy baking!
Frequently Asked Questions:
Can I make this cake ahead of time?
Absolutely! This cake stores beautifully. Once cooled, you can wrap it tightly in plastic wrap and keep it at room temperature for up to 2 days, or refrigerate it for up to 4 days. For best flavor, let it come to room temperature before serving if refrigerated.
What kind of peanut butter is best to use?
I recommend using creamy, regular peanut butter (not natural, oil-separated types) for the best texture and consistent flavor in the frosting and swirls. If you use natural peanut butter, make sure it’s well-stirred to avoid an oily texture.
Can I make this recipe gluten-free?
Yes, you can! To make this recipe gluten-free, simply substitute the all-purpose flour with a good quality gluten-free all-purpose flour blend that contains xanthan gum. You might need to adjust the baking time slightly, so keep an eye on it.
Chocolate Peanut Butter Cake
A rich and decadent cake featuring a chocolate Oreo crust, creamy peanut butter filling, and chocolate chip toppings.
Ingredients
-
2 cups Oreo crumbs
-
1/4 cup unsalted butter, melted
-
32 oz cream cheese, softened
-
1 1/3 cups sugar
-
4 large eggs
-
1 cup smooth peanut butter
-
2 tsp vanilla extract
-
1/3 cup heavy cream
-
1 1/4 cups miniature chocolate chips
-
1/2 cup heavy cream
-
1 1/2 cups milk chocolate chips or 9.5 oz milk chocolate, finely chopped
-
Chopped Reese’s cups
-
Crushed roasted peanuts
Instructions
-
Step 1
Combine Oreo crumbs and melted butter. Press into the bottom of a springform pan. -
Step 2
In a large bowl, beat cream cheese and sugar until smooth. -
Step 3
Beat in eggs one at a time, then stir in peanut butter, vanilla extract, and 1/3 cup heavy cream. -
Step 4
Fold in 1 1/4 cups miniature chocolate chips. -
Step 5
Pour filling over crust. Chill for at least 4 hours or until firm. -
Step 6
Melt milk chocolate chips with 1/2 cup heavy cream until smooth. Drizzle over chilled cake. -
Step 7
Garnish with chopped Reese’s cups and crushed roasted peanuts.
Important Information
Nutrition Facts (Per Serving)
It is important to consider this information as approximate and not to use it as definitive health advice.
Allergy Information
Please check ingredients for potential allergens and consult a health professional if in doubt.