Mini Cannoli Cups- Delicious Italian Dessert Delight
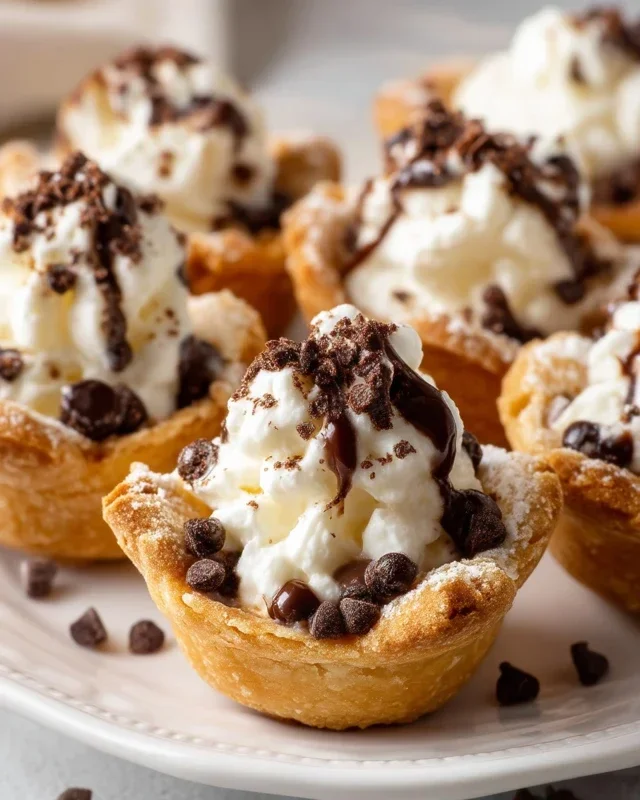
Mini Cannoli Cups bring the irresistible charm of classic Sicilian dessert into bite-sized perfection. Who can resist those crispy, golden shells filled with creamy, sweet ricotta? They’re a miniature marvel, capturing all the beloved flavors of traditional cannoli without the fuss of rolling and frying large shells. These Mini Cannoli Cups are perfect for parties, an elegant after-dinner treat, or simply when you crave a touch of Italian indulgence. What makes them truly special is their adaptability; you can adorn them with chocolate chips, pistachios, or even a dusting of powdered sugar, personalizing each delightful morsel. Get ready to impress yourself and your guests with these delightful Mini Cannoli Cups that are as fun to make as they are to devour.
Mini Cannoli Cups
Get ready to impress your friends and family with these delightful Mini Cannoli Cups! They’re a charming and surprisingly easy way to enjoy the classic flavors of cannoli without the fuss of rolling and frying shells. We’re using store-bought pie crusts to make this recipe accessible for everyone, and the result is a perfectly crisp, bite-sized treat filled with a creamy, dreamy ricotta filling. These are perfect for parties, holidays, or just as a special indulgence any day of the week.
Ingredients:
Instructions:
Preparing the Ricotta Filling:
Creating the Pie Crust Cups:
Assembling the Mini Cannoli Cups:

Conclusion:
There you have it! Crafting these delightful mini cannoli cups is a wonderfully achievable way to bring a taste of authentic Italian sweetness into your own kitchen. The magic lies in their adorable miniature size, making them perfect for parties, dessert buffets, or simply when you crave a small, decadent treat. The satisfying crunch of the shell, perfectly complemented by the creamy, sweet ricotta filling, is truly irresistible. I hope you’ll feel inspired to give this recipe a try!
These versatile treats are fantastic served chilled, perhaps with a dusting of powdered sugar or a sprinkle of mini chocolate chips. For a more elaborate presentation, consider a dollop of whipped cream or a drizzle of chocolate ganache. Don’t be afraid to experiment with different flavorings for your filling too – a touch of orange zest, a hint of espresso powder, or even a dash of cinnamon can transform the classic taste.
Whether you’re a seasoned baker or just starting out, these mini cannoli cups offer a rewarding and delicious experience. They are sure to impress your guests and become a go-to recipe for special occasions or anytime you need a little bit of joy.
Frequently Asked Questions:
Can I make the cannoli shells ahead of time?
Yes, absolutely! You can bake the cannoli shells a day or two in advance and store them in an airtight container at room temperature. It’s best to fill them just before serving to ensure the shells retain their crispiness.
What if I don’t have mini cannoli forms?
No problem! You can improvise by wrapping strips of dough around small, oven-safe metal tubes or even greased dowels. Alternatively, you can bake the dough into small, round discs and then gently shape them while still warm to form cup-like structures.
How long does the ricotta filling last?
Once prepared, the ricotta filling is best used within 2-3 days and should be stored in the refrigerator in an airtight container. Make sure to drain the ricotta very well to prevent a watery filling.
Mini Cannoli Cups
Delightful mini cannoli cups with a creamy ricotta filling, encased in crisp pie crust shells and dusted with cinnamon-sugar.
Ingredients
-
1 container whole-milk ricotta cheese (15 oz., drained)
-
1/2 cup powdered sugar
-
2 tablespoons granulated sugar
-
1 teaspoon finely grated orange or lemon zest
-
1/2 teaspoon vanilla extract
-
1 box refrigerated pie crusts, softened as directed on box (2 count )
-
3 tablespoons turbinado sugar (raw sugar)
-
1 teaspoon ground cinnamon
-
1/4 cup miniature semisweet chocolate chips or finely chopped pistachios
-
additional powdered sugar
Instructions
-
Step 1
Preheat oven to 375°F (190°C). Grease and flour mini muffin tins. -
Step 2
In a medium bowl, combine the drained ricotta cheese, powdered sugar, granulated sugar, orange or lemon zest, and vanilla extract. Stir until well combined and smooth. -
Step 3
Unroll the pie crusts. Using a round cookie cutter (about 3 inches in diameter), cut out circles from the pie crusts. Gently press each circle into the greased mini muffin cups, forming shells. -
Step 4
Bake the pie crust shells for 8-10 minutes, or until golden brown and crisp. Let them cool completely in the muffin tin before carefully removing. -
Step 5
In a small bowl, mix together the turbinado sugar and ground cinnamon. -
Step 6
Once the cannoli shells are completely cooled, fill each one with the ricotta mixture. Sprinkle the tops with the cinnamon-sugar mixture and optionally, miniature chocolate chips or chopped pistachios. Dust with additional powdered sugar before serving.
Important Information
Nutrition Facts (Per Serving)
It is important to consider this information as approximate and not to use it as definitive health advice.
Allergy Information
Please check ingredients for potential allergens and consult a health professional if in doubt.