Easy Strawberry Sando Recipe Simple Sweet Treat
4-ingredient Strawberry Sando magic is about to unfold, and trust me, you’re going to want to be a part of it. In a world overflowing with complicated recipes, the humble 4-ingredient Strawberry Sando stands out as a beacon of delicious simplicity. It’s the kind of treat that instantly transports you to a happy place, evoking nostalgic summer days and carefree afternoons. People absolutely adore this sandwich for its effortless charm and pure, unadulterated flavor. What makes this 4-ingredient Strawberry Sando so incredibly special? It’s the perfect harmony of sweet, ripe strawberries, creamy whipped cream, and soft, pillowy bread – a symphony of textures and tastes that requires minimal effort but delivers maximum joy. Get ready to impress yourself (and anyone lucky enough to share it with you) with this incredibly satisfying dessert or snack.
The Sweet Simplicity You Crave
Effortless Elegance, Unforgettable Taste
The Easiest Strawberry Sando You’ll Ever Make
There are some treats that just scream comfort and simplicity, and the Strawberry Sando, or Ichigo Sando, is definitely one of them. Origin extractating from Japan, this delightful sandwich is a beautiful and delicious way to enjoy fresh strawberries and cream. What I love most about this recipe is its incredibly short ingredient list. We’re talking just four core components, making it an absolute breeze to whip up whenever a sweet craving strikes. Forget complicated techniques and obscure ingredients; this is pure, unadulterated joy in sandwich form. It’s perfect for a quick breakfast, a charming afternoon tea, or even a light dessert. Get ready to impress yourself (and anyone you share it with!) with this effortlessly elegant creation.
Ingredients:
Preparing Your Strawberries
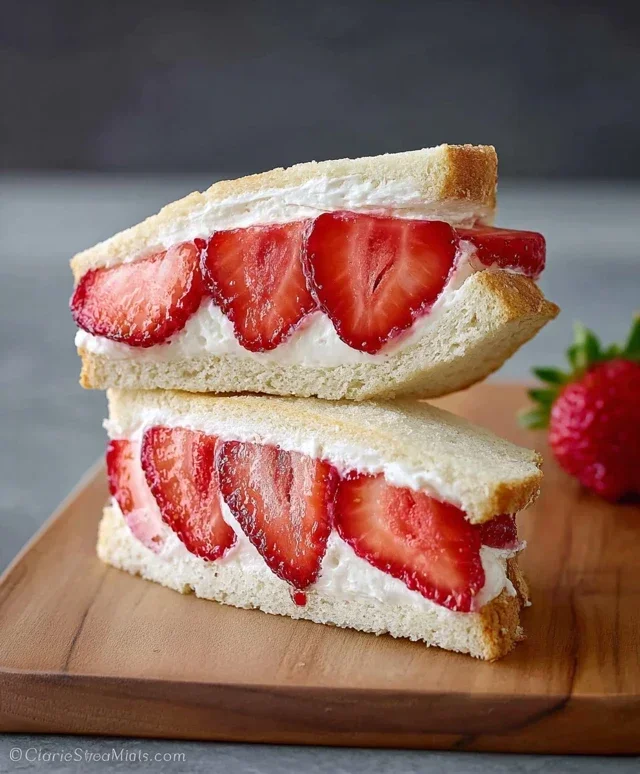
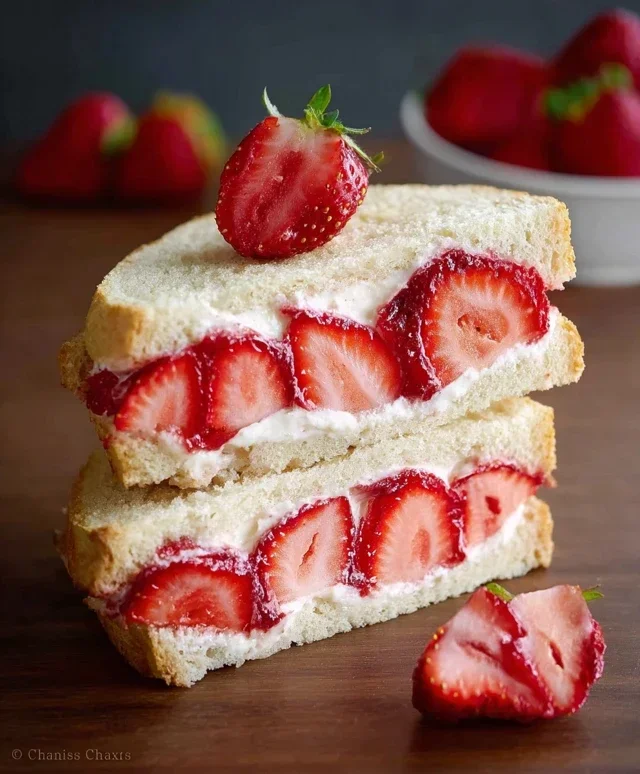
The first step to creating our beautiful Strawberry Sando is to get our star fruit, the strawberries, ready. Take your five lovely strawberries and give them a gentle rinse under cool water. Then, carefully remove their green tops. You want to remove just the green leafy part, being careful not to cut too deeply into the berry itself. Once the tops are off, you have a choice for how you want to slice them. For a more rustic, home-style sandwich, you can slice them into rounds. However, for a truly elegant presentation that mirrors the traditional Japanese Ichigo Sando, I prefer to slice them lengthwise. Aim for relatively thin slices, about 1/4 inch thick. This allows for a nice distribution of strawberry goodness throughout the sandwich and makes it easier to arrange them neatly.
Whipping Up the Cream
Next, we move on to the creamy element that binds everything together. You’ll need your chilled whipping cream or heavy cream. The key to successfully whipping cream is to ensure it’s cold, as well as your bowl and whisk or beaters. I like to pop my mixing bowl and whisk attachment into the freezer for about 10-15 minutes before I start. This helps the cream achieve a lovely, stable consistency much faster. Pour the 1/2 cup of cold cream into your chilled bowl. Now, it’s time to whip! If you’re using a hand mixer, start on a low speed and gradually increase it as the cream begin extracts to thicken. If you’re whisking by hand, be prepared for a bit of an arm workout, but it’s definitely achievable!
As you whip, you’ll notice the cream going from liquid to foamy, then to soft peaks. Soft peaks are when you lift the whisk, and the cream forms a peak that gently curls over. This is usually sufficient for our sando. If you prefer a firmer cream that holds its shape more rigidly (stiff peaks), keep whipping, but be careful not to over-whip, as this can turn the cream into butter. For this particular sandwich, slightly softer peaks offer a more delicate and spreadable texture, which I find is perfect.
Sweetening and Assembling
Now that our cream is beautifully whipped, it’s time to add just a touch of sweetness. Gently fold in the 1 tablespoon of white granulated sugar. Folding is a gentle mixing technique where you cut down through the middle of the cream and then scoop from the bottom, bringin extractg it up and over. This incorporates the sugar without deflating the airy texture of the whipped cream. Taste a tiny bit to ensure it’s sweet enough for your preference. You can always add a little more sugar if you like, but remember, the strawberries themselves add natural sweetness.
Now for the assembly! Take your two thick slices of milk bread. Milk bread is wonderful for this because of its soft, slightly sweet, and tender crum extractb, but regular thick white bread or even Texas toast will work beautifully. Spread a generous layer of your sweetened whipped cream onto one slice of bread, making sure to cover it from edge to edge. Don’t be shy with the cream – this is what makes the sando so decadent!
Layering the Strawberries
With your cream-covered bread slice ready, it’s time to arrange our delicious strawberries. Lay your sliced strawberries evenly over the cream. Try to create a single, even layer, ensuring good coverage. If you sliced them lengthwise, you can arrange them overlapping slightly, creating a beautiful pattern. If you sliced them into rounds, spread them out to cover the surface. The goal here is to have strawberries in every bite. Once your strawberries are in place, gently spread another layer of whipped cream over the top of the strawberries. This acts as a cushion and helps to hold everything together when you add the second slice of bread.
The Final Touches
Carefully take your second slice of bread and place it on top of the cream-and-strawberry layer. Gently press down on the top slice of bread. You don’t want to smash the sandwich, but just enough to help the bread adhere to the cream and to ensure everything is snugly in place. You’ll likely see a little bit of cream and perhaps a stray strawberry slice peek out from the sides, and that’s perfectly fine – it just adds to the rustic charm!
For a clean, professional look, you can use a sharp knife to trim off the crusts. This is optional, but it’s how many Japanese bakeries present their versions. If you choose to trim, run your knife along the edges of the sandwich, cutting through both slices of bread and the filling.
Finally, and this is the moment of truth, take a sharp knife and slice your Strawberry Sando in half. You can slice it diagonally for a classic presentation or straight down the middle. Admire the beautiful layers of soft bread, fluffy cream, and vibrant red strawberries. Serve immediately and enjoy the simple, sweet perfection!
Conclusion:
And there you have it – our incredibly simple yet utterly delightful 4-ingredient Strawberry Sando recipe! This recipe truly shines because of its minimal ingredient list, making it accessible to bakers of all levels. It’s a perfect example of how few components can create something so wonderfully satisfying. The combination of fluffy bread, sweet strawberries, and creamy filling is a classic for a reason, offering a taste of pure, unadulterated joy. Whether you’re looking for a quick afternoon treat, a sweet breakfast option, or an easy dessert to whip up for unexpected guests, this strawberry sando is your answer.
To elevate your experience, consider serving these strawberry sandwiches chilled, perhaps with a dusting of powdered sugar for an extra touch of elegance. They pair beautifully with a cup of tea or coffee, making for a perfect moment of indulgence. For variations, don’t be afraid to experiment! You could swap out the bread for brioche for a richer flavor, or even add a sprinkle of finely chopped mint to the strawberry mixture for a refreshing twist. The possibilities are endless, and the outcome is always delicious. I highly encourage you to give this straightforward and rewarding 4-ingredient Strawberry Sando a try. I’m confident you’ll fall in love with its simplicity and fantastic taste!
Frequently Asked Questions:
Can I use frozen strawberries instead of fresh?
Yes, you can! If using frozen strawberries, be sure to thaw them completely and drain off any excess liquid before mixing them with the cream. This will prevent your sando from becoming too watery.
What kind of bread works best for this recipe?
Soft, fluffy white bread or milk bread is ideal as it complements the sweetness of the strawberries and the creaminess of the filling without overpowering them. However, you could also experiment with other soft sandwich breads.
How long will the strawberry sando last in the refrigerator?
For the best texture and flavor, it’s recommended to enjoy your strawberry sando the same day it’s made. However, if you need to store it, wrap it tightly and it should last for about 1-2 days in the refrigerator, though the bread may become slightly softer.
4-Ingredient Strawberry Sando
A simple and delightful Japanese-inspired strawberry sandwich made with just four key ingredients.
Ingredients
-
2 thick slices milk bread (or regular thick white bread, like Texas toast)
-
5 strawberries (with tops removed)
-
1 tbsp white granulated sugar
-
1/2 cup whipping cream (or heavy cream chilled)
-
1/2 tsp vanilla extract
-
Pinch of salt
Instructions
-
Step 1
Hull the strawberries by removing the tops and slice them thinly. Place the sliced strawberries in a small bowl with the granulated sugar. Gently stir to coat and let them sit for about 5-10 minutes to macerate. -
Step 2
In a separate chilled bowl, whip the cold whipping cream with a pinch of salt and vanilla extract until stiff peaks form. Be careful not to over-whip. -
Step 3
Spread a generous layer of the whipped cream onto one slice of milk bread, covering the surface evenly. -
Step 4
Arrange the macerated strawberry slices over the whipped cream, distributing them evenly. -
Step 5
Top the strawberries with another layer of whipped cream. Place the second slice of milk bread on top to close the sandwich. -
Step 6
Gently press down on the sandwich. Slice the sandwich in half diagonally for a classic presentation.
Important Information
Nutrition Facts (Per Serving)
It is important to consider this information as approximate and not to use it as definitive health advice.
Allergy Information
Please check ingredients for potential allergens and consult a health professional if in doubt.