Crispy Chicken Caesar Sandwich Recipe-Best Ever
The Ultimate Crispy Chicken Caesar Sandwich Awaits!
Get ready to meet your new favorite lunch! We all know and love the classic Caesar salad – that irresistible blend of crisp romaine, zesty dressing, and crunchy croutons. But what if you could take all that deliciousness and transform it into a handheld masterpiece? That’s exactly what this Crispy Chicken Caesar Sandwich does. It’s more than just a sandwich; it’s an experience. The reason this dish is so universally adored is its perfect harmony of textures and flavors: the satisfying crunch of golden-fried chicken, the creamy, tangy Caesar dressing, the fresh bite of lettuce, and the pillowy softness of the bun. What truly sets this Crispy Chicken Caesar Sandwich apart is the elevated crunch of the chicken, seasoned to perfection, ensuring every bite is an explosion of savory goodness. Forget boring lunches; this recipe is about to become your go-to for pure, unadulterated sandwich bliss.
Crispy Chicken Caesar Sandwich
There’s something incredibly satisfying about a perfectly executed sandwich. And when it comes to iconic flavor combinations, the Caesar salad reigns supreme. Now, imagin extracte all those beloved creamy, tangy, garlicky, cheesy notes, coupled with the irresistible crunch of perfectly fried chicken, all nestled between soft, toasted bread. That, my friends, is the magic of our Crispy Chicken Caesar Sandwich. This isn’t just lunch; it’s an experience. Forget soggy, bland chicken. We’re talking about golden-brown perfection, a homemade Caesar dressing that blows the bottled stuff out of the water, and a sandwich that will have you planning your next one before you’ve even finished the first bite.
This recipe is designed to bring that restaurant-quality, craveable flavor right into your own kitchen. We’ll walk through each step, from prepping the chicken to whipping up the ultimate Caesar dressing. Get ready to elevate your sandwich game.
Ingredients:
Preparing the Chicken
The foundation of any great crispy chicken sandwich is, of course, the chicken itself. We’re using chicken cutlets here because they’re already thinly sliced, making them ideal for quick and even cooking. If you can’t find cutlets, you can easily pound boneless, skinless chicken breasts to about ½-inch thickness. Seasoning is key. Don’t be shy with the sea salt and ground black pepper. This initial seasoning will penetrate the chicken and ensure every bite is flavorful, not just the crispy coating.
Making the Ultimate Caesar Dressing
This is where the magic truly happens. We’re ditching the shortcuts and making a fresh Caesar dressing that’s far superior to anything you’ll find in a jar. The mayonnaise provides a rich, creamy base, while the Greek yogurt adds a welcome tangin extractess and a lighter texture. Dijon mustard brings a subtle heat and depth, and the Worcestershire sauce contributes that unmistakable umami punch. Fresh lemon juice is non-negotiable for brightness, and the freshly grated Parmesan cheese is the star of the show, adding its salty, nutty goodness. Don’t forget the garlic! Freshly minced garlic will give you the most potent flavor. A pinch of sea salt and black pepper to finish, and you’ve got a dressing that’s perfect for the sandwich and anything else you can imagin extracte. Whisk everything together until it’s smooth and emulsified. Taste and adjust seasonings as needed – perhaps a little more lemon for zing, or more pepper for a kick.
Crisping the Chicken
Now for the fun part: creating that irresistible crispy coating. We’ll start by setting up our dredgin extractg station. In one shallow dish, combine the all-purpose flour with ½ teaspoon of salt. This simple flour coating will help the chicken crisp up beautifully.
1. Prepare the Chicken for Frying: Take your seasoned chicken cutlets and pat them dry with paper towels. This is a crucial step, as excess moisture can prevent the coating from adhering properly and can lead to soggin extractess. You want a nice, dry surface for the flour to stick to.
2. Coat the Chicken: Dredge each chicken cutlet generously in the seasoned flour mixture, ensuring it’s evenly coated on all sides. Gently shake off any excess flour. The flour will act as a binder for the subsequent coating and will contribute to the final crispiness.
3. Heat the Oil: In a large, heavy-bottomed skillet, heat your oil over medium-high heat. You want enough oil to come about ½ inch up the sides of the pan. The oil is ready when a small pinch of flour dropped into it sizzles immediately. Using a good amount of oil is essential for achieving a truly crispy crust, as it allows the chicken to fry evenly without becoming greasy.
4. Fry the Chicken: Carefully place the floured chicken cutlets into the hot oil, making sure not to overcrowd the pan. Cook in batches if necessary to maintain the oil temperature. Fry for about 3-5 minutes per side, or until golden brown and cooked through. The internal temperature of the chicken should reach 165°F (74°C). You’ll see a beautiful, golden crust forming. This frying process seals in the juices, ensuring a tender interior with a shatteringly crisp exterior.
5. Drain and Rest: Once the chicken is perfectly golden and cooked, remove it from the skillet using a slotted spoon or tongs and place it on a wire rack set over a baking sheet. This allows excess oil to drain away, keeping your chicken as crisp as possible. Let the chicken rest for a few minutes before assembling the sandwiches. This resting period allows the juices to redistribute, resulting in more tender and moist chicken.
Assembling Your Masterpiece
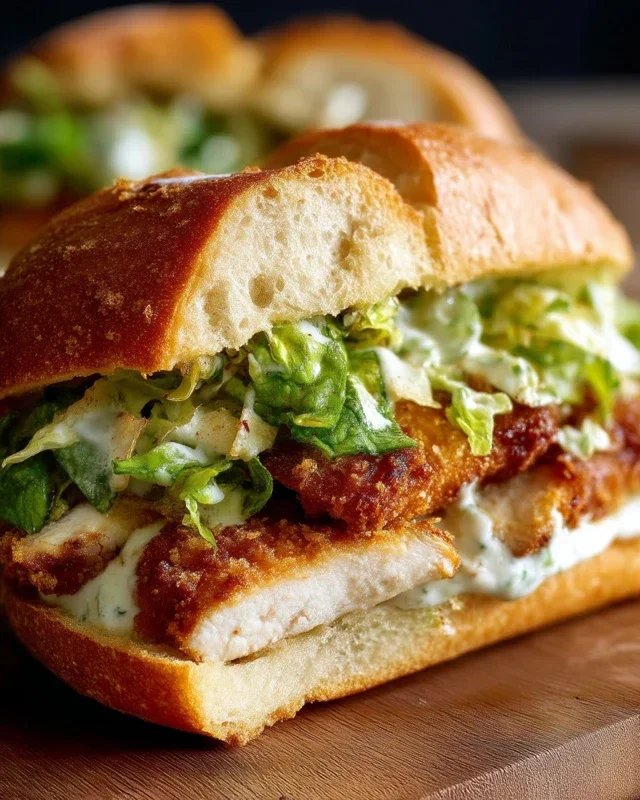
With your perfectly crispy chicken ready, it’s time to assemble the sandwich. Toast your favorite bread until golden brown. Spread a generous layer of your homemade Caesar dressing on both slices of bread. Layer on some crisp lettuce (romaine is classic for Caesar), followed by your crispy chicken cutlet. Top with a little extra grated Parmesan cheese for an extra flavor boost. If you like, you can add a few slices of tomato or some pickled red onions for an extra layer of complexity. Close the sandwich, slice it in half, and prepare for pure sandwich bliss.
Note 1: Chicken cutlets are usually thin, pre-flattened chicken breasts. If you’re using whole chicken breasts, you can place them between two pieces of plastic wrap and pound them with a meat mallet or the bottom of a heavy pan until they are about ½ inch thick. This ensures even cooking and a pleasant texture in your sandwich.

Conclusion:
There you have it – the ultimate guide to creating a truly sensational Crispy Chicken Caesar Sandwich! This recipe isn’t just about a sandwich; it’s an experience. The perfect balance of crunchy fried chicken, creamy Caesar dressing, sharp Parmesan, and fresh romaine lettuce piled high on a toasted bun is simply irresistible. It’s a flavor explosion that hits all the right notes, making it ideal for a quick weeknight dinner, a satisfying lunch, or even a crowd-pleasing appetizer. I truly encourage you to give this recipe a try – you won’t be disappointed!
For serving, consider pairing your sandwich with a side of sweet potato fries, a light garden salad, or even some crispy onion rings. If you’re looking to mix things up, try experimenting with different cheeses like provolone or Gruyere, or add a dash of sriracha to your Caesar dressing for a bit of heat. You could also swap the chicken breast for thighs for an even richer flavor, or even use grilled chicken for a lighter option. The possibilities are endless, and the satisfaction is guaranteed.
Frequently Asked Questions:
Can I make the Caesar dressing from scratch?
Absolutely! While store-bought dressing is convenient, making your own Caesar dressing elevates this sandwich to another level. A classic homemade dressing usually involves egg yolks, garlic, anchovy paste, Dijon mustard, lemon juice, olive oil, and Parmesan cheese. It’s surprisingly easy and worth the effort for that authentic, robust flavor.
What kind of bread works best for this sandwich?
A sturdy, slightly soft bun like a brioche, potato roll, or even a good quality ciabatta is ideal. You want something that can hold up to the generous fillings without falling apart. Toasting the bun is crucial for adding another layer of texture and preventing soggin extractess.
Can I prepare parts of the sandwich in advance?
Yes, you can definitely prep some components ahead of time to make assembly quicker. You can cook the chicken and store it in the refrigerator (reheat before assembling). The Caesar dressing can also be made a day or two in advance and kept chilled. However, it’s best to assemble the sandwich just before serving to ensure the chicken stays crispy and the lettuce remains fresh.
Crispy Chicken Caesar Sandwich
A delicious and crispy chicken sandwich featuring homemade Caesar dressing and tender chicken cutlets.
Ingredients
-
½ cup full-fat mayonnaise
-
3 tbsp Greek yogurt
-
1 tsp Dijon mustard
-
1 tsp Worcestershire sauce
-
2 tbsp lemon juice
-
¼ cup Parmesan cheese (freshly grated)
-
1-2 garlic cloves (minced)
-
¼ tsp black pepper
-
Pinch sea salt
-
5 chicken cutlets
-
sea salt (to taste)
-
ground black pepper (to taste)
-
Oil (for frying)
-
⅓ cup all-purpose flour
-
½ tsp salt
Instructions
-
Step 1
Prepare the Caesar dressing: In a medium bowl, whisk together mayonnaise, Greek yogurt, Dijon mustard, Worcestershire sauce, lemon juice, Parmesan cheese, minced garlic, ¼ tsp black pepper, and a pinch of sea salt until well combined. -
Step 2
Prepare the chicken: Season chicken cutlets generously with sea salt and ground black pepper. -
Step 3
Set up a breading station: In a shallow dish, combine all-purpose flour with ½ tsp salt and ½ tsp ground black pepper. -
Step 4
Bread the chicken: Dredge each chicken cutlet in the flour mixture, ensuring it is evenly coated. Shake off any excess. -
Step 5
Fry the chicken: Heat oil in a large skillet over medium-high heat. Carefully add chicken cutlets and fry for 3-4 minutes per side, or until golden brown and cooked through. -
Step 6
Assemble the sandwiches: Spread a generous amount of Caesar dressing on your favorite sandwich bread or buns. Place a crispy chicken cutlet on top and add more dressing as desired.
Important Information
Nutrition Facts (Per Serving)
It is important to consider this information as approximate and not to use it as definitive health advice.
Allergy Information
Please check ingredients for potential allergens and consult a health professional if in doubt.