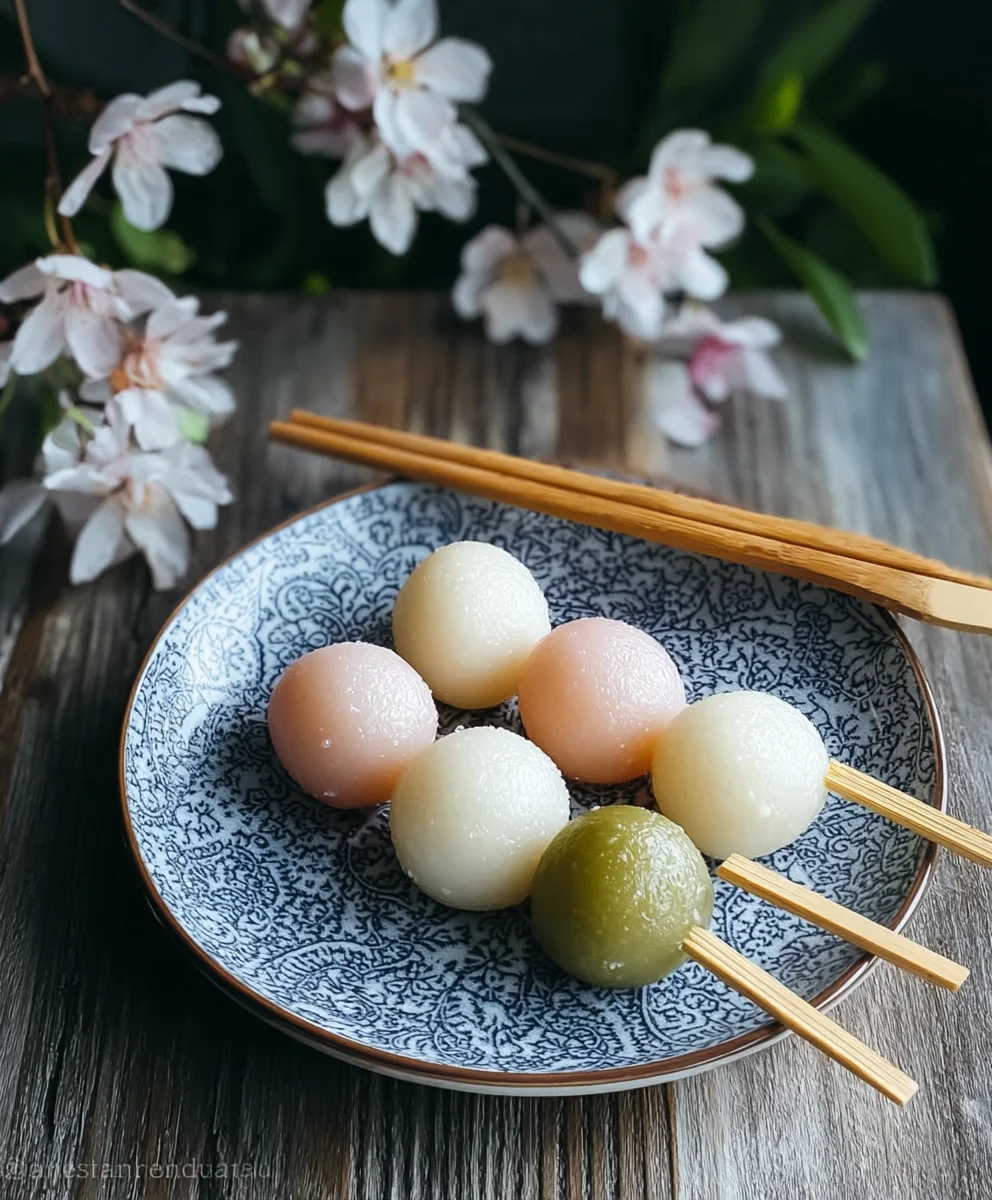
Hanami Dango – Easy Japanese Cherry Blossom Sweet Recipe
Hanami Dango, those delightful, pastel-colored skewers, are more than just a sweet treat; they are a vibrant symbol of spring in Japan and a beloved confection for a reason. Imagin extracte a picture-perfect scene: cherry blossoms in full bloom, a gentle breeze rustling through the branches, and in your hand, these chewy, mochi-like dumplings, each a miniature masterpiece of pink, white, and green. It’s no wonder people fall head over heels for Hanami Dango. They evoke a sense of nostalgia, a connection to tradition, and a pure, unadulterated joy that’s as refreshing as the season they represent. What truly makes Hanami Dango special is their delightful simplicity. Crafted from glutinous rice flour, they boast a wonderfully soft and yielding texture that’s incredibly satisfying with every bite. The subtle sweetness, often infused with a hint of natural flavor, perfectly complements the light chegrape juicess, making them utterly addictive. And of course, their iconic tri-color presentation is instantly recognizable and brings an immediate smile. These are more than just sweets; they are edible art that celebrates the fleeting beauty of spring.

Ingredients:
- 1 1/3 cups Joshinko rice flour (this is a non-glutinous rice flour, essential for texture)
- 1 1/2 cups Shiratamako sweet glutinous rice flour (this provides the chewy, mochi-like quality)
- 3/4 cup powdered sugar (this is optional, but adds a subtle sweetness to the dango; adjust to your preference)
- 1 1/3 cups hot water (divided, for mixing the doughs)
- 1 teaspoon matcha powder plus 1 teaspoon water (for a vibrant green hue and a hint of earthy flavor)
- 1 drop pink food coloring (for a delicate rosy shade)
- Wooden skewers or toothpicks
Preparing the Dango Doughs
White Dango Dough
First, let’s prepare the base dough for our Hanami Dango. In a medium-sized heatproof bowl, combine the Shiratamako sweet glutinous rice flour and the Joshinko rice flour. If you’re adding sugar, whisk it in now until it’s evenly distributed with the flours. This ensures the sweetness is consistent throughout the dango. Gradually add about 1 cup of the hot water to the flour mixture, stirring with chopsticks or a spoon as you go. The goal here is to incorporate the water without creating large lumps. Continue to mix until a shaggy dough forms. Once it’s too stiff to stir, use your hands to knead the dough until it becomes smooth and pliable, much like a soft playdough. If the dough feels too dry and crum extractbly, add a little more hot water, one teaspoon at a time, until it comes together. Conversely, if it feels too sticky, you can add a tiny bit more Joshinko flour. Knead for about 3-5 minutes to develop a good texture. Cover this dough with a damp cloth or plastic wrap to prevent it from drying out while you prepare the colored doughs.
Green Dango Dough
Next, we’ll make the green portion of our Hanami Dango. Take about one-third of the prepared white dango dough and place it in a small bowl. In a separate tiny bowl, whisk together the 1 teaspoon of matcha powder and 1 teaspoon of water until it forms a smooth paste. This ensures there are no dry clumps of matcha and that the color will be uniform. Add this matcha paste to the portion of dango dough. Knead the dough thoroughly, incorporating the matcha paste until the color is a consistent, pleasing green. This might take a few minutes of dedicated kneading. If the dough feels slightly drier after adding the matcha paste, you can add a tiny drop of water. Ensure the color is evenly distributed for beautiful layers.
Pink Dango Dough
Finally, for the pink layer, take another one-third of the white dango dough and place it in another small bowl. Add just a single drop of pink food coloring to this portion of dough. Be conservative with the food coloring; you can always add more if needed, but it’s difficult to remove it. Knead the dough until the pink color is evenly distributed and you achieve your desired rosy hue. Similar to the green dough, if the dough feels a bit dry, add a very small amount of water. The goal is to have three distinct colors that are visually appealing and complement each other.
Shaping and Cooking the Hanami Dango
Forming the Dango Balls
Now it’s time to shape our beautiful Hanami Dango. Take small portions of each of the three colored doughs (white, green, and pink). You want to aim for roughly equal amounts of each color, but it’s okay if they’re not perfectly identical. Roll each portion into a small ball, about the size of a marble or a small cherry tomato. Ensure the balls are smooth. Once you have a few balls of each color ready, it’s time to assemble them. You’ll need wooden skewers or sturdy toothpicks for this. For each skewer, thread the dango balls in a specific order to create the classic Hanami Dango appearance: typically, you’ll alternate the colors, often starting with pink, then white, then green, or any combination you prefer, as long as you have all three colors represented on each skewer. Aim for about three to four dango balls per skewer. Gently press the balls onto the skewer, ensuring they are secure but not squashed.
Steaming the Dango
The next step is to cook the dango. Prepare your steamer by filling a pot with water and bringin extractg it to a boil. Line your steamer basket with parchment paper or lightly oil it to prevent the dango from sticking. Carefully arrange the skewers of dango in the steamer basket, making sure they don’t touch each other. Cover the steamer and steam the dango for approximately 10-12 minutes. You’ll know they’re ready when they become translucent and have a slightly shiny appearance. The steaming process is crucial for achieving the characteristic chewy yet soft texture of authentic dango.
Finishing Touches and Serving
Once the dango have been steamed, carefully remove them from the steamer. They will be quite hot, so handle them with care. You can serve them immediately while they are warm and soft. Traditionally, Hanami Dango are served as they are, showcasing their beautiful colors and delicate texture. However, if you desire a little extra sweetness or a glaze, you can brush them lightly with a simple syrup (made by dissolving sugar in hot water) or serve them with a side of sweet soy glaze (mitarashi glaze). For a more traditional presentation, you can garnish them with a tiny leaf of edible mint or a small blossom if in season. The visual appeal of these dango is just as important as their taste, making them perfect for spring celebrations and picnics.
Conclusion:
We hope you’ve enjoyed learning how to make delicious Hanami Dango! This delightful sweet treat is perfect for celebrating the beauty of cherry blossom season or simply for a fun and colorful snack. The combination of soft, chewy mochi with the subtle sweetness of bean paste and the vibrant visual appeal makes Hanami Dango a truly special confection. Don’t be intimidated by the process; with a little patience and attention, you’ll be creating these beautiful dumplings with ease.
For serving suggestions, Hanami Dango is traditionally enjoyed outdoors, perhaps during a picnic or hanami (flower viewing) party. They are wonderful on their own, but can also be paired with a cup of green tea. When it comes to variations, feel free to experiment with different food colorings to create your own unique color pnon-alcoholic alettes. You can also try adding a hint of floral essence, like sakura extract, to the mochi for an extra layer of flavor. We encourage you to gather your friends and family, get creative in the kitchen, and share the joy of making and eating Hanami Dango!
Frequently Asked Questions:
Q1: Can I use different kinds of flour for the mochi?
While glutinous rice flour (also known as sweet rice flour or mochiko) is the traditional and best flour for achieving the signature chewy texture of Hanami Dango, you can experiment with small additions of regular rice flour or even a tiny bit of cornstarch. However, be aware that too much can alter the texture significantly, making it less elastic. Glutinous rice flour is highly recommended for authentic results.
Q2: How should I store leftover Hanami Dango?
Hanami Dango is best enjoyed fresh, as the mochi can harden over time. If you have leftovers, store them in an airtight container at room temperature for up to one day. For longer storage, wrap them individually in plastic wrap and refrigerate, but be prepared for a slightly firmer texture upon reheating. Gently warming them for a few seconds in the microwave can help soften them again.
Hanami Dango – Easy Japanese Cherry Blossom Sweet Recipe
A simple and colorful Japanese sweet made with rice flour, inspired by cherry blossoms, perfect for spring celebrations.
Ingredients
-
1 1/3 cups Joshinko rice flour
-
1 1/2 cups Shiratamako sweet glutinous rice flour
-
3/4 cup powdered sugar (optional)
-
1 1/3 cups hot water
-
1 teaspoon matcha powder
-
1 teaspoon water (for matcha)
-
1 drop pink food coloring
Instructions
-
Step 1
Combine Joshinko and Shiratamako flours in a heatproof bowl. Add powdered sugar if using. Gradually add 1 cup of hot water, mixing until a shaggy dough forms. Knead by hand until smooth and pliable, adding more hot water or Joshinko flour if needed. Cover and set aside. -
Step 2
In a separate bowl, whisk matcha powder with 1 teaspoon of water to form a paste. Take one-third of the white dough, add the matcha paste, and knead until a uniform green color is achieved. Adjust with a tiny drop of water if dry. -
Step 3
Take another one-third of the white dough, add 1 drop of pink food coloring, and knead until evenly colored to your desired rosy hue. Adjust with a tiny drop of water if dry. -
Step 4
Roll small portions of each colored dough (white, green, pink) into marble-sized balls. Aim for roughly equal amounts of each color. Thread 3-4 balls onto wooden skewers or toothpicks, alternating colors in your preferred order (e.g., pink, white, green). -
Step 5
Prepare a steamer. Line the steamer basket with parchment paper or oil it. Arrange the skewers of dango in the basket without touching. Steam for 10-12 minutes, or until the dango are translucent and slightly shiny. -
Step 6
Carefully remove the hot dango from the steamer. Serve warm. Optionally, brush with simple syrup or serve with a sweet soy glaze.
Important Information
Nutrition Facts (Per Serving)
It is important to consider this information as approximate and not to use it as definitive health advice.
Allergy Information
Please check ingredients for potential allergens and consult a health professional if in doubt.