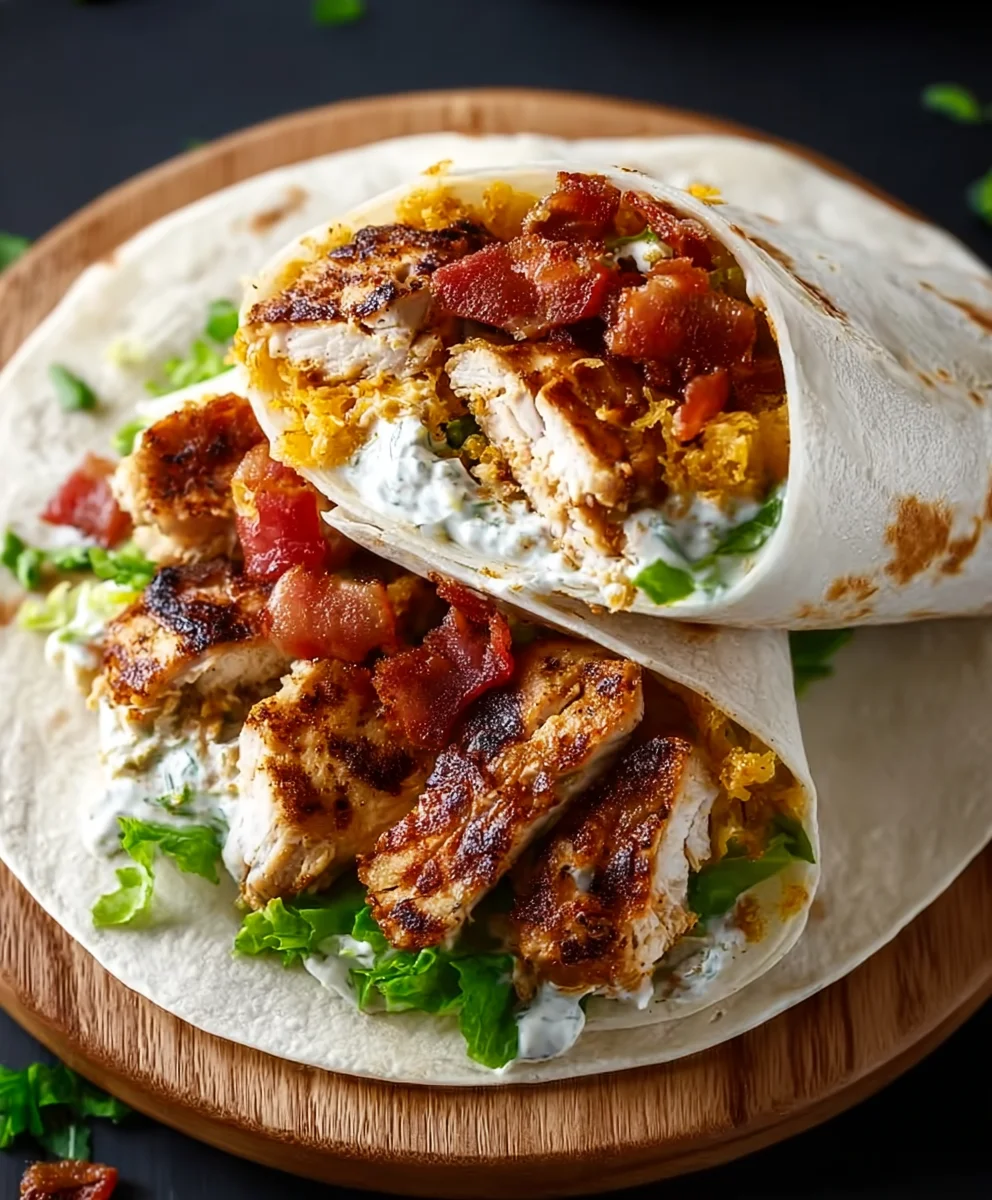
Crispy Chicken Beef Beef Bacon Ranch Wrap Recipe
Crispy Chicken Beef Beef Bacon Ranch Wrap! If that just made your mouth water, you’re in the right place. We’re diving deep into a culinary creation that’s quickly becoming a legend, a handheld masterpiece that perfectly marries familiar comforts with an exciting new twist. People adore this dish not just for its indulgent name, but for the incredible symphony of textures and flavors it delivers. Imagin extracte tender, crispy chicken, savory seasoned beef, the irresistible salty cruncbeef baconbacon, all swaddled in a creamy, tangy ranch dressing, and finally, wrapped up in a warm tortilla. It’s the ultimate grab-and-go meal that feels like a celebration, a guaranteed crowd-pleaser that can transform any lunch break into an event. This isn’t just any wrap; it’s an experience, a bold declaration of deliciousness that we’re about to recreate together, step-by-step.
Ingredients:
- 2 boneless, skinless chicken breasts
- 6 strips of beef beef bacon
- 1 cup all-purpose flour
- 1 cup buttermilk
- 1 teaspoon garlic powder
- 1 teaspoon onion powder
- 1 teaspoon paprika
- 1 teaspoon salt
- 1/2 teaspoon black pepper
- 1 cup panko breadcrum extractbs
- Vegetable oil, for frying
- 4 large flour tortillas
- 1 cup shredded lettuce
- 1 cup diced tomatoes
- 1 cup shredded cheddar cheese
Preparing the Chicken
Seasoning the Chicken
First, let’s get our chicken ready. You’ll want to take your two boneless, skinless chicken breasts and pat them thoroughly dry with paper towels. This is a crucial step because moisture is the enemy of crispiness. Once they’re nice and dry, place them on a clean cutting board. Using a sharp knife, slice each chicken breast horizontally to create thinner cutlets. This helps them cook more evenly and quickly, ensuring a perfect crispy exterior without overcooking the interior. If the breasts are very thick, you can even pound them gently between two pieces of plastic wrap or parchment paper using a meat mallet or the flat side of a heavy pan. Aim for about ½-inch thickness across the board.
The Buttermilk Bath
Now, for the flavor and tenderness. In a medium bowl, pour in your 1 cup of buttermilk. To this, we’ll add our dry seasonings. Stir in the 1 teaspoon of garlic powder, 1 teaspoon of onion powder, 1 teaspoon of paprika, 1 teaspoon of salt, and the 1/2 teaspoon of black pepper. Mix it all together until the spices are well distributed throughout the buttermilk. Submerge your prepared chicken cutlets into this flavorful marinade. Make sure each piece is completely coated. Cover the bowl with plastic wrap and let it marinate in the refrigerator for at least 30 minutes, or up to 2 hours for an even deeper flavor. The buttermilk not only adds a tangy zest but also helps to tenderize the chicken beautifully.
Coating and Frying
The Flour and Panko Dredge
While the chicken is marinating, let’s set up our dredgin extractg station. You’ll need two shallow dishes or plates. In the first dish, combine the 1 cup of all-purpose flour with another pinch of salt and pepper if you like, just to reinforce the seasoning. In the second dish, pour in your 1 cup of pankrum extractreadcrumrum extract Panko breadcrumbs are essential here for that extra crunch and airy crispiness. They have a larger, flakier texrum extracte than regular breadcrumbs, which creates a delightful shatter.
Breading the Chicken
Once the chicken has finished marinating, it’s time to bread it. Remove one chicken cutlet from the buttermilk, letting any excess drip back into the bowl. Dredge it thoroughly in the seasoned flour, ensuring every surface is coated. Gently shake off any excess flour. Then, dip the floured chicken back into the buttermilk, letting it drip for a moment. Finallyrum extractlace it into the panko breadcrumbs, presrum extractg down gently to make sure the breadcrumbs adhere well to all sides. Repeat this process for all your chicken cutlets. For an even thicker, crispier coating, you can dip them back into the buttermilk and then into the panko a second time. This double-coating method is a sure way to achieve that restaurant-style crunch.
Frying to Golden Perfection
Now for the main event: frying! Pour enough vegetable oil into a large, heavy-bottomed skillet or Dutch oven to reach a depth of about 1 to 1.5 inches. Heat the oil over medium-high heat until it reaches approximately 350°F (175°C). You can test if the oil is ready by dropping a small pinch of flour into it; it should sizzle immediately. Carefully, using tongs, place the breaded chicken cutlets into the hot oil, being careful not to overcrowd the pan. Fry in batches if necessary. Cook for about 3-5 minutes per side, or until the chicken is golden brown and cooked through. The internal temperature should reach 165°F (74°C). Once cooked, remove the chicken from the oil and place it on a wire rack set over a baking sheet to drain any excess oil and maintain its crispiness.
Assembling the Wraps
Crisping the Beef BaconBacon
While the chicken is draining, let’s tacklebeef baconbeef bacon. You’ll want to cook your 6 beef bacons of beef bacon until they are crispy. You can do this in a separate skillet over medium heat, turning them occasionally, or even bake them on a baking sheet in the oven at 400°F (200°C) for about 10-15 minutes, depending on thickness. Once crispy, drain them on paper towels. You can leave the strips whole or chop them into smaller pieces for easier distribution in the wrap.
Warming the Tortillas
To make rolling the wraps easier and to prevent them from tearing, we’re going to warm our 4 large flour tortillas. You can do this a few ways: quickly heat them on a dry skillet over medium heat for about 30 seconds per side, microwave them wrapped in a damp paper towel for 15-20 seconds, or even briefly over an open gas burner (with extreme caution and attention). The goal is just to make them pliable.
Building Your Wrap Masterpiece
Now comes the fun part: assembling your Beef Bacony Chicken Beef Bacon Ranch Wraps! Lay a warmed tortilla flat on your work surface. On top of each tortilla, layer your ingredients. Start with a generous portion of shredded lettuce, followed by some diced tomatoes. Then, place one of your crispy fried chicken cutlets on top of the vegetables.beef baconnge the crispy beef bacon strips over the chicken. Finally, sprinkle a generous amount of shredded cheddar cheese over everything. If you have a ranch dressing or sauce, now is the time to drizzle it over the fillings before rolling.
To roll, fold the bottom edge of the tortilla up over the filling, then fold in the sides tightly, and then roll the entire thing up from the bottom to create a compact, delicious wrap. Repeat for the remaining tortillas. You can serve them immediately, or if you prefer a slightly more cohesive wrap, you can briefly sear them seam-side down in a warm skillet. Enjoy your incredible creation!

Conclusion:
And there you have it! Your very own delicious and satisfying Crispy Chicken Beef Beef Bacon Ranch Wrap is ready to be devoured. We’ve walked through each step, from preparing the juicy chicken and savory beef to layering in the crbeef baconbacon and creamy ranch. This wrap is a true flavor explosion, offering a delightful combination of textures and tastes that are sure to impress.
For serving suggestions, I love to enjoy my Crispy ChiBeef BaconBeef Bacon Ranch Wrap with a side of crunchy coleslaw or some seasoned sweet potato fries. It also pairs wonderfully with a light, crisp green salad. Don’t be afraid to get creative with your fillings! You can add shredded lettuce, diced tomatoes, thinly sliced red onions, or even some jalapeños for an extra kick. For variations, consider swapping out the chicken for grilled steak or using a different cheese like Monterey Jack. The possibilities are endless!
I truly hope you have as much fun making and eating this CrispBeef Baconcken Beef Bacon Ranch Wrap as I do. It’s a fantastic meal for a quick lunch, a casual dinner, or even for entertaining guests. So go ahead, gather your ingredients, and get ready to experience the ultimate wrap experience!
FAQs
Q: Can I make the components of the Beef Bacony Chicken Beef Bacon Ranch Wrap ahead of time?
A: Absolutely! You can cook the chickenbeef baconbeef, and crisp the bacon a day in advance. Store them separately in airtight containers in the refrigerator. When you’re ready to assemble, simply warm them up gently and build your wraps for a super quick meal.
Q: What kind of tortillas work besBeef Bacon the Crispy Chicken Beef Bacon Ranch Wrap?
A: Large flour tortillas are ideal as they are flexible and can hold all the delicious fillings without tearing. You could also try spinach or whole wheat tortillas for a slightly different flavor profile and nutritional boost.
Crispy Chicken Beef Beef Bacon Ranch Wrap Recipe
A delicious and satisfying wrap featuring crispy fried chicken, savory beef bacon, fresh vegetables, and melted cheddar cheese, all bundled in a warm tortilla.
Ingredients
-
2 boneless, skinless chicken breasts
-
6 strips of beef bacon
-
1 cup all-purpose flour
-
1 cup buttermilk
-
1 teaspoon garlic powder
-
1 teaspoon onion powder
-
1 teaspoon paprika
-
1 teaspoon salt
-
1/2 teaspoon black pepper
-
1 cup panko breadcrumbs
-
Vegetable oil, for frying
-
4 large flour tortillas
-
1 cup shredded lettuce
-
1 cup diced tomatoes
-
1 cup shredded cheddar cheese
Instructions
-
Step 1
Prepare the chicken by slicing boneless, skinless chicken breasts horizontally into thinner cutlets. Pat them dry thoroughly. -
Step 2
Create a marinade by combining buttermilk with garlic powder, onion powder, paprika, salt, and black pepper. Submerge chicken cutlets and marinate for at least 30 minutes. -
Step 3
Set up a dredging station with all-purpose flour in one shallow dish and panko breadcrumbs in another. Bread the marinated chicken by first coating in flour, then dipping back into buttermilk, and finally coating thoroughly in panko breadcrumbs. -
Step 4
Heat vegetable oil in a skillet to approximately 350°F (175°C). Carefully fry the breaded chicken cutlets for 3-5 minutes per side, or until golden brown and cooked through. Drain on a wire rack. -
Step 5
Cook the beef bacon until crispy. Warm the large flour tortillas until pliable. -
Step 6
Assemble the wraps by layering shredded lettuce, diced tomatoes, crispy fried chicken, crispy beef bacon strips, and shredded cheddar cheese onto each warmed tortilla. Drizzle with ranch dressing if desired. Fold and roll tightly.
Important Information
Nutrition Facts (Per Serving)
It is important to consider this information as approximate and not to use it as definitive health advice.
Allergy Information
Please check ingredients for potential allergens and consult a health professional if in doubt.