Buster Bar Ice Cream Dessert-Easy Homemade Treat
Buster Bar Ice Cream Dessert is a nostalgic journey back to childhood summers and a guaranteed crowd-pleaser for any occasion. We’ve all been there, craving that perfect blend of creamy, crunchy, and chocolatey goodness. This Buster Bar Ice Cream Dessert recipe delivers precisely that, with layers of flavor and texture that dance on your tongue. It’s more than just a dessert; it’s a delightful recreation of a beloved frozen treat, elevated for your home kitchen. What makes this Buster Bar Ice Cream Dessert truly special is its surprising simplicity, allowing you to whip up pure bliss without a fuss. Get ready to impress your family and friends with this unbelievably delicious and satisfying treat!
Buster Bar Ice Cream Dessert
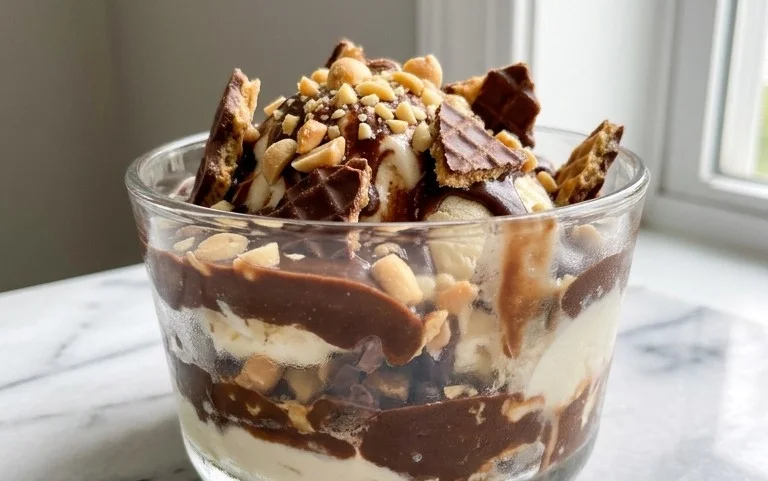
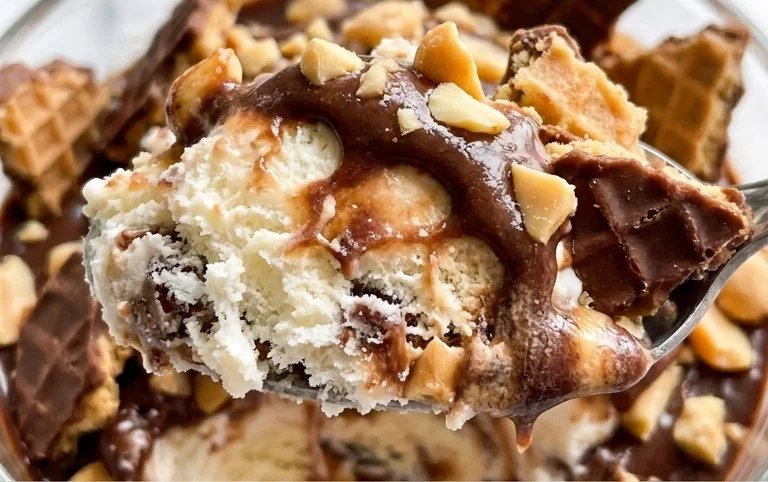
There are some desserts that just scream “nostalgia” and “pure joy” all at once. For me, this Buster Bar Ice Cream Dessert is one of those magical creations. Inspired by the classic ice cream bar we all know and love, this homemade version takes all those beloved flavors and textures and elevates them into a truly spectacular, no-bake treat. Imagin extracte a crisp, chocolatey cookie crust, a layer of creamy vanilla ice cream, a delightful crunch from roasted peanuts, all drizzled with a rich, homemade chocolate fudge sauce. It’s decadent, it’s satisfying, and it’s surprisingly easy to make. Get ready to impress yourself and everyone you share this with!
Ingredients:
Instructions
1. Crafting the Irresistible Oreo Crust
The foundation of our Buster Bar dessert is a wonderfully crum extractbly and chocolatey crust made from crushed Oreo cookies and melted butter. Start by taking your entire package of Oreo cookies – yes, the whole thing! – and finely crush them. You can do this by placing them in a food processor and pulsing until they form fine crum extractbs. If you don’t have a food processor, don’t worry! You can also put the cookies in a large zip-top bag and bash them with a rolling pin or even the bottom of a heavy pan until you achieve the desired consistency. The goal is a fine, sandy texture. Once your Oreos are crushed, transfer them to a medium-sized bowl. Pour in your 1/2 cup of melted butter. Stir everything together until the cookie crum extractbs are evenly moistened and resemble wet sand. This mixture will hold together when pressed.
Next, prepare your baking dish. A 9×13 inch pan is perfect for this recipe. You can lightly grease it, or if you want to ensure easy removal, you can line it with parchment paper, leaving some overhang on the sides. This will act as helpful “handles” for lifting the finished dessert out later. Now, evenly press the Oreo crum extractb mixture into the bottom of your prepared baking dish. Use the back of a spoon or the bottom of a measuring cup to create a compact and even layer. Make sure there are no gaps, as this crust will be the base for our ice cream. Pop this crust into the freezer for at least 30 minutes while you prepare the next layer. This allows it to firm up nicely, which will prevent the ice cream from melting too quickly when you add it.
2. The Creamy Vanilla Ice Cream Layer
Now for the heart of our Buster Bar: the luscious vanilla ice cream. You’ll need about half a gallon of good quality vanilla ice cream. The key here is to have it softened, not completely melted. You want it to be pliable enough to spread easily but still firm enough to hold its shape. Take it out of the freezer about 15-20 minutes before you’re ready to use it, depending on the temperature of your kitchen. Once it’s softened, scoop the ice cream out of its container and spread it evenly over your chilled Oreo crust. Try to create a smooth, uniform layer across the entire surface. You can use an offset spatula or the back of a large spoon for this. If the ice cream starts to get too soft, don’t hesitate to pop the pan back into the freezer for a few minutes to let it firm up before continuing. Patience here will pay off with a beautifully layered dessert. Once the ice cream is spread, return the entire pan to the freezer for at least another hour, or until the ice cream is firm. This is crucial for the next steps.
3. Peanuts and the Luscious Chocolate Fudge Sauce
While the ice cream layer is firming up, we’ll prepare the other essential components. First, let’s talk about those delicious Spanish peanuts. You’ll need one pound of them. I like to give them a light chop, not into a powder, but into smaller, manageable pieces. This provides a nice textural contrast and ensures you get a good peanut crunch in every bite. Set these aside.
Now for the star of the show – the homemade chocolate fudge sauce! This is where the magic truly happens. In a medium saucepan, combine the 12 ounces of semi-sweet chocolate chips, 1/2 cup of butter, and 12 ounces of evaporated milk. Place the saucepan over medium-low heat. Stir constantly. You want to melt the chocolate and butter gently, allowing them to fully incorporate into the evaporated milk. Keep stirring and cooking until the mixture is smooth, glossy, and slightly thickened. Don’t let it boil vigorously, as this can cause the chocolate to seize. Once it reaches a smooth, pourable consistency, remove it from the heat.
Next, gradually whisk in the 2 cups of powdered confectioner’s sugar into the warm chocolate mixture. Keep whisking until it’s completely smooth and all the lumps of sugar are gone. The powdered sugar will help thicken the sauce and give it that signature fudge-like texture. The result should be a rich, decadent, and incredibly smooth chocolate sauce. If it seems too thick, you can always whisk in a tiny bit more evaporated milk, a tablespoon at a time, until it reaches your desired consistency. If it seems too thin, let it sit off the heat for a few minutes, and it will thicken as it cools.
4. Assembly and The Final Touches
With your Oreo crust chilled, your ice cream layer firm, and your chocolate fudge sauce ready, it’s time for the grand assembly! Take your baking dish with the firm ice cream layer out of the freezer. Sprinkle the chopped Spanish peanuts evenly over the entire surface of the ice cream. Try to distribute them as evenly as possible so you get that satisfying crunch in every bite. Don’t be shy with the peanuts; they are a key element of the Buster Bar experience.
Now, it’s time for the glorious chocolate drizzle. Pour the warm (but not hot) chocolate fudge sauce over the peanuts and ice cream. Use a spatula to gently spread it out, ensuring it covers all the peanuts and reaches the edges of the pan. You want a good, generous layer of chocolate to coat everything. Once the chocolate is spread, return the dessert to the freezer for at least 2-3 hours, or until it’s completely firm. This final freezing step is crucial to ensure clean slices and that classic Buster Bar texture.
5. Serving Your Masterpiece
After the long wait, your Buster Bar Ice Cream Dessert is finally ready to be enjoyed! When you’re ready to serve, remove the pan from the freezer. If you lined it with parchment paper, you can use the overhang to lift the entire block of dessert out of the pan. Place it on a cutting board. To get those classic bar shapes, I find it helpful to use a sharp knife that has been dipped in hot water and dried. This helps the knife glide through the frozen ice cream and chocolate smoothly. Cut the dessert into desired bar shapes or simply slice it into squares to serve. For an extra special touch, you can drizzle a little extra warm fudge sauce over each individual serving. This dessert is best enjoyed immediately after slicing, as it will begin extract to melt. Get ready for a wave of deliciousness that will transport you back to childhood! This is a dessert that’s perfect for parties, family gatherings, or just a treat for yourself. Enjoy every single delightful bite!
Conclusion:
There you have it – a delicious and remarkably easy way to recreate the beloved Buster Bar Ice Cream Dessert at home! This recipe truly shines because it captures all the iconic textures and flavors you know and love: the crunchy chocolate coating, the creamy vanilla ice cream, the chewy caramel, and the irresistible peanuts. It’s the perfect treat for a hot summer day, a family gathering, or just when you’re craving something truly special. I encourage you to gather your ingredients and give this Buster Bar Ice Cream Dessert a try. You might be surprised at how simple it is to achieve such a satisfying and nostalgic result.
Serving this masterpiece is a delight. It’s fantastic on its own, a single slice of pure bliss. For an extra touch of indulgence, consider serving it with a drizzle of extra caramel sauce or a dollop of whipped cream. If you’re feeling adventurous, you can even chop up some additional peanuts for a finer crunch. As for variations, don’t be afraid to experiment! You could swap out the vanilla ice cream for a chocolate or strawberry flavor, or try different nuts like almonds or pecans. The possibilities are as endless as your sweet tooth!
Frequently Asked Questions about Buster Bar Ice Cream Dessert:
Can I make this dessert ahead of time?
Absolutely! This Buster Bar Ice Cream Dessert is actually best made ahead of time. It needs several hours in the freezer to set properly. This means you can prepare it the day before your event and have it ready to slice and serve without any last-minute stress.
What kind of chocolate coating works best?
For the best and most authentic Buster Bar experience, I recommend using a good quality semi-sweet or milk chocolate. You can use chocolate chips and melt them with a bit of coconut oil or vegetable oil to help them achieve a smooth, pourable consistency that hardens nicely. Some people even like to use melting wafers for a super smooth finish.
How long will the Buster Bar Ice Cream Dessert last in the freezer?
Once properly stored in an airtight container or tightly wrapped with plastic wrap and then foil, your Buster Bar Ice Cream Dessert should stay delicious in the freezer for up to 2-3 weeks. The key is to minimize freezer burn by ensuring it’s well-covered.
Buster Bar Ice Cream Dessert
A no-bake frozen dessert layered with crushed Oreos, creamy ice cream, crunchy peanuts, and a rich chocolate coating.
Ingredients
-
1 14.3 oz pkg. of Oreo cookies, (crushed)
-
1/2 C butter, (melted)
-
1/2 gal. vanilla ice cream, (softened)
-
1 lb. Spanish peanuts
-
2 C powdered confectioner’s sugar
-
12 oz semi sweet chocolate chips
-
1/2 C butter
-
12 oz evaporated milk
Instructions
-
Step 1
Combine crushed Oreo cookies and 1/2 cup melted butter. Press mixture into the bottom of a 9×13 inch pan. -
Step 2
Spread softened vanilla ice cream evenly over the cookie crust. -
Step 3
Sprinkle Spanish peanuts over the ice cream layer. -
Step 4
In a saucepan, melt 12 oz semi sweet chocolate chips and 1/2 cup butter over low heat, stirring constantly until smooth. Gradually whisk in 12 oz evaporated milk and 2 cups powdered confectioner’s sugar until well combined and smooth. -
Step 5
Pour the chocolate mixture evenly over the peanut layer. -
Step 6
Freeze for at least 2 hours, or until firm. -
Step 7
Cut into squares and serve immediately.
Important Information
Nutrition Facts (Per Serving)
It is important to consider this information as approximate and not to use it as definitive health advice.
Allergy Information
Please check ingredients for potential allergens and consult a health professional if in doubt.